How to Create a Digital Passport Photo at Home: an Easy 2-Step Guide
Table of contents:
- Step 1: Take the Source Photo
- Step 2. Create Your Digital Passport Photo with PhotoGov
- What to Keep in Mind Before Submitting: File Format, Size, Color Profile, and Metadata
- Your Digital Passport Photo is Ready: Now it’s Time to Submit. Requirements by Portal
- 8 Common Mistakes in Home-Made Digital Passport Photos That Can Lead to Rejection
- Making a Digital Passport Photo at Home: Final Thoughts
- Frequently Asked Questions
- Official Government Sources
Making a digital passport photo at home takes three things: a well-lit shot against a plain white background, a processing tool that handles the file-level parameters, and the correct output format for the portal you are submitting to.
This easy 2-Step guide helps you prepare a compliance-aligned digital passport photo without spending time and money on a studio visit. Step one takes you through the photo-making process — all you need is a smartphone — and Step 2 describes how to create a JPEG file ready for direct submission with our PhotoGov passport photo maker.
Step 1: Take the Source Photo
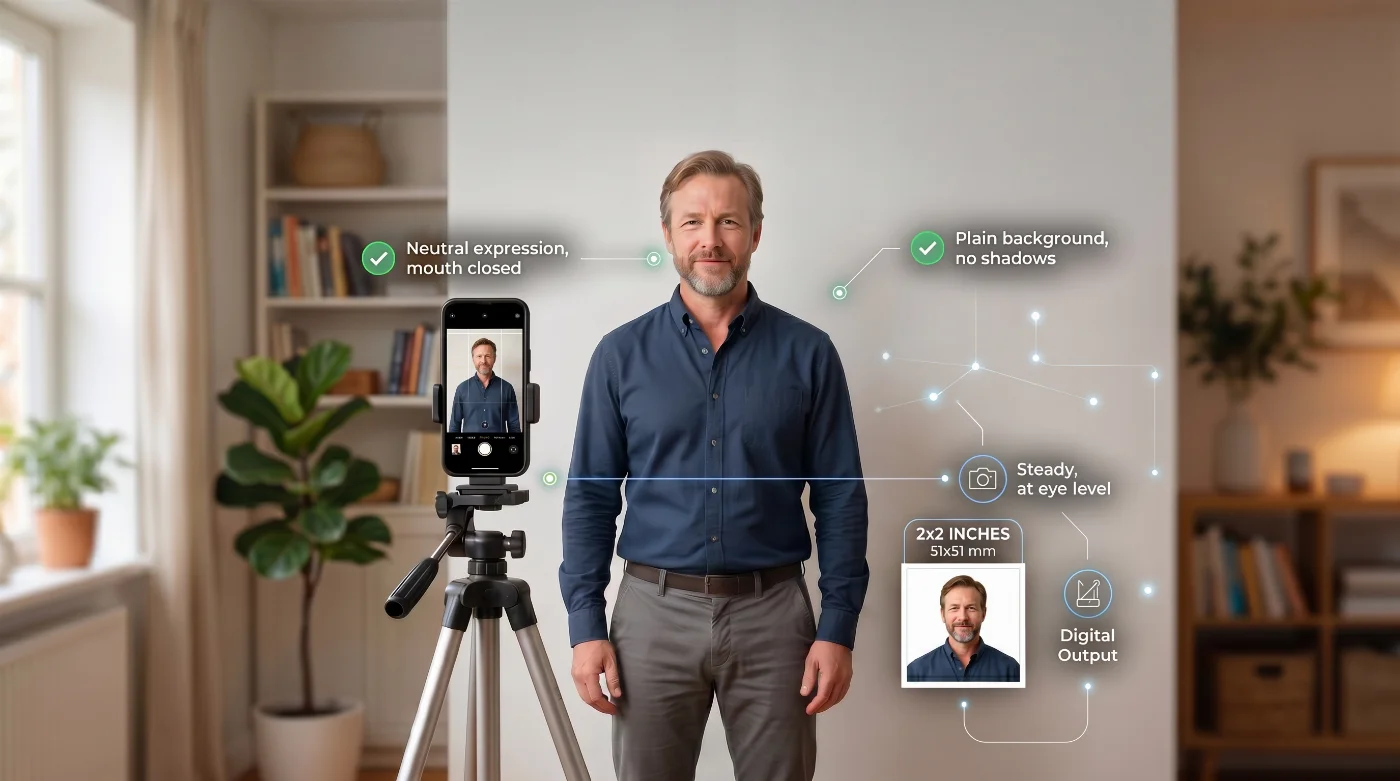
The quality of your source photo sets the foundation for the next step — adjusting it to the digital photo requirements for your document type with an automated passport photo maker. An online tool will adjust cropping, background, color profile, and digital file properties. But facial detail critical for biometric recognition depends on resolution, even lighting, and sharp focus in the original image. That’s why capturing the source photo properly is essential — let’s do it like a pro.
Background
Use a plain white or off-white wall — smooth, uniform surface, free of texture, pattern, marks, and objects. A freshly ironed white bedsheet pinned flat to a wall works equally well. Position yourself at least 20 inches (50 cm) from the backdrop. At that distance, your shadow falls below the frame rather than onto the surface, which gives background replacement software a clean, uninterrupted plane to work with.
Lighting
Stand by a window. Soft, indirect daylight — on an overcast day or with direct sun diffused by a sheer curtain — spreads evenly across both sides of the face with no hard edges. For indoor shooting without natural light, place two lamps at roughly 45-degree angles to either side of your face at face level and diffuse each with white paper or a lampshade. This setup replicates the even, shadowless coverage that window light provides naturally.
Common lighting problems and their causes: Overhead-only sources create shadows under the nose, chin, and in the eye sockets. A single lateral lamp leaves one cheek in shadow, and the facial detail on that side is permanently lost. Colored bulbs shift skin tone during sRGB conversion. Direct flash produces glare, eliminates surface texture, and causes red-eye.
Camera
Use the rear (main) camera. The wide-angle lens on the front-facing camera distorts facial proportions — faces appear narrower or wider than they are, which triggers automated proportion checks on some portals.
Before shooting, switch off:
Portrait mode — its depth-of-field blurs the edges of your head, altering the natural geometry.
Beauty / skin-smoothing — removes real skin texture and changes tonal range, both prohibited by passport regulations. All freckles, little scars, and natural skin imperfections must be clearly visible on the photo as required by the ICAO Doc 9303 international biometric standard.
HDR portrait enhancement — composites multiple exposures, introducing motion blur between frames.
Any AI filter or third-party camera effect — alters the appearance in ways that reduce biometric reliability.
Take photos in standard Photo mode. If your phone allows it, tap the eye area on the screen to lock focus on the face before pressing the shutter.
Pose and Expression
Face the camera directly — shoulders square to the shot.
Look straight into the lens — keep still and don’t move to avoid the blur.
Neutral expression: mouth closed, jaw relaxed, eyebrows level.
Eyes fully open, looking forward.
Head and shoulders centered — chin parallel to the floor, face and shoulders centered in the frame.
Stand at roughly arm's length from the camera. Position the phone at eye level so the lens is parallel to your face.
Practical Tips
Take 15–20 shots. A sharp, compliant frame and a blurred one are often separated by less than a second.
Review on a large screen before uploading — focus and expression issues that look fine on a phone are clear on a monitor.
Upload the original from your camera roll directly. Messaging apps — WhatsApp, iMessage, Telegram — recompress images during transfer, adding JPEG artifacts and degrading the color profile in the copy that arrives on the other device.
Step 2. Create Your Digital Passport Photo with PhotoGov
Once you have a source photo, PhotoGov handles all the file-level parameters automatically: cropping, background, color profile conversion, compression, and file size. The steps below describe the complete workflow from upload to submission-ready file.
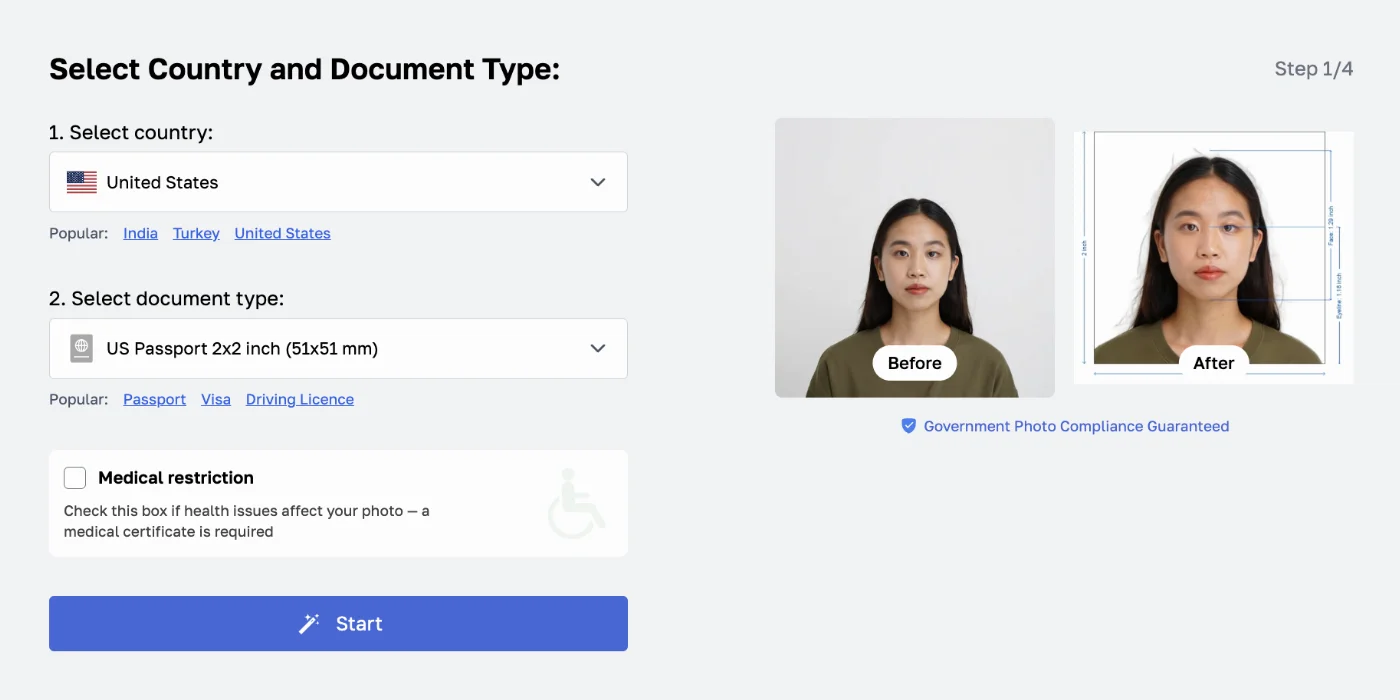
Select Your Document and Upload
Open PhotoGov and select the document you are applying for — U.S. passport, U.S. nonimmigrant visa (DS-160), U.S. immigrant visa (DS-260), DV Lottery (Diversity Visa Program)), Schengen visa, or another supported document. The selection determines the technical profile applied to your photo: pixel dimensions, file size envelope, color space, and biometric crop standard.
Tap or click "Upload" and choose the original photo from your camera roll or file system.
Automatic Processing
PhotoGov processes the photo automatically in under 30 seconds:
Auto-cropping: Face detected; head centered; chin-to-crown set to 50–69% of image height per U.S. State Department requirements.
Resizing: Output scaled to the correct pixel dimensions for the selected document.
Background replacement: Background replaced with clean, uniform white — shadows and gradients removed.
sRGB conversion: Color profile confirmed or converted to sRGB IEC 61966-2-1. Display P3 files (iPhone default) are remapped with accurate skin-tone preservation.
Metadata cleanup: Orientation corrected in the pixel data. sRGB ICC profile preserved. All other metadata stripped.
Compression and file-size check: JPEG encoded at a quality level that preserves facial detail. File size set within the correct envelope for the selected document.
The processed result is displayed for review at full size. A source photo with a significant issue — heavy side shadow, very low resolution, or strong color shift — is flagged with a description of the problem.
Expert Human Verification (Optional)
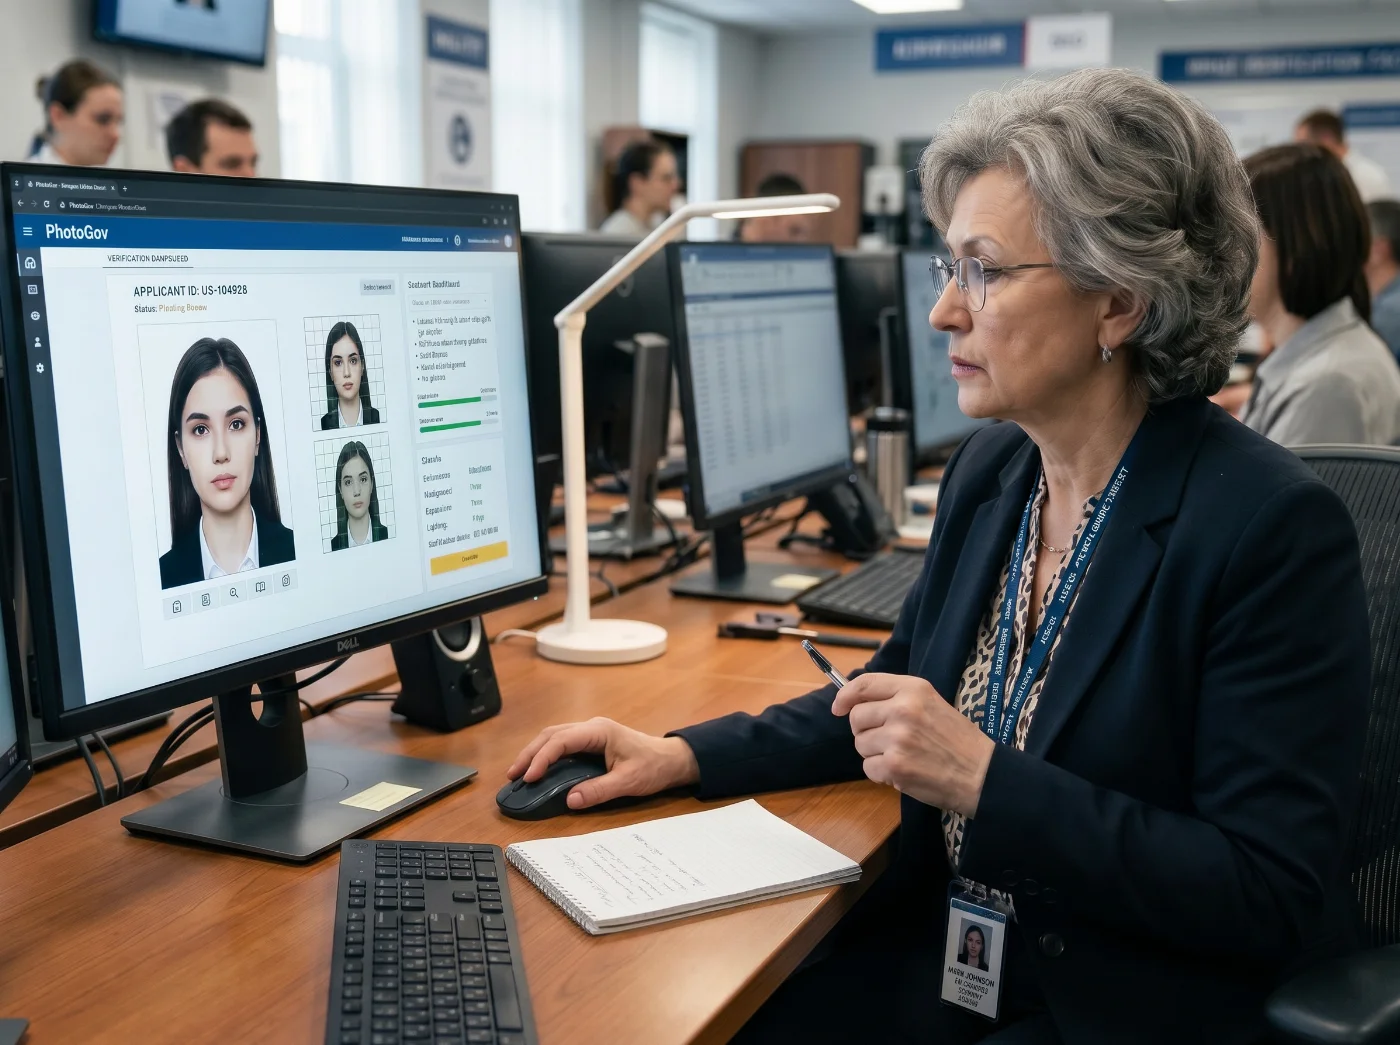
For an added layer of certainty — particularly for consular interviews, immigration applications, or any submission where a rejected photo at the document inspection stage carries high cost or delay — add Expert Human Verification at checkout.
A senior compliance specialist on the PhotoGov team personally reviews your photo against the complete requirements for the selected document. The review covers: face visibility and occlusion (eyes, eyebrows, nose, mouth, jawline); lighting quality and shadow distribution; expression and pose compliance; background uniformity and edge quality; color accuracy and tonal range.
The specialist provides written feedback on the result — a compliance confirmation when the photo passes, or a precise description of the specific issue and a clear recommendation for a reshoot when a parameter falls outside the accepted range.
When to choose Expert Verification: Consular visa interviews, USCIS benefit applications (I-485, N-400), DS-260 immigrant visa, or any application where a rejected photo causes a missed appointment or extended processing delay.
Professional Clothing Change (Optional)
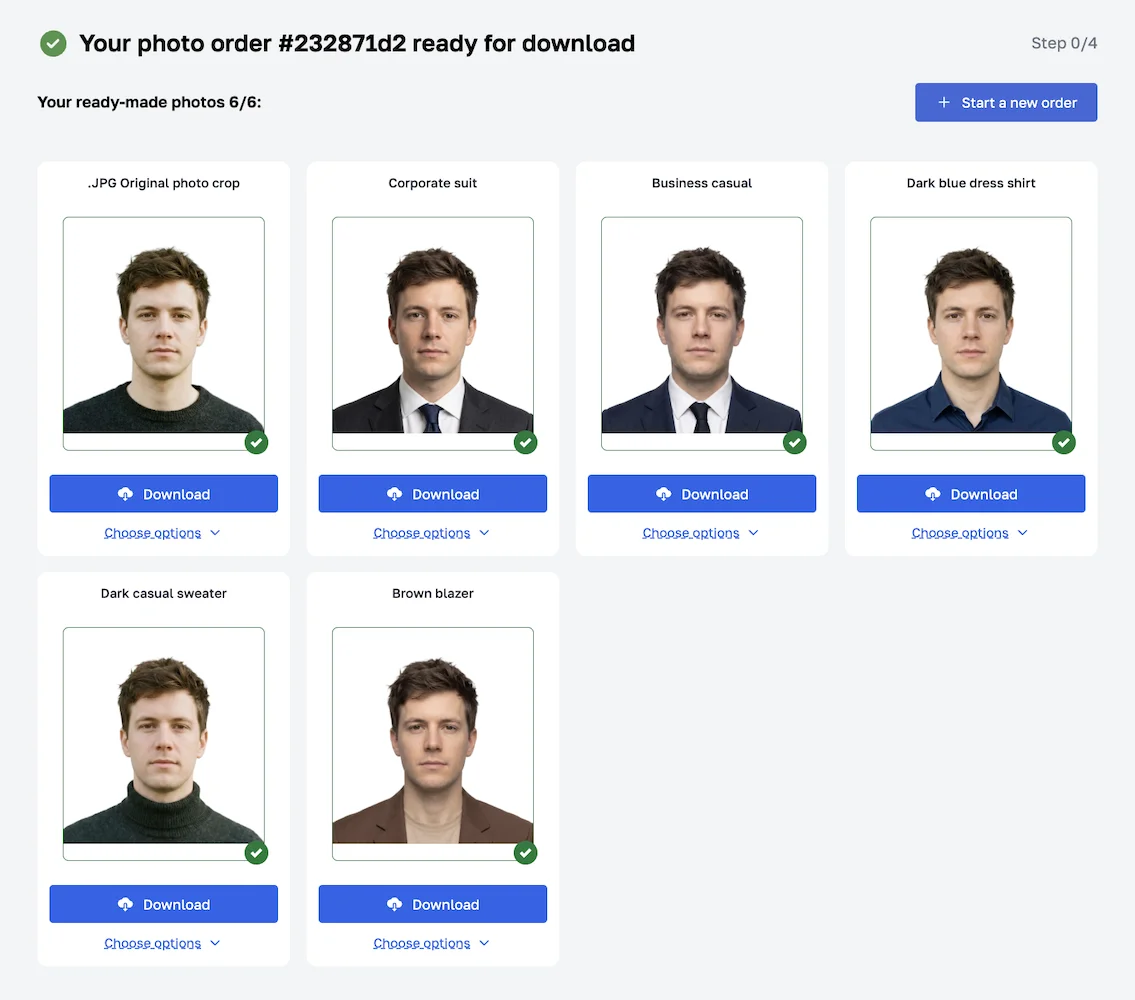 Correct clothing is critical for your digital passport photo acceptance — both by automated systems and passport/visa authority officers. A white top on a white background creates edge-detection artifacts at the shoulder line. Very dark clothing produces shadow effects around the neckline. A tank top is almost a certain reason for a rejection, as it doesn’t match the formality of the document. PhotoGov's Clothing Change service replaces your outfit with a professional business ensemble — producing a result that is formally appropriate and technically clean.
What you receive:
Digital passport photo in your original clothing (one JPEG, formatted for the selected document)
5 additional variants with different professional clothing styles — different collar types, colors, and ensembles to choose from
9 more additional variants for an extra price.
Important notice: Clothing Change replaces the outfit only. The face, hair, skin tone, head geometry, and all biometric data are identical to the original processed photo. The result meets the same compliance standard.
Professional-Grade Printable Passport Photos
For an additional fee, receive a professional-grade printable PDF with four passport-size photos — 2×2 inches for U.S. documents, 35×45 mm for international formats. The document doesn’t require any adjustments — it only needs to be professionally printed on photographic paper, producing photos for in-person submission at a passport acceptance facility, embassy, or consulate.
Download and Submit
Download the file once the result is ready — after automatic processing, expert verification, or clothing change. PhotoGov delivers a JPEG Baseline file in the sRGB color space, sized and compressed for the document you selected. Upload it directly to the relevant portal:
U.S. online passport renewal: travel.state.gov renewal portal — file within the 54 KB–10 MB accepted range
DS-160 (U.S. nonimmigrant visa): ceac.state.gov — file within the 240 KB ceiling
DV Lottery: dvprogram.state.gov — file meets the 600×600 px minimum and the 240 KB ceiling
Printed submission: Take the downloaded JPEG to any pharmacy or print service and request a 2×2-inch print on photo-quality paper
Keep the original full-resolution source photo on your device. A new compliant output can be generated from it at any time without a reshoot.
What to Keep in Mind Before Submitting: File Format, Size, Color Profile, and Metadata
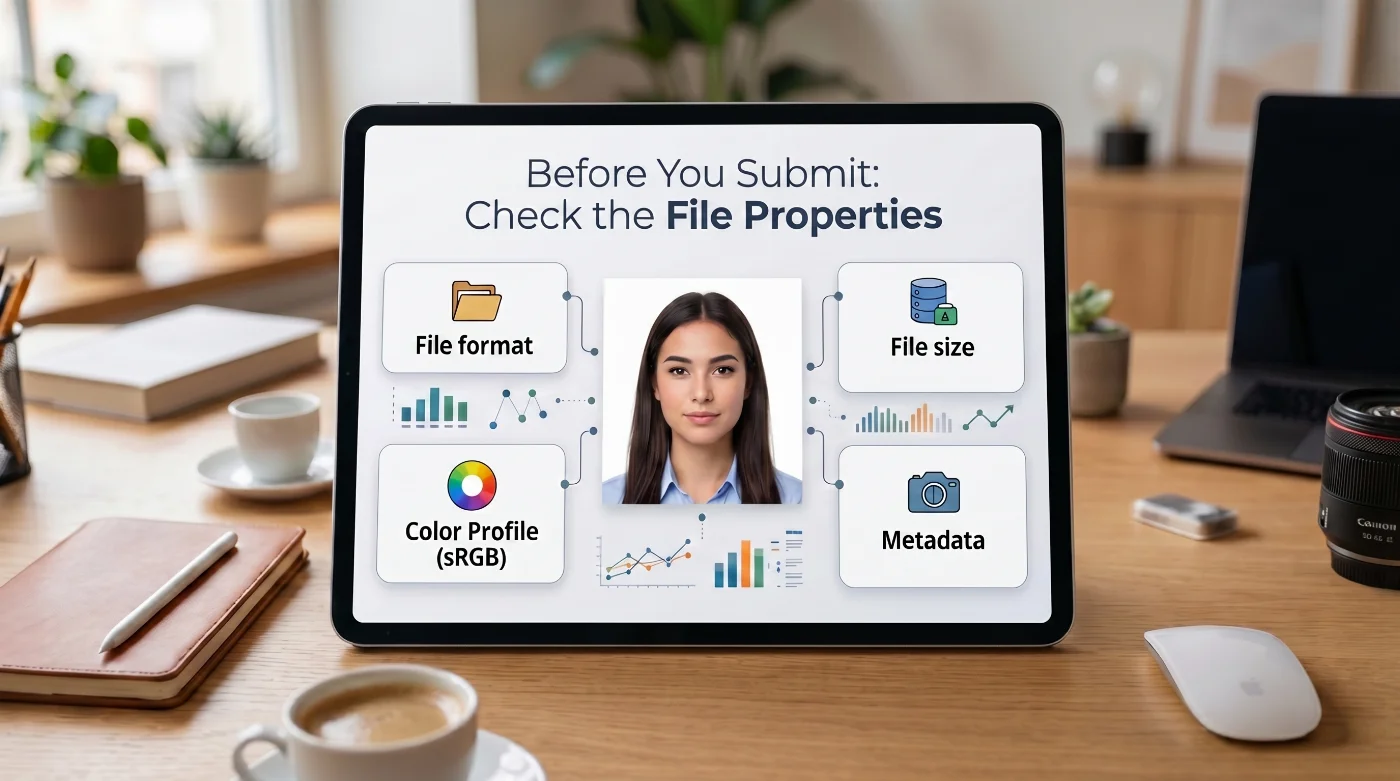 Even if your image is biometrically correct, a digital passport photo submission can fail due to faults in the file parameters — format, size, color profile, or metadata. Let’s see how to avoid that, producing a correct file.
File Format
Government portals require JPEG (.jpg or .jpeg) — specifically JPEG Baseline, the standard format produced by every digital camera and smartphone. It compresses image data while preserving facial detail for biometric analysis, and decodes consistently across all inspection systems.
Avoid Progressive JPEG. It's common in web image optimization but rejected by some government portals. If you're uploading directly from your camera roll, you're already in the correct format.
The U.S. online passport renewal system also accepts PNG and HEIF (.heic), the default capture format on modern iPhones. The DS-160, DV Lottery, and USCIS portals require JPEG only. PhotoGov delivers a JPEG Baseline file for every document type.
File Size
File size requirements vary by portal:
U.S. Online Passport Renewal: 54 KB to 10 MB. A high-resolution smartphone's original typically falls within this range.
DS-160 (U.S. Nonimmigrant Visa Application): maximum 240 KB. A full-resolution smartphone photo is typically 3–10 MB. Resize to 600×600–1200×1200 pixels, and the JPEG file size falls within the 240 KB limit.
DV Lottery (Diversity Visa Program): maximum 240 KB — same constraint as visa portals, same solution.
USCIS forms (I-485, N-400, DS-260): file size limits vary by form — check the specific instructions on uscis.gov or travel.state.gov.
Color Profile (sRGB)
Every image file carries a color profile — a tag that tells software how to display its colors. For passport and visa photos, online application systems expect sRGB, the standard color space used in government document workflows.
Most Android phones already capture photos in sRGB. iPhones from the iPhone 12 onward use Display P3, a wider color space that looks fine on the phone but does not match what portals expect. When you upload a Display P3 file, the government system converts it to sRGB on its side, and skin tones can shift slightly in the process.
PhotoGov performs this conversion before upload. It takes an iPhone Display P3 original, converts it to sRGB, and saves that profile in the file, so the colors the portal sees match the colors you see on your screen.
Metadata
Image files carry embedded metadata alongside the pixel data: camera model, capture date and time, GPS coordinates, orientation, color profile tag, and processing history. Two fields are functionally significant for portal submission:
Color profile tag (ICC profile): Records which color space the file uses. An accurate sRGB ICC profile tag ensures consistent color rendering after upload. PhotoGov preserves this tag and removes all other metadata.
Orientation tag: Records the rotation applied at capture. Portals handle this tag inconsistently — some apply it correctly, others display the image at the captured angle. PhotoGov bakes the correct orientation directly into the pixel data so the image displays correctly on every system.
Home capture summary: A modern smartphone already produces the correct file format (JPEG Baseline) and sufficient resolution. The parameters that typically require correction before submission are color profile (Display P3 from iPhones, converted to sRGB) and file size (full-resolution originals resized to 600×600–1200×1200 px for visa and DV Lottery portals).
A reliable online passport photo maker handles all these adjustments automatically — you don't need to fix anything manually.
Your Digital Passport Photo is Ready: Now it’s Time to Submit. Requirements by Portal
The requirements below are drawn from 22 CFR §51.27, the U.S. Department of State photo rules, and ICAO Document 9303.
Specification | |||
File format | JPEG or HEIF | JPEG (.jpg) | JPEG (.jpg) |
Pixel dimensions | Square, 600×600 – 1200×1200 px | Square, 600×600 – 1200×1200 px | Square, 600×600 – 1200×1200 px |
File size | 54 KB – 10 MB | < 240 KB | < 240 KB |
Color | 24-bit sRGB | 24-bit sRGB | 24-bit sRGB |
Head height | 50–69% of image height (chin to crown) | 50–69% of image height | 50–69% of image height |
Background | White or off-white, plain, shadow-free | White or off-white | White or off-white |
Recency | Within 6 months | Within 6 months | Within 6 months |
Where to submit |
8 Common Mistakes in Home-Made Digital Passport Photos That Can Lead to Rejection
Compressed source file. Messaging apps (WhatsApp, iMessage, Telegram) recompress images during transfer, stripping color data and adding JPEG artifacts. Upload the original from the camera roll.
Portrait mode enabled. Depth-of-field blurring and AI face-reshaping alter head geometry, which can break automated face detection.
Front-facing camera used. Wide-angle distortion from the selfie lens changes apparent face proportions.
Complex or off-white background. Heavy texture or a background tone that closely matches the hair produces edge artifacts at the hairline after background replacement.
Strong one-sided lighting. Facial detail in the shadow region requires light. A source that illuminates only one side of the face leaves the other side permanently underexposed.
Beauty mode or skin smoothing enabled. Altered skin texture and tonal range reduce biometric reliability and are prohibited by U.S. passport regulations and ICAO 9303.
Screenshot submitted. Screenshots carry compressed color profiles and fixed pixel dimensions that rarely match the required range.
Wrong document selected. File size and pixel dimension envelopes differ by portal. Selecting the correct document in PhotoGov sets these automatically.
Making a Digital Passport Photo at Home: Final Thoughts
A compliant digital passport photo from home is a combination of a clean capture and a correctly prepared file. With a white background, even light, and a sharp, neutral portrait from your phone, the biometric side is covered. With PhotoGov handling crop, size, JPEG Baseline, sRGB color, and minimal metadata for the specific portal you choose, the file side is covered as well. Keep your original source photo, generate the output for each application you need, and submit online without a studio visit.
Still have questions? Visit our Digital Passport Photo FAQ page to get all the answers!
Frequently Asked Questions
Can I Really Make a Digital Passport Photo at Home?
Yes. A current‑generation smartphone, a plain white or off‑white wall, and even window light are enough to meet biometric standards if you follow the capture rules in Step 1: rear camera only, no portrait/beauty/AI modes, neutral expression, and a shadow‑free background. The file‑side requirements — JPEG Baseline, correct pixel dimensions, file size limits, sRGB color profile, and minimal metadata — are handled in Step 2 when you generate the photo through PhotoGov for your specific document type.
How to Make a Digital Passport Photo at Home?
Set up a simple shooting space: stand about 50 cm from a plain white or off‑white wall and face a window so the light falls evenly across your face, without hard shadows. Use the rear camera in standard Photo mode, disable portrait and beauty filters, keep a neutral expression, and take a short series of shots, then pick the sharpest frame. Upload the original file from your camera roll to PhotoGov, select the document you are applying for, and download the processed image — cropped, resized, background‑cleaned, converted to sRGB, and saved as JPEG Baseline within the portal’s file‑size limits.
Can I Take a Digital Passport Photo with My Phone?
Yes. A current-generation smartphone produces sufficient resolution and image quality. Use the rear (main) camera, shoot in standard Photo mode with Portrait mode and all AI enhancements disabled, and upload the original file from your camera roll.
How to Print a Digital Passport Photo that I Made at Home?
Download the processed JPEG from PhotoGov and choose the print option that matches your document: 2×2 inches for U.S. passports and visas, 35×45 mm for most international formats. You can print at home on photo‑quality paper using a color printer with “actual size” and no scaling, or take the file to a pharmacy or photo lab and ask for passport‑size prints. If you purchase PhotoGov’s printable layout, it arrives as a ready‑to‑print PDF sheet with multiple passport photos on one page — you only need to print it on photo paper and cut along the guides.
What Format Does a Digital Passport Photo Need to Be?
JPEG (.jpg or .jpeg) for all U.S. visa, DV Lottery, and USCIS portals. The online passport renewal system also accepts HEIF (.heic) and PNG files. JPEG Baseline in sRGB is the correct format for every submission channel. PhotoGov delivers JPEG Baseline by default.
What Pixel Dimensions Does a Digital Passport Photo Need?
Square, 600×600 to 1200×1200 pixels for U.S. passport and visa applications, per the State Department's digital image guidance. A non-square crop is rejected by the upload system. PhotoGov generates a square output at the correct dimensions for the selected document.
Does the Background of My Digital Passport Photo Have to Be White?
Yes, you're applying for the U.S. documents — per 22 CFR §51.27 and the State Department's photo requirements, the background must be white or off-white, plain, uniform, and shadow-free. PhotoGov replaces the background automatically in the processing step.
Why Does the Color Profile Matter for a Digital Passport Photo?
The color profile tag tells the portal's software how to interpret pixel color values. sRGB IEC 61966-2-1 is the required standard. iPhones capture in Display P3 by default — a wider color space that renders accurately on the device screen and shifts toward warmer or more saturated tones after sRGB conversion on upload. Converting the profile to sRGB before submission preserves accurate skin-tone rendering across all systems.
What Is the PhotoGov Expert Human Verification Service?
An optional add-on in which a senior compliance specialist personally reviews the processed photo against the full requirements for the selected document. The specialist checks face visibility, lighting quality, expression, pose, background uniformity, and color accuracy, and provides written feedback — a compliance confirmation when the photo passes, or a precise description of the specific issue and recommendation for a reshoot. Designed for applications where a rejected photo at the consular or USCIS stage causes significant delays.
What Is the PhotoGov Clothing Change Service?
An optional service that replaces your outfit with a professional business ensemble. Delivers your original compliant passport photo (1 JPEG) plus 5 additional variants showing different professional styles. For an additional fee, upgrade to 9 printed passport-format photo cards (2×2 inches or 35×45 mm) on photo-quality paper, ready for in-person submission. The service replaces clothing only — the face, hair, skin tone, and all biometric data are identical to the original processed photo.
Can I Submit the Digital Photo that I Made With PhotoGov Directly to a Government Portal?
Yes. PhotoGov formats the output for the selected document — pixel dimensions, sRGB color space, JPEG Baseline encoding, and file size are all set within the portal's requirements. Upload the downloaded file directly.
What If My Photo Is Rejected by the Government Portal?
Check the rejection message — portals typically specify the failing parameter. A technical failure (file size, dimensions) is resolved by regenerating from PhotoGov with the correct document selected. A capture issue (lighting, expression, background) is resolved by reshooting under the Step 1 conditions and uploading the new source file. Expert Human Verification includes a follow-up review on returned applications.
Is a Digital Passport Photo the Same as a Printed One?
Yes and no. The biometric requirements are identical — same head proportion, pose, expression, background, and color standards, per 22 CFR §51.27 and ICAO Document 9303. A printed photo is submitted physically with a paper application. A digital photo is a JPEG file uploaded to an online portal, with additional file-level constraints — pixel dimensions, file size, color profile, and compression — managed in the processing step.
Can I Use the Same Digital Photo for Multiple Applications?
The same source photo can generate compliant outputs for multiple document types, provided the photo was taken within the last six months. Each document type has its own file size and pixel envelope — generate a separate output for each using the correct selection in PhotoGov.
What Should I Wear for a Digital Passport Photo?
Wear everyday clothing in solid colors that contrast with the white background. Mid-tone colors — navy, grey, burgundy — work well and avoid the technical issues associated with white tops (edge artifacts) and very dark clothing (neckline shadows). Religious head coverings worn daily are accepted. The Clothing Change service provides a professional result when a formal, ID-type presentation is a priority.
What Is the File Size Limit for a Digital Passport Photo?
For an online passport renewal: 54 KB–10 MB (State Department guidance). DS-160, DS-260, and DV Lottery: maximum 240 KB. PhotoGov sets the file size automatically for the selected document.
Disclaimer: PhotoGov is not affiliated with any government agency. Final acceptance of any photograph rests with the issuing authority. This guide reflects publicly available 2026 specifications.
Official Government Sources
U.S. Passport Photo Requirements: U.S. Department of State
U.S. Online Passport Renewal: U.S. Department of State
Digital Image Requirements for U.S. Visa Photos: U.S. Department of State
DS-160: Nonimmigrant Visa Application: U.S. Department of State / CEAC
DS-260: Immigrant Visa Application: U.S. Department of State
DV Lottery — Diversity Visa Program: U.S. Department of State
22 CFR §51.27 — Passport Photographs: Code of Federal Regulations
Form I-485 — Adjustment of Status: USCIS
Form N-400 — Application for Naturalization: USCIS
ICAO Document 9303 — Machine Readable Travel Documents: ICAO
Authored by:
Nathaniel K. RowdenApproved by Association of Visa center
On this page:
- Step 1: Take the Source Photo
- Step 2. Create Your Digital Passport Photo with PhotoGov
- What to Keep in Mind Before Submitting: File Format, Size, Color Profile, and Metadata
- Your Digital Passport Photo is Ready: Now it’s Time to Submit. Requirements by Portal
- 8 Common Mistakes in Home-Made Digital Passport Photos That Can Lead to Rejection
- Making a Digital Passport Photo at Home: Final Thoughts
- Frequently Asked Questions
- Official Government Sources
We value your Privacy
We use cookies to enhance your browsing experience, serve personalized ads or content. By clicking “Accept All”, you consent to our use of cookies.