How to Take a U.S. Digital Passport Photo at Home Without an App
Table of contents:
- Essentials U.S. Digital Passport Photo Requirements
- What You Need Before You Start (At-Home Setup Tools)
- Build a DIY Home Passport Photo Studio (Step-by-Step Blueprint)
- The Rules of Pose, Expression and Position: Practical Guide
- How to Take the Photo: overview of workflow
- Quick Compliance Checklist (before submission)
- Typical problems & solutions (troubleshooting)
- FAQ
- Conclusion
If you’re one of those people who have wondered about taking their own digital passport photo at home, the answer is yes - you certainly can. The U.S. government permits applicants to take their own digital passport photo as long as the image conforms to official guidelines. No app download, no studio visit, no fancy equipment.
Whether you’ve ever shot a formal portrait or not, this guide walks you through the whole process of passport photo DIY in a functional way that’s easy to understand. Everything here is intended for a straightforward home-based production using instrumentality tools you already have, and producing a clean, compliant result without the need of an app.
All of the instructions in this article comply with U.S. Department of State requirements including the lighting, sizing, framing, and background regulations you can expect – like the use of a white or off-white background, the photo being centered and well-lit.
Essentials U.S. Digital Passport Photo Requirements
When you’re getting ready to put together your home studio, it will be useful to know a few technical (and not so technical) rules that do influence the actual shooting of your digital passport photo. These are not designed to scare you — they are simply the essentials that need to be followed to ensure your picture meets the official US photo requirements.
Pixel and File Requirements
A U.S. digital passport photo has to be in a specific digital format, but the requirements are straightforward. The file should be a square (with an aspect ratio of 1:1) and sized between 600×600 px and 1200×1200 px. You must also save it with a name of at most 8 characters (in JFIF format with extension JPG), ensure that the color profile used is sRGB, and the file size can not be more than 240 KB. These rules are to ensure that the photo is clean when processed by the government’s automated systems.
To make this section more scannable, here’s a quick reference table for everything:
|
Requirement |
Accepted Value |
|
Pixel size |
600×600 px – 1200×1200 px |
|
File format |
JPEG |
|
Color profile |
sRGB |
|
Maximum file size |
240 KB |
|
Aspect ratio |
1:1 square |
Background and Lighting Specifications
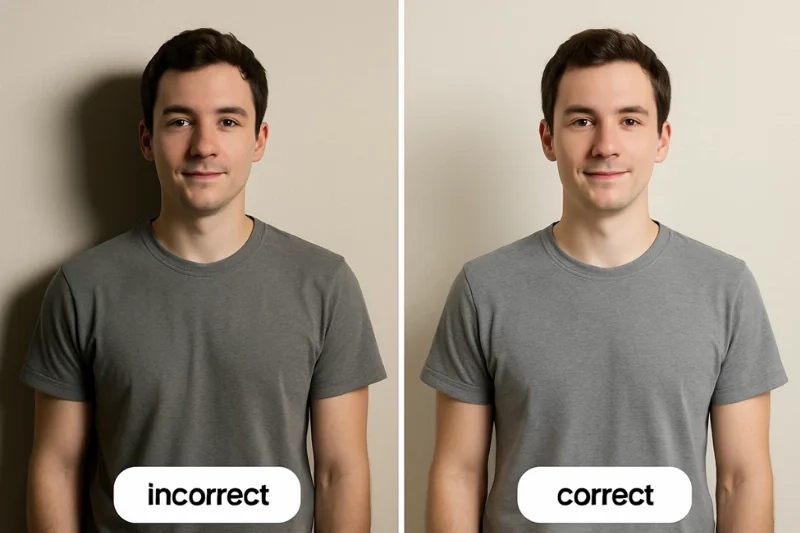
The lighting and background are meticulously regulated by the government but the logic is simple: they want a clean, well-lit face on a white or off-white background with no shadows or patterns. You can do this yourself at home by working near a bright window or with two diffused light sources that minimize your shadows. The only important thing is to keep the background clean and the light uniform across the two sides of the face.
A brief checklist can be done tightly:
- The background should be plain white or off-white
- Lighting needs to be bright, even and without shadows
- Lighting needs to be bright, even and without shadows
Size & Position of the Head
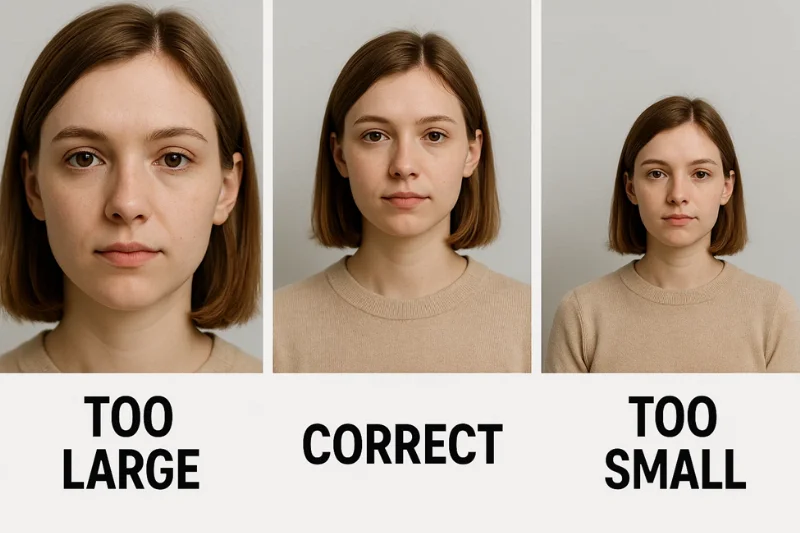
Your head should be centered and sized appropriately so your identity is easy to confirm, but not so large things like parts of your face or shoulders end up getting cropped out. The frame should include the top of your head and at least your upper shoulders, leaving a little space above your hair.
A few quick reminders make it easy:
- Head should be centred vertically and horizontally
- Both sides of your face are visible and evenly lit
- There is some room above the head, but not too much

Pose and Expression
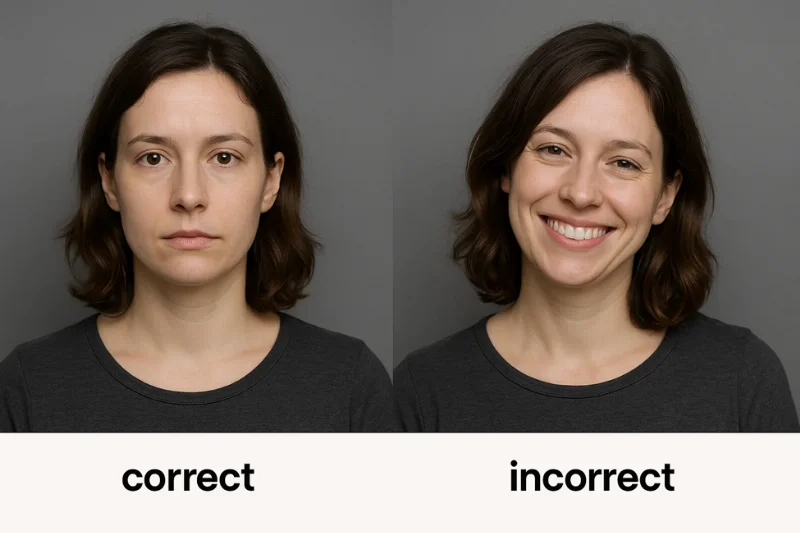
A neutral expression is required by U.S. Dept. of State, and just that rule throws out a sizable percentage of rejected photos. The point isn’t to look dour, but rather avoid exaggerated facial expressions that might alter the shape of your face. Keep all your eyes open, look straight at the camera, and relax your face. No tilting, no turning and no leaning! Just a natural, centered posture.
A quick “avoid” list helps clarify:
- No smiling or raised eyebrows
- No tilting your head
- No dramatic lighting / shadows on one side of your face

What You Need Before You Start (At-Home Setup Tools)
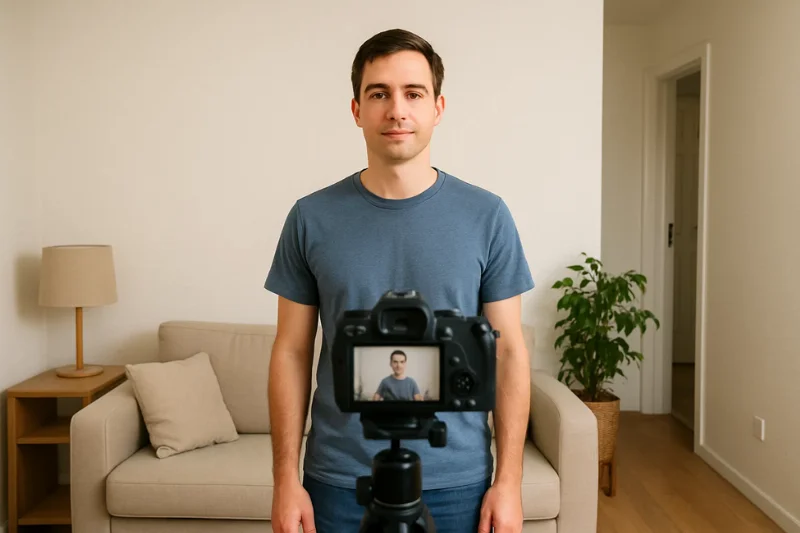
Before you take your passport photo with a camera, it’s good to gather a few very basic supplies that will make the entire home setup feel smooth and predictable. None of this requires special studio gear, everything on this list can be found in most homes, and each item has a very small but important part in helping you get a clean, compliant photo that you can DIY.
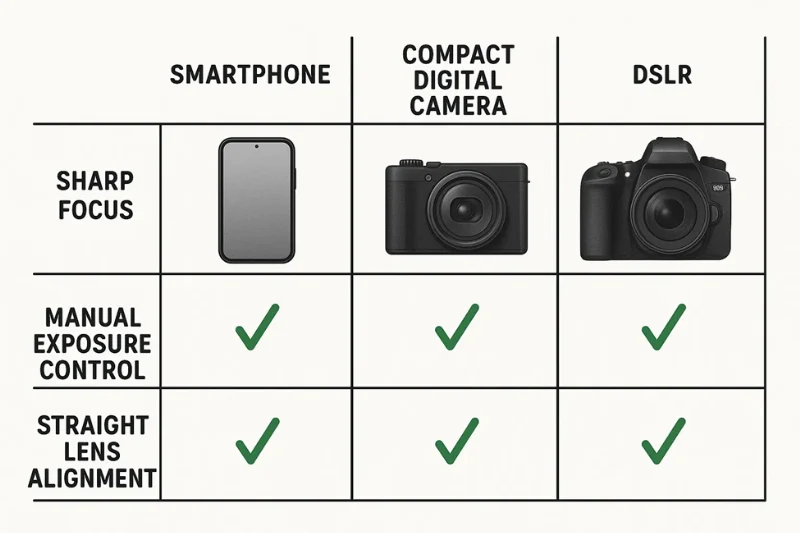
Phone Camera Options
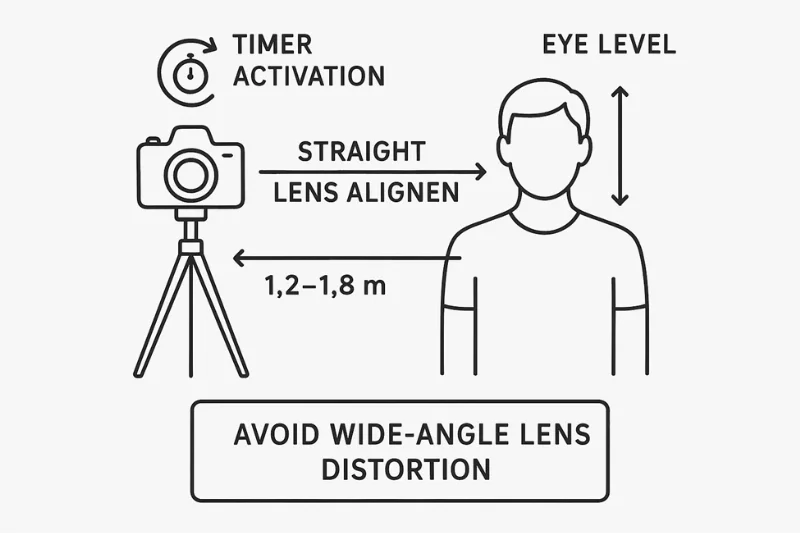
You may use a smartphone or a simple digital camera — both will be sufficient as long as the photo is crisp and has good exposure. With today’s phones it’s easy to take good quality photos, and built-in stabilization helps reduce blur. The important thing is to have the lens at eye-level and to keep the frame straight.If your device supports manual modes, maintaining the exposure stable and the white balance neutral will result in the clean look which the government requires for passport photos.
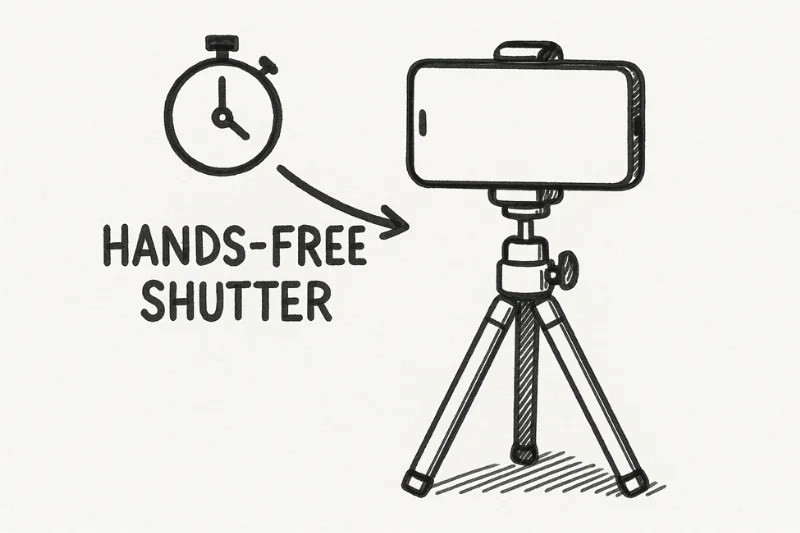
Support Tools (Tripod, Timer, Stable Surface)
A stable camera angle is essential, so a simple tripod arrangement is the easiest way. If you don’t have a tripod, a steady surface such as a shelf or a stack of books will work — just make sure the camera stays centered and doesn’t tilt. Use the self-timer or a remote shutter so that your hands are not in the frame and the camera is still complete during the shot.
A quick prep list:
- Tripod or stable surface
- 3–10 second timer
- Lens at eye level
Background Materials
The background is one of the simplest elements in a home setup as all you require is a flat, light-colored surface. The blank white wall is fine and dandy. If you don’t have a white wall, you can use a white sheet as a background. But make sure it’s stretched so that no wrinkles or folds cast shadows.
Maintaining a clean background will allow soft shadows or lack thereof - something the government insists on.
Lighting Sources
When it comes to passport photo lighting is what makes or breaks, and that applies for home photography too. Natural light is the best light source in this situation. Standing in front of a window in natural daylight provides a beautiful soft and even light with no harsh glaring or shadows. If the window light is not sufficient, you can add indoor lights - just position them at 45° angles and diffuse the light with a piece of fabric or lamp shade.
Your only objective is on the face illumination on even, no hotspots, no deep shadows.
Measuring Tools
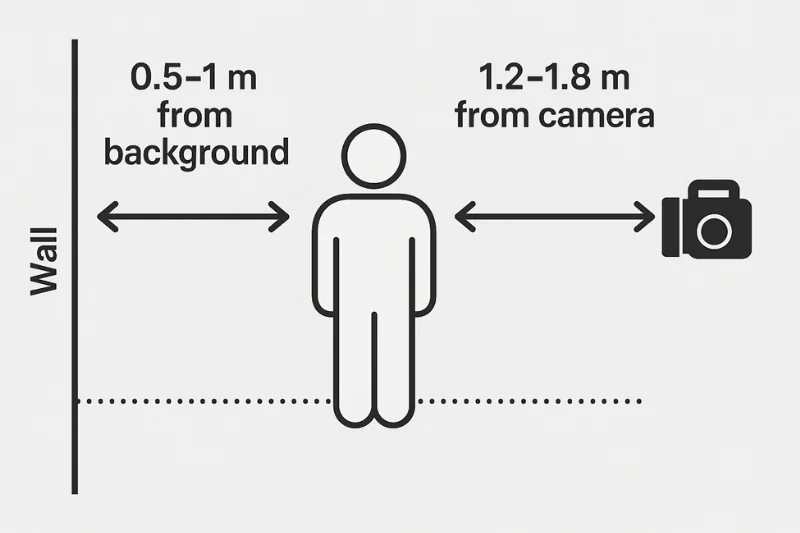
A little bit of measuring goes a long way to keeping your setup consistent. Use a tape measure or even a piece of string to measure the distance between subject and wall, which should be enough to keep shadows off the wall but not so great that the background drops out of the shooting frame. You can also use these guides to assist you in finding the correct distance from the camera so your head is centered, and the size of your head is accurate in the final image.
A simple rule of thumb:
- Stand 0.5–1 meters from the background
- Position the camera 1.2 to 1.8 meters away from you
These distances prevent shadows and the framing is clean.
Build a DIY Home Passport Photo Studio (Step-by-Step Blueprint)
Making your own studio at home isn’t rocket science. When you know how to make a clean passport photo background, how to arrange your lights and how to mount your camera, you'll find that a compliant photo is really just a matter of control — controlling shadows, distance and angles.A professional-looking home setup The following are simple steps for a good looking home setup using nothing more than some basic staple household items.
Background Setup
A bright white background is the key to a good passport photo and can easily be made at home. You can use a white or off-white background, such as a wall or a sheet — just make sure the material is smooth, has an even lighting, and isn’t distracting in any way. Even small wrinkles or shadows can lead to an automatic rejection, so pay attention to this step.
Begin with the most straightforward approach: a solid wall. If your wall isn’t white enough, you can hang a white sheet as a background over it, make sure you pull the fabric enough so it’s tight. Wrinkles give an uneven surface, which can affect your exposure and make your lighting look uneven. Whatever you decide to go with, the background should extend sufficiently around your shoulders and head so that no furniture, door frames, or anything else sneaks into your shot.
Distance also plays a big role in shadow elimination. Standing too close to the wall produces a dark halo around your head. The sweet spot is a background distance of 0.5-1 meter, which softens the shadows and ensures that the background is fully visible in the image.

Lighting Setup
Lighting is the most crucial factor when making a home passport photo look believable. You want to achieve soft light, an effect that results in uniform illumination on the subject's face and background without shadows or bright spots. The best way to do this is with natural light.
If you have the benefit of soft window light through a window, position yourself a few feet away from it. This, in combination with the overhead light which tends to create harsh shadows, naturally evens out the light and balances out the deep shadows that are so common with overhead lighting. Window-facing arrangements provide good color balance, natural skin tone, and high clarity with minimal effort.
However, if you don’t have sunlight, you can simulate the look with bulbs. Aim two lights toward your face approximately 45° apart. These serve as your key light and fill light, and so they cancel each other out — no side of your face will be too bright or too dark. Just tape a skin tinted piece of paper towel or a lampshade to diffuse up a small lampshade of light is what this cloth or lampshade does makes light softer and hides hotspots. Steer clear of overhead light — that casts harsh shadows under the chin and the eyes.
Turn your lights on and off and observe the effects on the exposure. The more uniform your light source is, the more crisp looking your image will be.
Camera/Phone Setup
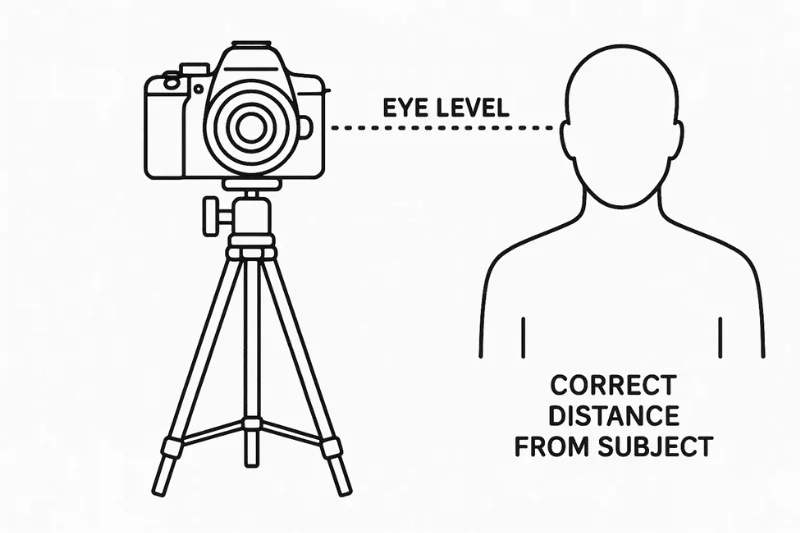
The final part of your DIY studio is the camera setup, and it is just a matter of making a handful of minor adjustments . Place first your device on a steady tripod setup (or pile of books when necessary) with the lens directly at the level of your eyes. A straight camera angle also avoids distortion, allowing the natural shape of your head to look natural and proportionate to the final video.
Then move the camera to the appropriate camera distance — approximately 1.2–1.8 meters (or 4–6 feet) away from you. It also prevents the photo from appearing crowded and it’s less likely for lens distortion to sneak in, particularly on mobile phones. If your device comes with a pair of or more lenses, stay away from wide-angle ones; it tends to stretch your facial features. Use the main lens instead.
For clarity, just hold the device steady before pressing the shutter button. Choose a 3–10 second timer or use a remote shutter if you're around so you won't be touching the camera. This ensures that the photograph remains perfectly still, helping you capture a sharp image. If you can, switch the camera mode to auto or locked white balance for true colors and skin tones, and consider any noise-reducing strategies, such as staying away from dark areas.
The Rules of Pose, Expression and Position: Practical Guide
Achieving the pose is easier than many people think. You don’t need to be stiff or tense, just controlled and consistent. With your head centered, your posture relaxed, and your expression neutral, you’re 90% of the way there to a compliant DIY passport photo. What follows are straightforward tweaks to hair, clothing and accessories that make it easier for the camera to see a clean, full-faced view illuminated by symmetrical lighting.
Head Centering, Shoulders Showing
Your head should be centered in the frame, with your shoulders showing and your face pointing completely toward the camera. It understands it like you are taking a portrait where the only thing on its mind is balance: equal visual space on both sides, equal amounts of light across your face, and the chin and top of the head naturally fitting in the frame. Maintain your level portrait so that the government gets the proportions they want.
To make it easy:
- Sign your head vertically in the photo
- Relax your shoulders and make them visible
- Look directly at the camera and not just above or below the lens

Expression
A neutral expression is required for a U.S. passport, which is basically a calm, natural expression. It’s not that you’re supposed to make such a serious face -- it’s just the most reliable way to capture the details of your face. Relax your face,mouth closed and straight look into the lens until the camera take one shot to get better light source on your face
Avoid any of the following:
- Smiling
- Raising eyebrows
- Tilting the head
- Squinting or widening your eyes
Keeping a neutral expression preserves your natural skin color and the lighting remains consistent on both sides of your face.
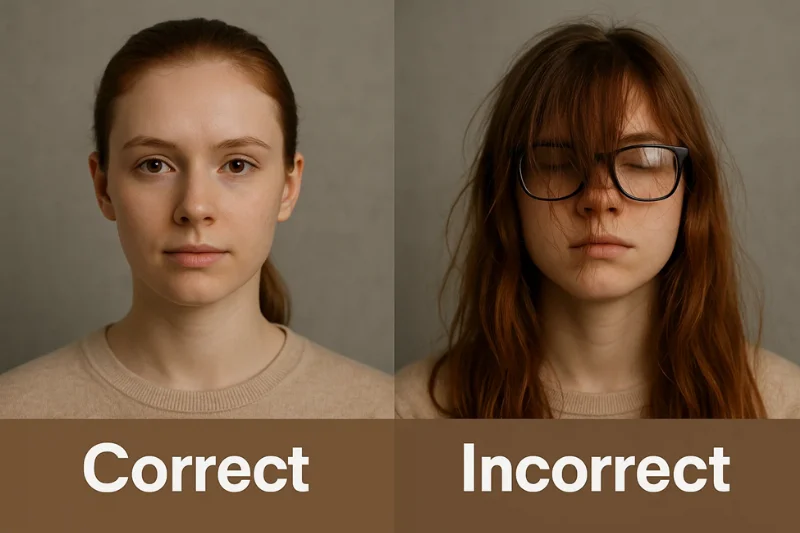
Hair, Glasses, Accessories
You can keep your hair just as you normally wear it – it just shouldn't be hanging in front of your eyes or casting shadows on your face. If necessary, push long bangs to the side, and don't let any part of your hair get in front of your full-face view.
Glasses may be worn only for medical need and proof must be presented to this effect. Even those must be non-reflective and allow you to see the eyes. They also are safer to remove.
Accessories should be kept to a minimum. No hats, scarves, or thick jewelry. The objective is a clean mask with no features that masks or distorts your features
A quick guide:
- Hair out of the eyes
- No glasses (unless medically required)
- No hats, hoods, or head coverings (unless for religious reasons)
- Earrings are fine if small and unobtrusive
What Clothing Works Best
When it comes to clothing, less is more. Solid colors are always better than patterns, as they enable the camera to keep exposure and separation from the background smooth and clean. Solid colors in neutral or dark shades provide a good contrast against a white background.Wear no white tops at all - they disappear into the white or cream backdrop and make your subject look overexposed, washed out and they return with white in their eyes from the reflection.
Stick to:
- Plain, solid-color shirts
- Medium or dark tones
- Invisible or subtle collars
Avoid:
- Bright neon colors
- Busy patterns
- Anything white or close to white
Wanting to work with light instead of battling it — particularly when clean, evenly lit lines along the shoulders are what you’re after.
How to Take the Photo: overview of workflow
This is the whole process you’ll use to take a digital passport photo at home on your own. It’s straightforward, predictable, and for anyone who wants to do a DIY passport photo without special equipment.Every step is a single clean action — no overthinking, no photography jargon — just a well-defined path from setup to final export
Set Up the Background
Begin by making a blank white/off-white background. Flatten your wall or pull a sheet taut so it’s uniform, then take a step back and look for shadows or texture.Later good lighting will make the background even cleaner, but having a flat field now avoids complications with exposure correction later.

Set Up Your Lighting
Sit in front of a window or two soft light sources at 45° angles. The aim is to have light evenly placed over your face and shoulders without any hard lines. Check both sides of your face to ensure color balance is consistent --- symmetrical lighting will prevent you from having to do heavy exposure corrections later.
Position the Camera
Place your phone or camera on a steady surface or tripod and elevate it to your eye level. Hold the lens straight — not tilted upward or downward — to prevent distortion. Put the unit at a distance of 1.2 to 1.8 meters so that the composition looks natural and the face is kept crisp and ready for sharpening.
Frame the Head Correctly
Stand or sit up straight, relax your shoulders and keep your head centered. Leave a small space over your head and show a little bit of your shoulders.The objective is to achieve the correct head height ratio, this renders the final square crop neat and compliant.
Use a Timer and Take Multiple Shots
Set a timer for 3–10 seconds to let the camera stay motionless. Take multiple shots with a slight variation in your pose each time.This way you prevent blinks, soft focus or very small digital artifacts that may appear on only one shot.
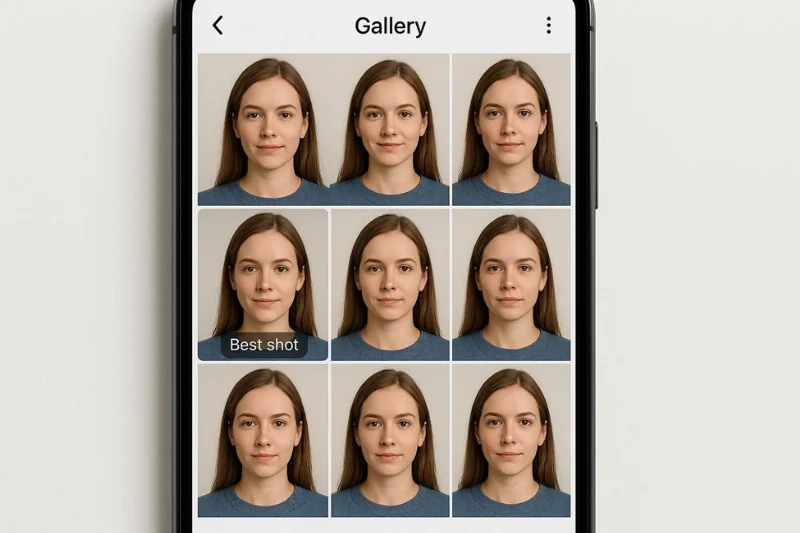
Select the Best Image
Scroll through your shots and select the cleanest one. Make sure that the light is uniform, the eyes are open, the head is straight, and the background remains smooth. The best frame will be of natural color and it will not require much editing except for cropping and pixel resizing.
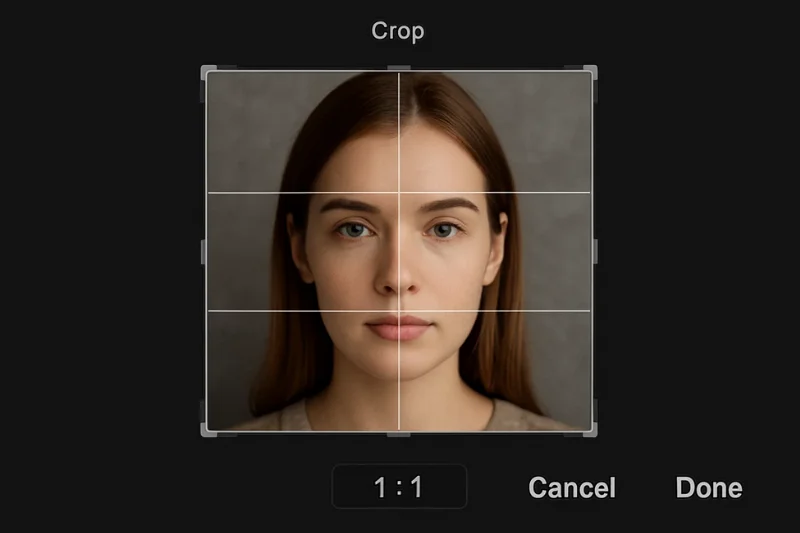
Crop to 1:1
Make a crop to 1:1 to turn your photo into a square. Keep your head centered with a little space over the hairline. This step formats your image for the square crop required for U.S. sale.
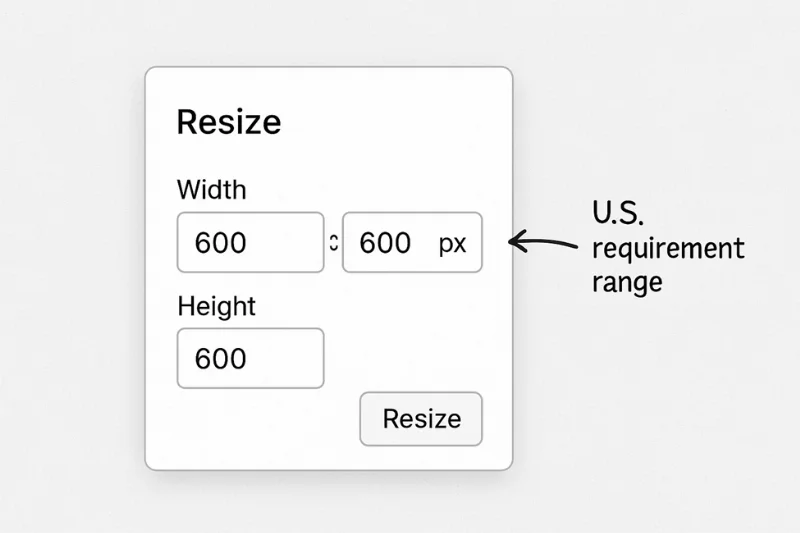
Resize to 600×600–1200×1200 px
Resize the image to fit within the approved dimensions of 600×600 to 1200×1200 pixels. Here is your pixel resizing step - small enough to keep under the upload cap but large enough to keep the image clear.
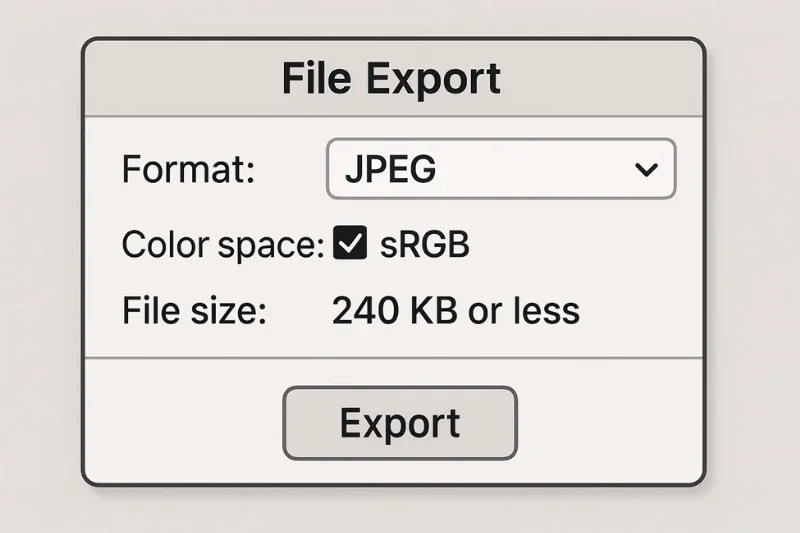
Export in JPEG, sRGB, < 240 KB
Save the final image as a JPEG with the sRGB color profile. Ensure that the file size stays below the size limit of 240 KB to pass the automated check. Keeping the file size small then helps prevent loss of detail or pixelation in the image while the image is compressed.
Quick Compliance Checklist (before submission)
Please note that Stacks will not adjust once submitted! Before you submit your finished digital passport photo, check off this short list to make sure everything meets the standards in the U.S..This is by no means an exhaustive list of requirements — just a quick and simple guide to cover the basics to make sure your picture isn’t red-flagged by automated screening
You should only move forward once every point below is checked off:
Background & Lighting
- Clean white or off-white surface with correct background
- Even lighting across the face with no shadows
- Balanced brightness with proper exposure (no blown-out highlights or dark patches)
Framing & Positioning
- Head centered with correct head size
- Shoulders visible, posture straight
- Neutral expression and direct gaze into the camera
Image Quality & Format
- Crisp, sharp focus with natural skin tones
- File saved in file format and size required for U.S. uploads (JPEG, sRGB, < 240 KB)
- Pixel dimensions fall within 600×600 to 1200×1200 px
- No visible digital noise, artifacts, or distortion

Typical problems & solutions (troubleshooting)
Even if you have a decent setup at home, it’s pretty standard to have minor issues here and there with producing a blurry photo, uneven lighting, or different head size. The good news is there’s a simple, quick fix for each of these issues — no photography education required.Every day, people make these mistakes at home and below are exact solutions without having to start all over.
Shadows on Background
The issue: You see dark lines, shadows, or halos behind the head and/or shoulders. This is typically caused by standing too close to a wall and/or the light is not being diffused enough.
The fix:
- Raise your distance from the background to 0.5 to 1 m
- Shift the lights a bit outward for a more uniform light
- Put a diffuser (lampshade , thin fabric)
- You're supposed to look straight at the light not at a slant
All of these tweaks minimize shadowing on the background, and produce a crisp outline.
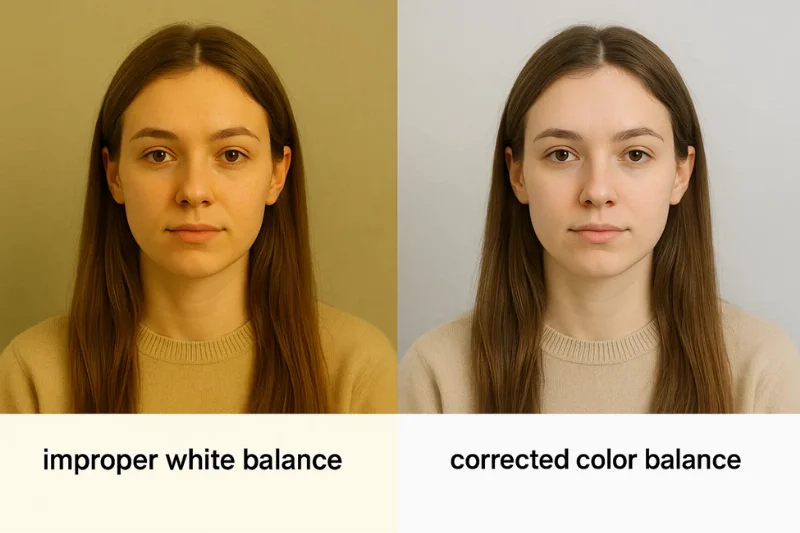
Yellow or Gray Background
The issue:
Your background is too warm (yellow) or too cold (gray). This is usually the result of indoor lights fighting in daylight, or the phone’s white balance shifting.
The fix:
- Turn off warm bulbs and use natural light when you can
- Use cooler LED light bulbs in place of the warm incandescent variety
- Set your camera or phone to auto white balance or "daylight" mode
- Make sure the wall or sheet is evenly illuminated from both sides
It corrects the background color and the image stays neutral.
Overexposure or Underexposure Problems
The problem:
Your face may look washed out (too bright) or too dark (too dim). This causes overexposure, highlight clipping or heavy shadows.
The fix:
- Step back a little from the direct light to diffuse the brightness
- Dim the lamp or diffuse the light more
- If your camera has this option, decrease the brightness/exposure manually
- Make sure your light is balanced on both sides
Balanced light reduces adjustments needed and keeps the image complaint compliant.

Head Too Small or Too Large
The problem:
Your face is either so big it fills the screen or too small it has too much empty space around it.This causes the image to not meet the required head size proportions.
The fix:
- Modify the camera distance:
- Take one step backward if the head is too big
- Step forward if the head is too small
- Hold the camera at eye level to avoid distortion
- Reposition the lens so that the top of the head has a little space
The correct head height ratio will help make your eventual square crop fit the US guidelines.
Blurry Images
The problem:
The image is out of focus or too soft which makes it more difficult for the details to be read. That usually is caused by motion blur or insufficient focus.
The fix:
- Use a tripod or rest your camera on a stable surface
- Activate the self-timer to avoid shaking the camera
- Stand in bright light (reduces blur)
- Tap the screen to focus on your eyes before you press the shutter button
Better lighting and steadiness eliminate most blur and assists in keeping the focus sharp.
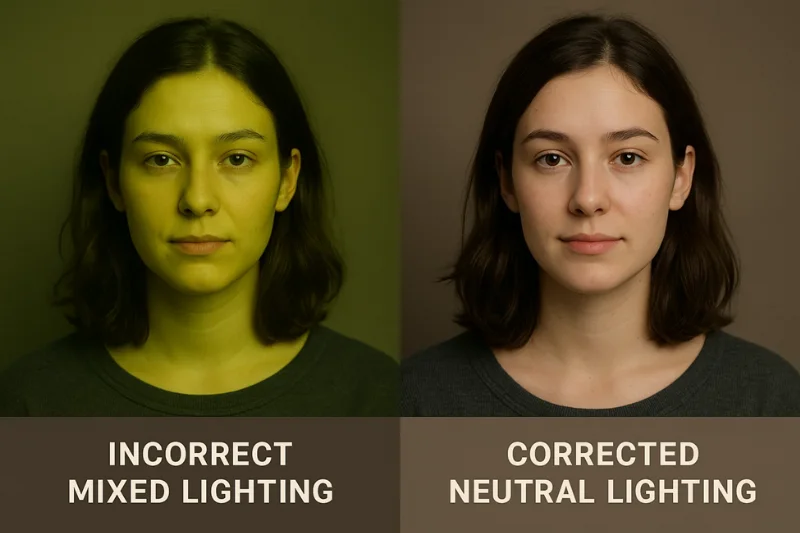
Color Distortion
The problem:
The tone of your skin appears unnatural — too red, too pale, too green, or blotchy. This is usually due to mixed lighting, or the white balance is wrong.
The fix:
- Don't mix warm and cool light together
- Use daylight or make sure all your bulbs are the same temperature
- Set your white balance to “Auto” or “Daylight”
- Move lights around to minimize dappled light and shadows
A balanced light ultimately results in better color balance and less pixelated or color banded images later.
FAQ
The following questions and answers are regarding technical rules that must be adhered to when digitizing a passport photo for U.S. use. All responses are brief, precise, and geared directly to the official specs - with no straying into printing instructions, apps or non-US formats.
1. What is the pixel size for a digital U.S. passport photo?
Your image must be at least 600×600 pixels and at most 1200×1200 pixels.Anything above or below this pixel size will get flagged by automated checks, even if the rest of the photo appears to be fine.
2. What is the aspect ratio of the image?
It had to be a perfect square. The only allowed format is 1:1 aspect ratio, so that the face and shoulders look balanced and well aligned in the final output image.
3. Is DPI important for digital submission?
No. DPI does not affect a digital passport photo because DPI is only applied to printed pictures. It is pixel count that matters, not the density of the print.
Provided your size is within the acceptable limits and the image is not blurry, you can ignore the DPI completely.
4. What file format and color profile do I use?
Save the file as a JPEG using sRGB color profile. This is the only pair accepted by the system.It maintains colors consistently and avoids problems with metadata while uploading.
5. Then can the image be rectangular?
No. The U.S. passport systems reject any file that isn’t a perfect square. Even minor variations from the square format can cause an error. Crop to a strict 1:1 before resizing.
6. Do I have to abide with max file size?
Yes. Your digital passport photo must be less than 240 KB in size.Larger files cannot be uploaded successfully and must be compressed or resized prior to submission.
Conclusion
Taking a U.S. passport photo yourself is not only doable — it’s really easy once you know what to do. With a bit of coordination, and the right equipment, you can take a digital passport photo at home that is clean and professional and can be used for official processing.
The process is straightforward: create a clean white background, stand in good lighting, center your head, use a tripod (or stable surface), snap a few pictures, and follow the final crop-and-export instructions. From top to bottom, all the instructions are crafted so you can take a do-it-yourself passport photo at home that satisfies all the required U.S. guidelines without relying on apps, special equipment, or paid services.
So, it doesn’t matter if you’re using a phone or a point-and-shoot camera, just know you can 100% get a crisp, fully compliant photo at home and with way less hassle than most people anticipate.
Authored by:
Nathaniel K. RowdenApproved by Association of Visa center
On this page:
- Essentials U.S. Digital Passport Photo Requirements
- What You Need Before You Start (At-Home Setup Tools)
- Build a DIY Home Passport Photo Studio (Step-by-Step Blueprint)
- The Rules of Pose, Expression and Position: Practical Guide
- How to Take the Photo: overview of workflow
- Quick Compliance Checklist (before submission)
- Typical problems & solutions (troubleshooting)
- FAQ
- Conclusion