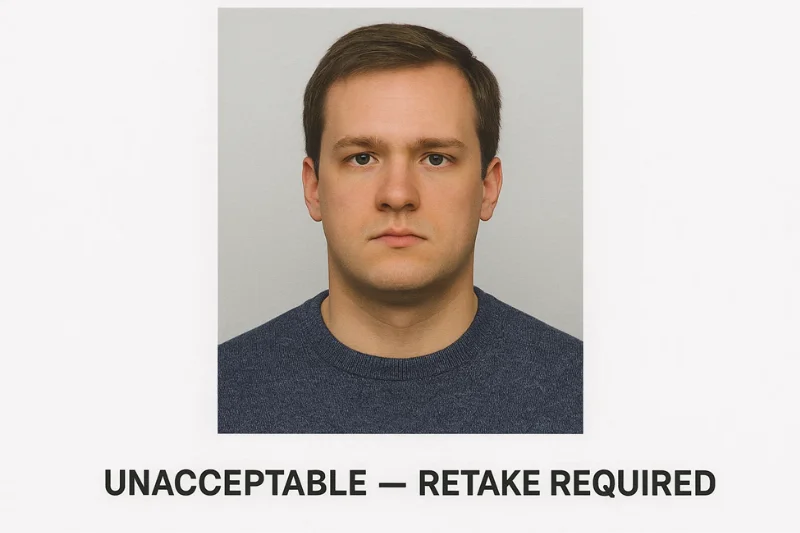
U.S. Digital Passport Photo Rejected? Fix Checklist
Table of contents:
- Why U.S. digital passport photos get rejected
- Top 15 Reasons U.S. Digital Passport Photos Get Rejected
- Official 2025 U.S. Digital Passport Photo Specifications
- The 2025 U.S. Fix Checklist — Step-by-Step Troubleshooting
- Why photos are not accepted by the U.S. automated review system
- When You Have To Reshoot (Do Not Try To Fix It)
- Stop Rejection Before You Upload With PhotoGov Compliance Checker
- FAQ
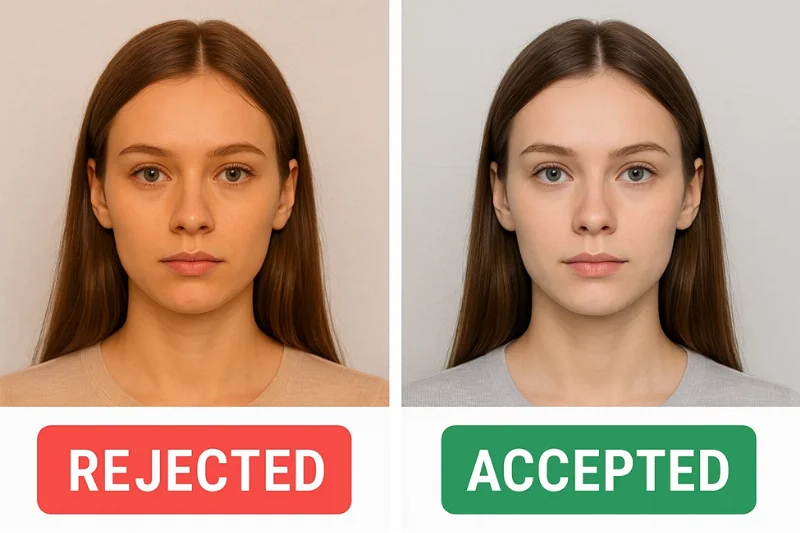
If you got a digital passport photo rejected out of the blue, you’re addressing one of the more common problems in the U.S. passport photo submission system. Both the U.S. Department of State and the on-screen automated checks of the online renewal system have very rigorous standards to which they apply. Even very minor details — uneven lighting, a crop that’s a couple of pixels off, the wrong color profile — can cause the image to be rejected outright.
This guide is intended to allow you to know exactly why your photo failed, understand what the system is detecting on your photo, and use a simple, straightforward fix checklist to remedy the problem prior to resubmitting. The objective is to prevent unnecessary rejections and be confident that your digital photo complies with every U.S. rule for 2025.
Why U.S. digital passport photos get rejected
The U.S. digital submission portal is dependent on rigorous technical and biometric validations. If these specifications are not met precisely, the system outputs a digital passport photo rejected message. Knowing how the process works will explain the most common reasons for a passport photo to be rejected and why they keep happening.
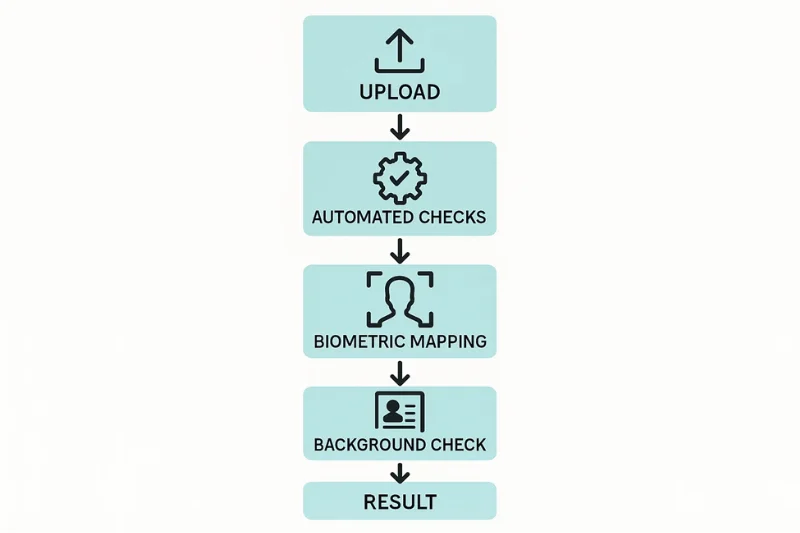
How the U.S. Digital Screening Process Works
The process starts as soon as you upload your photo.
What happens first:
- Your file is automatically scanned by the image validation system.
- The system performs some technical checks first before anything else.
- A human reviewer can look at the file (in a limited number of cases) only if it passes the automated checks.
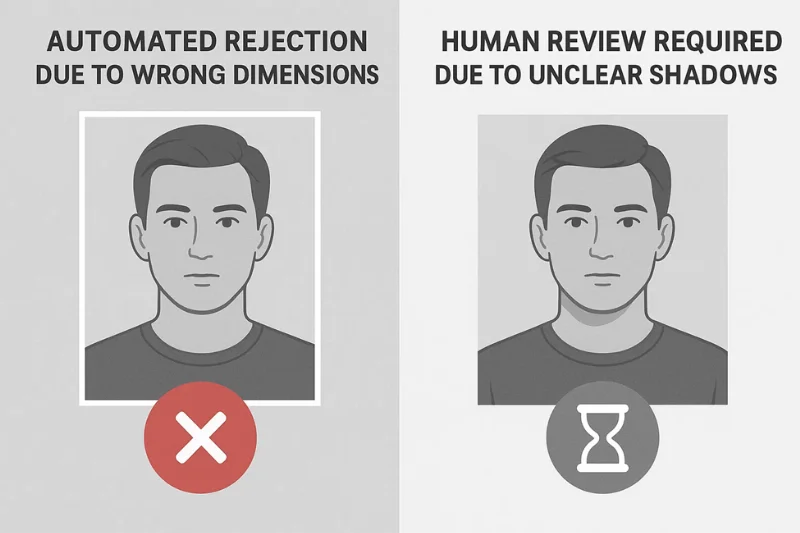
Automated Review vs Human Review
Most of the rejections happen before a human ever views the photo.
Automated review checks:
- File dimensions
- Aspect ratio
- File type (must be JPEG)
- Color profile (must be sRGB)
- File size limits
- Metadata integrity
- Orientation
- Exposure and brightness
Human review applies when:
- An image cannot be confidently classified by the automated system
- Biometric detection is inconclusive
- Lighting or background is marginally acceptable
What the System Checks
The U.S. System evaluates your file in an expected order:
|
Check Type |
What It Looks For |
Common Failure Points |
|
Size |
600×600 px – 1200×1200 px |
Incorrect pixel dimensions |
|
File Specs |
JPEG + sRGB |
Wrong color profile, HEIC exports |
|
Face Landmarks |
Head ratio, eye level |
Head too big/small |
|
Background |
Pure white, no shadows |
Off-white, uneven texture |
|
Compression |
No artifacts or pixel noise |
Over-compressed image |
This sequence causes the most reasons for rejecting a passport photo, particularly when the photo is invalid from the start (size, format, color profile).
Why the 2025 Rules Are Tighter
With more Americans using the online renewal system, the government is heavily reliant on automation. As a result:
- The margin of error is smaller
- Background and lighting problems cause an automatic failure
- Wrong crops cause rejection on the spot
- Even tiny color deviations from sRGB are tagged
- They can detect filters and smartphones processing more easily
Automation helps expedite the process, but also dismisses borderline shots that could have been approved-by-hand in prior years.
Top 15 Reasons U.S. Digital Passport Photos Get Rejected
These are the most common errors that the U.S. Department of State’s system detects. Each mini section is an explanation of what was wrong, why it is rejected by the system, which US rule it breaks, and what typeof solution is needed (not giving the solution steps yet).
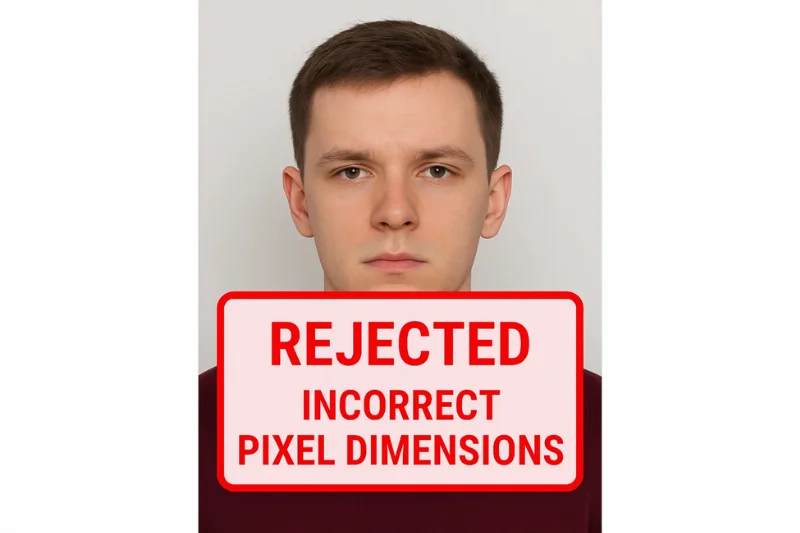
1. Incorrect Image Size or Pixel Measurements
Wrong pixel dimensions are the top reason for rejection. The U.S. system is used for a square image with a minimum size of 600×600 px and a maximum size of 1200×1200 px. Anything that is not in this range is immediately flagged as the wrong size.
Reasons for system flags:
- The pixel dimensions are checked by the automated validator before anything else.
- If the image is not square or the size is too small for the file to retain its integrity, the upload is prevented.
Which rule does it infringe:
- The U.S. Department of State requires a 1:1 aspect ratio with at least 600×600 px resolution.
Fixing intent:
- The photo needs to be re-cropped or re-exported to fit within the exact pixel dimensions.
2. Wrong aspect ratio (must be 1:1)
A U.S. passport photo for online submission must be a perfect square. When the width and height are not equal, the image is instantly rejected due to an aspect ratio that is invalid. The auto validator checks photo shape first, and a non-square image is treated as a cropping mistake which misaligns the face.
This violates the 1:1 ratio rule for U.S. digital submissions. To fix the problem, re-crop the image into a square without scaling the face. The only time you really need a list is when you want to highlight the main failure points, e.g.:
- The validator identifies the width and height mismatch as a formatting error.
3. File Too Large or Too Small
Your file needs to be less than 240 KB and still have enough detail for the system to read it. Large image files tend to crash when uploading, and very small image files lose too much quality due to heavy compressing.
This violates the official DOS file size rule (≤ 240 KB). Usually the system will alert when the JPEG is either overloaded with information or over compressed to the point where the face is lost in a blur.
Export the image once more with the trade-off roughly halfway balanced. Only one entry is required:
- File sizes that are too large are rejected during internal JPEG validation.
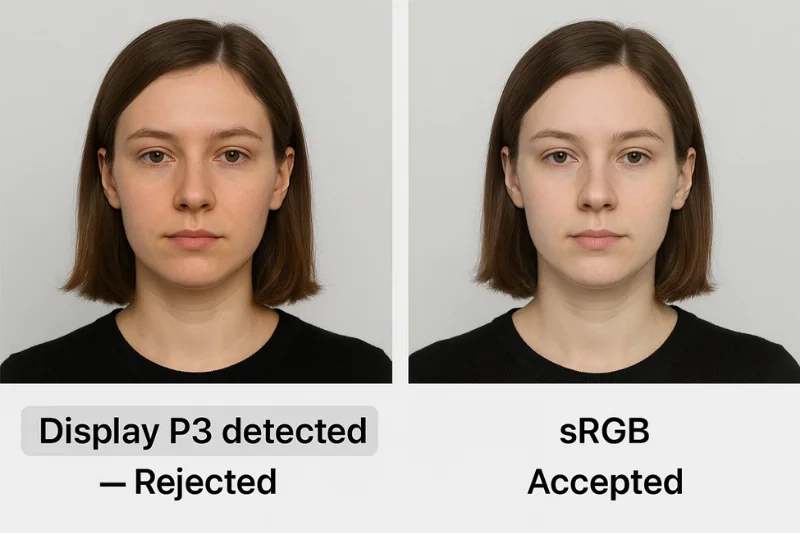
4. Incorrect file format or color profile
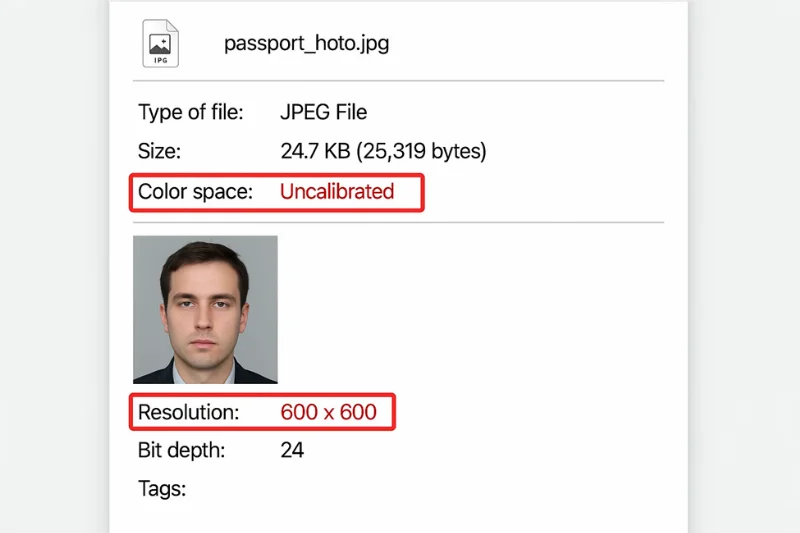
US digital submissions are JPEG files only, exported in the sRGB color profile. Everything else – PNG, HEIC, AdobeRGB, Display P3 – is getting rejected automatically because the system can’t read non-standard formats.
This contravenes the federal stipulation that all digital passport photos are JPEG + sRGB. The problem usually occurs when the image is taken directly from a phone or editing app that defaults to another format or color space. The solution is simple - Just re-export the photo from the original source with the right settings.
Only one detail warrants a list:
- Non-JPEG images or images with a non-sRGB color profile are rejected by our automated validation system.
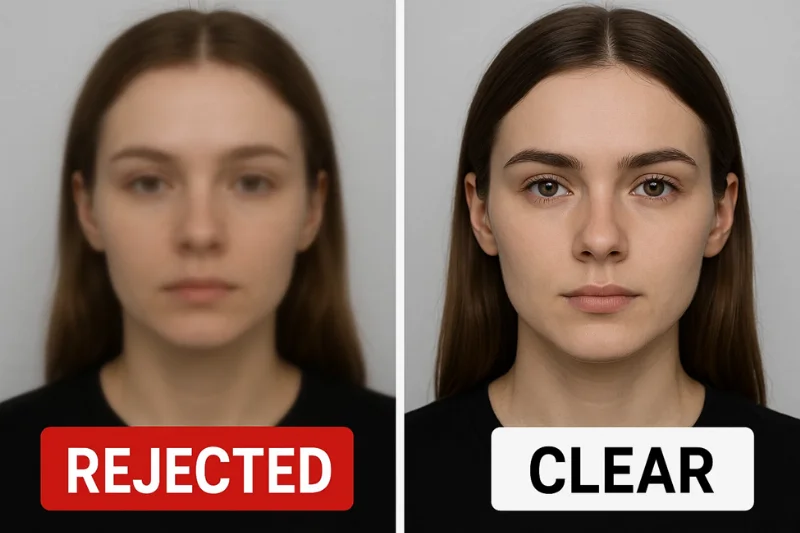
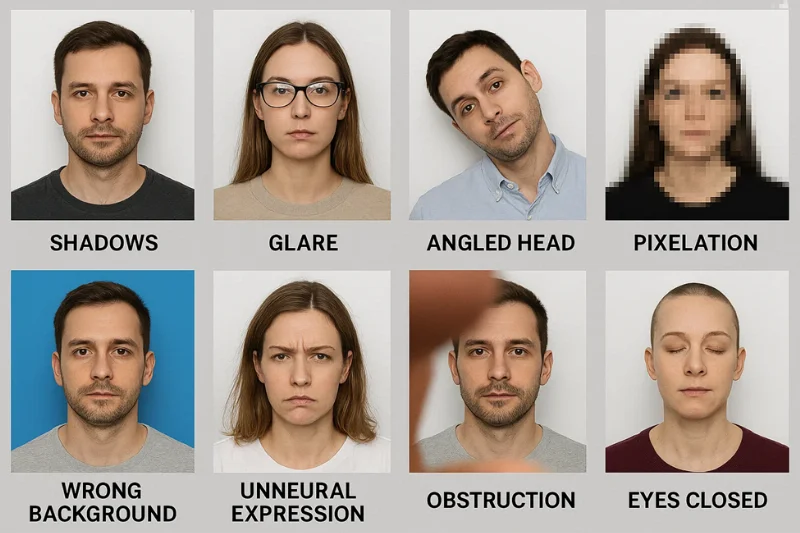
5. Blurry or pixelated image
Any photo that is out of focus, grainy, or has been subjected to excessive smoothing is discarded, as the system is unable to obtain dependable biometric information. Soft focus, camera motion, or digital retouching products can all affect us of landmarks.
This violates the U.S. standard that the photo be of sufficient quality to allow an accurate biometric reading. If the program fails to detect clear facial features, it considers the picture as a throwaway. The only time a list is useful is if you want to call out the core detection trigger:
- When the facial landmarks cannot be detected due to blur, pixelation, or other compression artifacts the validator will reject the photo.
The only real solution is to take the photo again with a stable hand, clear focus, and sufficient light to prevent noise.
6. Shadow in Face or Background
Diffuse shadows also cause instant rejection as they interfere with the biometric mapping and give an impression of unevenness of background. The system processes light first, so all dark spots – on the skin or in the back of the head – are flagged as noncompliance.
This breaks the U.S. requirement of plain background color that is uniformly lit in pure white with no gradients. Shadows can occasionally be due to underexposure or to a colored wall. One thing is made easier by a list:
- During background segmentation lighting is not perfect the algorithm considers shadows as noise.
To correct the problem, alter the lighting configuration or capture a new image in a well-lit environment without any shadows.
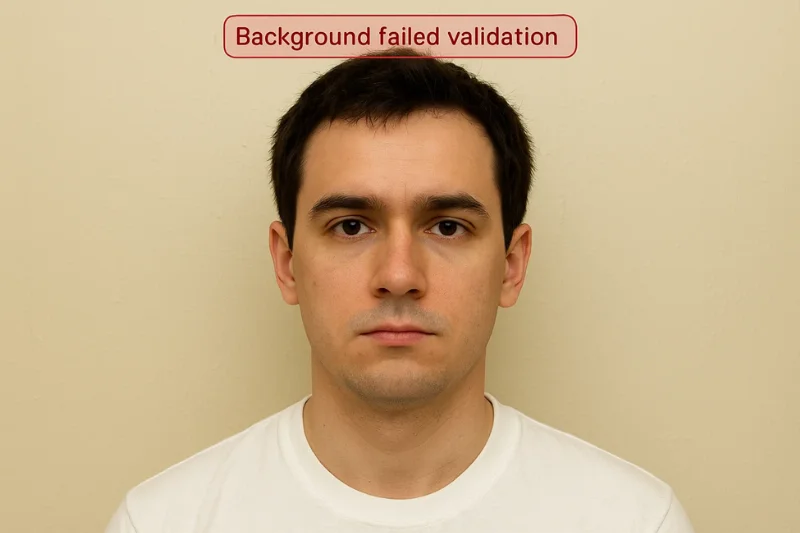
7. Incorrect Background
System require normal solid white background (with #FFFFFF is recommended) without any texture, tint or gradient. A little bit of yellow, beige or gray streaks are enough to lead to rejection as they disrupt uniformity in machine inspections.
This is in contravention to the required U.S. rule of a plain white background for digital submissions. The validator typically will catch the issue at the border check, when it looks for non-white borders or patterns. The only item that does get a list is the detector core trigger itself:
- Texts are broken when textures, creases, stains, or light off-white shades are detected by edge detection.
To fix the problem, take away the inconsistencies in the background or retake the picture using a plain backdrop of some kind and make sure it’s uniformly lit.
8. Facial Expression Issues (Smile, Open Mouth)
There is a slight change in the geometry of the face when people smile, which is imperceptible to the eye, but the system considers these deformations as a distortion in the biometric. Unlike a completely neutral expression, all other expressions are rejected because they violate symmetry and landmark consistency.
This breaks the U.S. regulation that states all applicants must have a neutral expression with their mouths firmly closed. The validator is only verifying the mouth (and by proxy the jaw) and the pixels around it, and will throw the error when they don't match the expected template:
- Landmarking captures the mouth deformation or the symmetry imbalance of the face when smiling or opening the mouth.
The only choice is to shoot the photograph again with a relaxed face, eyes open and neutral expression.
9. Head Too Big or Too Small
The head should cover 50 to 69% of the total photograph height. Outside of that range is also a leading cause of denial because your face can’t be matched to the biometric template used by the U.S.
This is not in compliance with the standard of having head height between 50 and 69% for the proper positioning in the federal guideline. The crop is usually flagged by the validator if the face is too close to the camera, too far away, or too much empty space is left above the head. Only one point can be gained from listing:
- Discrepancy is when the biometric template detects a cropping error or head size variation.
To fix the problem crop again (or just take the photo again) so the head takes up the right amount of the frame.
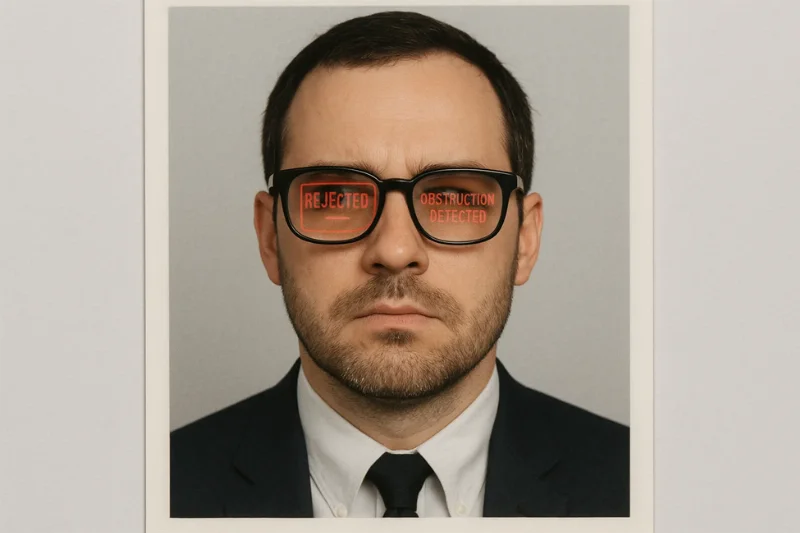
10. Glasses or Barriers
Glasses have not been allowed in U.S. passport photos since 2016, and a little glare or obstruction causes an image to be rejected. Reflections, shadows or partially obscured eyes compromise the biometric reading so any eyewear is treated as a non-compliance.
This is in breach of the 'no glasses or facial obstructions' rule for a digital passport photo. If it detects a reflective surface, eye area obscured or any other factors that hide the visibility of landmarks, a warning is raised by the validator. The one entry that counts are the core detection trigger itself:
- The algorithm considers glare, reflections, or eye occlusion as noise in biometrics.
To fix the problem, remove the glasses and then re-take the picture with a clear view of your face.
11. Lighting or Exposure Not Appropriate
If photos are overexposed or underexposed, they fail right away since there is no way to retrieve stable face details. Brightness normalization in one of the preprocessing steps helps to overcome the issue but is limited due to fading out the features in over-exposed image and introducing noise to under-exposed photo that can potentially mislead the biometric template.
This is contrary to the federal requirement to provide uniform, adequately balanced lighting for the entire face. When brightness and contrast are out of the allowed ranges, the algorithm raises the alert: the main trigger for detection is:
- Facial features vanish or get noisy due to over/under exposure and then the validator rejects the image.
To fix this, you can modify your lighting setup or take the photo again in a bright place without causing glares or shadows.
12. Digital Alteration Detected (Filters)
All forms of digital processing – filters, smoothing tools, AI enhancements – lead to visual patterns that the system can briefly read. These changes modify the texture of the skin, remove natural details and also alter biometric consistency, which automatically leads to a rejection.
The U.S. also states that passport photos can’t be digitally touched up in any way. The validator issues a warning when it finds unnatural processing and the fundamental trigger is:
- Trace of filter, pattern of smoothing or artifact of compression appeared to be the results of digital processing of the image.
To solve the problem, submit a Plain, Unaltered Photo taken without any filters or editing.
13. Hair Obstructs Eyebrows or Eyes
If eyebrows are covered by hair or if one or both eyes are occluded, the system is unable to read to the key biometric points. Hardly any obstruction is enough to disrupt landmark mapping so the photo gets rejected on the spot.
That violates the U.S. rule that a person’s full face is on display — including both eyes, both eyebrows, and both nostrils. The core trigger can be characterized as: the red flag is raised by the validator whenever it detects an occlusion above critical regions of the face; the core trigger can be described as:
- Landmark detection is not working when hair covers one or both eyes.
To correct this, just pull the hair out of the face completely and retake the picture.
14. Head Tilt or non-Frontal Angle
The head should be straight and looking at the camera directly with no tilt or rotation. A small tilt or turn makes the system misinterpret the face geometry, and that on its own means the photo will be automatically rejected.
This violates U.S. policy of having the head position be frontal, centered, and upright. The validator signals the problem when pose detection reports the head turned out from the expected orientation; the main trigger is:
- Even minor rotation disrupts biometric orientation mapping.
To fix this, just retake the photo with the chin level and the head exactly straight.
15. Color Issues (Incorrect White Balance or Tint)
The system rejects photos with an orange, blue, green or any other tinted cast because such unnatural color shifts distort the skin tone and may cause errors in automated checks. It has been reported that smartphone cameras produce these tints when capturing under artificial or different lighting.
This is under the US natural colour expectation of normal biometry and chromatic should align with norm. The validator generates this warning when it detects a strange color temperature or chromatic imbalance; the only known cause is:
- A major white-balance change will cause the system to treat the image as miscolorized.
Fix it by adjusting the white balance or shoot again under clean, neutral, natural light.
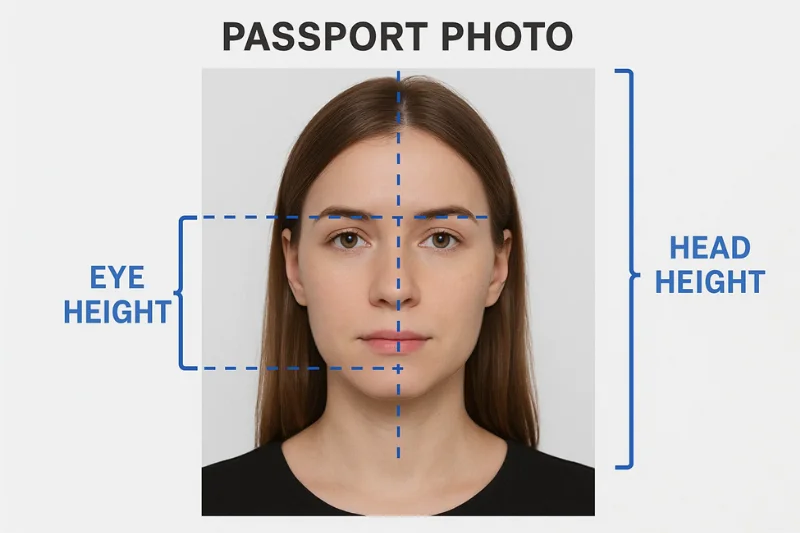
Official 2025 U.S. Digital Passport Photo Specifications
Having the right digital passport photo specifications is crucial to clear the automated verifications in the US online renewal process. Here is a summary of the core U.S. passport photo specifications which every applicant should comply with in 2025.
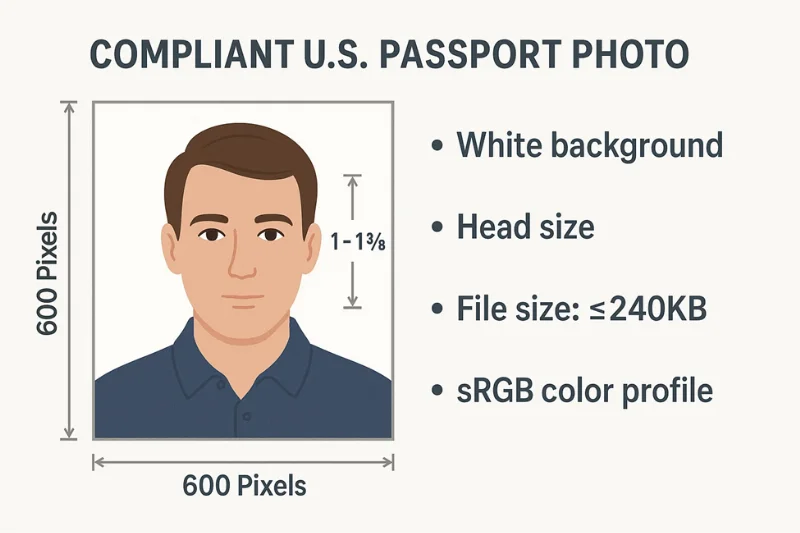
U.S. Digital Passport Photo Specification Table
|
Requirement Type |
U.S. Standard (2025) |
Purpose of the Rule |
|
Pixel Size |
600×600 px to 1200×1200 px, square |
Ensures enough resolution for facial analysis |
|
Aspect Ratio |
1:1 aspect ratio |
Keeps facial landmarks in the correct position |
|
File Size |
Up to 240 KB |
Prevents data loss and upload issues |
|
File Format |
JPEG |
Stable processing across federal systems |
|
Color Profile |
sRGB |
Standardized color rendering for identity checks |
|
Background |
Pure white (#FFFFFF) |
Clean contrast for automated segmentation |
|
Head Height |
50–69% of image |
Aligns the face with biometric templates |
|
Eye Height |
Eyes centered within U.S. mapping zone |
Maintains the correct landmark geometry |
|
Expression |
Neutral |
Supports consistent biometric matching |
|
Prohibited |
Glasses, filters, shadows |
Causes landmark detection failures |
1. Pixel Size
U.S. format photos are square and measure between 600×600 px and 1200×1200 px. A small image does not contain sufficient detail for blossom extraction; a large file interferes with automated scaling. The validator checks pixel dimensions first, so wrong sizing is one of the quickest and most common reasons for rejection.
2. File Size
Digital passport photos have to be 240 KB or less but still of sufficient quality to capture the texture of the applicant's face. Photos exceeding the limit are often rejected at the upload stage, while very small files are a sign of too much compression, which may cause loss of important details, like the edges of eyebrows or the texture of the skin. Both of those situations result in failure to capture a good biometric map.
3. File Type and Color Profile
Only a sRGB color profile JPEG file can be accepted. Formats such as PNG or HEIC, and profiles such as AdobeRGB or Display P3, change the color interpretation and break the automated workflow. Many smartphones use wide-gamut profiles by default that shift skin tone, which the upload validator immediately detects.
4. Head Placement Rules
The head should cover 50 to 69 percent of the total image with the eyes located within the U.S. digital mapping region. This guarantees uniform alignment for all applicants. When the head is too greatly cropped (or too small) the system is unable to accurately locate biometric landmarks such as chin, nose and eyes and the image is rejected automatically.
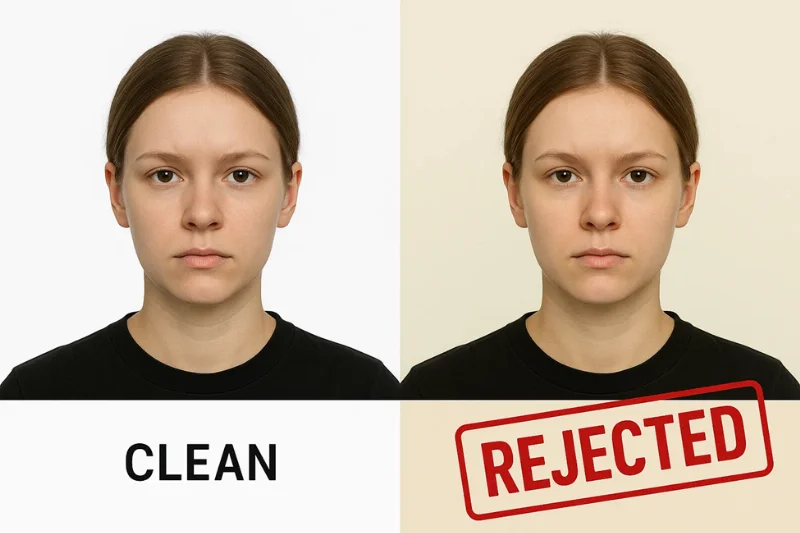
5. Background Requirements
A clean white (#FFFFFF) background with uniform lighting is required. Off-white walls, shadows, gradients or textured surfaces confuse the segmentation algorithm which is intended to isolate the face. Even small color changes — some beige or gray tones — make the background fail the uniformity test.
6. Prohibited Elements
Nothing that interferes with a clear biometric reading is permitted by the U.S. Department of State. This pertains to:
- Glasses
- Strong shadows
- Hair covering the eyebrows or eyes
- Beauty filters
- Skin-smoothing apps
- AI edits
- Overexposed or tinted photos
These create occlusions or artificial alterations to the face that prevent the authentic facial geometry from being seen, which leads to an immediate rejection irrespective of the quality of the image.
The 2025 U.S. Fix Checklist — Step-by-Step Troubleshooting
Diagnose why your photo was rejected and prepare a correction prior to resubmission of digital photo files using this fix checklist. Each step is specific to only one requirement checked by the U.S. system.
1. Check Pixel Size (600–1200 px)
Begin by verifying that your image is within the appropriate resolution range. The system takes only square photos with a minimum size of 600×600 px and a maximum size of 1200×1200 px.
Check carefully for:
- Is the image perfectly square?
- The width and height are the same.
- Your resolution is within the allowed range so that the image does not lose quality.
2. Check the 1:1 Crop and Head Ratio
A proper 1:1 crop facilitates precise Biometric Alignment. Head size must be between 50-69% of the image, and the face must be aligned center.
Check for:
- Balanced space above the head and below the chin.
- The head is not too big or too small.
- The face is horizontally and vertically centered in the image.
3. Inspect Background Uniformity (#FFFFFF)
The background should be clean white with no shadows, textures or color variation.
Check:
- Is the white consistent throughout the frame?
- Areas that are yellow, gray, beige or otherwise uneven.
- Foreign objects or borders that interrupt the uniform background.
This covers most of your fixed background failures.
4. Verify Lighting and Clear Shadows
Uneven lighting can throw shadows under your chin, around your nose, or behind your head—these are all common reasons for photo rejection.
Evaluate:
- Are both sides of the face evenly lit?
- Any dark spots or gradients in the background?
- Any glare, hotspots, or strong directional lighting?
5. Check for Blur or Noise
The details need to be crisp for the system to map facial landmarks. The soft focus and noise interfere with that.
Look at:
- Sharpness of the eyebrows, eyelashes and the line of the jaw.
- Motion blur due to camera shake.
- High noise due to low-light conditions.
6. Confirm No Glasses and a Neutral Expression
Glasses and smiles remain among the most common automatic fails.
Check for:
- Eyewear fully removed, including clear or thin frames.
- No teeth showing and relaxed lips.
- Eyes and eyebrows are fully visible without obstruction.
7. Validate The File Format and The sRGB Profile
JPEG in sRGB only. You will be rejected if you try to export in any other format or colour space.
Check for:
- The file extension is .jpg or .jpeg.
- The color profile is sRGB (no P3 or AdobeRGB).
- Skin tones are natural and not too warm or cool.
8. Re-export Correctly (JPEG, ≤240 KB)
Even a well crafted photo can go wrong if the exported file is corrupted or too big.
Verify that:
- The final file size is 240 KB or less.
- No excessive compression that results in artifacts.
- No embedded profiles or layers that interrupt processing.
9. Compliance check (PhotoGov)
Checking the picture with a compliance validator ahead of time can lessen the chances of being rejected multiple times.
Verify with PhotoGov:
- Crop Alignment and head size ratio.
- Background uniformity and shadow warnings.
- File specs – JPEG, sRGB, resolution, aspect ratio.
- Biometric alignment preview to detect minor problems.
This amounts to a last check before transmitting to the U.S. system.
Why photos are not accepted by the U.S. automated review system
Most applicants get just the last message — digital photo rejected. They don’t see the logic behind the automatic checker for photos that is the first line of business in online passport renewals. This system looks at the image as a biometric engine would -- mathematically, pixel by pixel, looking for patterns that match (or don't match) federally accepted identity standards.
Here’s a quick guide to how the system rates your photo, and why some images get the thumbs down immediately.
1. How does Facial Landmark Mapping work
After a picture is uploaded, the process starts with these face landmarks being detected:
- Eye corners
- Chin point
- Nose bridge
- Eyebrow arches
- Mouth edges
- Jawlines
These landmarks have to be within certain distances and angles that can be predicted. If any landmark is distorted, missing or not properly aligned, the system discards the photo.
The mapping fails when:
- The image is blurry
- The head is tilted
- Hair covers the eyes or eyebrows
- The mouth is open
- Facial expressions are inconsistent with biometric rules
2. How to understand white uniformity with Background Segmentation
The robot auditor separates the foreground from the background through background segmentation. It looks for pure white pixels and detects shadows, gradients, textures, or non-white tints on them.
Segmentation fails when:
- The wall is not white (yellow, beige, gray)
- There are very soft shadows behind the head
- The background has folds or patterns
- Uneven illumination due to Lighting
The system expects a background that is uniformly #FFFFFF to the machine, not just to humans.
3. How Cropping and Head Size Checks Are Applied
Once the landmarks are found, the head is checked to see if it fills the required percentage of the frame. The head should take up approximately 50% to 69% of the vertical space in the U.S. template.
Cropping leads to rejection when:
- There is too much headroom
- The face is too close to the camera, or is it too zoomed in on the face
- The photo is not a uniform 1:1 square
- The crop cuts off hair or shoulders in a way that makes the frame look unbalanced
This way, every applicant's image is mapped to the same biometric template.
4. How is Lighting and Shadows Detected
The exposure system obtains pixel brightness information and detects non-uniform exposure. This is the same way that image-processing programs detect highlights and shadows.
Lighting analysis fails when:
- Brightness of left and right sides of face is significantly different
- A shadow is cast beneath the chin or nose
- Bright hotspots on skin due to harsh lighting
- Background gradients produced by environmental light
These brightness contrasts lead to errors in reading the landmarks and immediate rejection.
5. How Does Color Accuracy and sRGB Validation Work
The color profile and color fidelity of the file is checked by the system. It anticipates that:
- sRGB color space
- Natural, unedited tones
- No tint or color cast
Color validation fails when:
- The photo is exported in AdobeRGB or Display P3
- Warm lighting can turn the face orange
- Cool lighting casts a blue or green hue
- Filters alter skin color
- White balance is way off
An incompatible color profile is also one of the quickest reasons to get automatically rejected.
6. Common Metadata and File Integrity Triggers
The system doesn't only look at pixels — it also looks at file-level attributes.
Rejections are triggered by:
- Missing or corrupted metadata
- Incorrect orientation flags
- Embedded ICC color profiles
- Multiple layers or transparency
- Excessive compression artifacts
- Non-JPEG containers mislabeled as JPEG
- Files saved from screenshots instead of exports
When integrity tests fail, the system treats the file as either manipulated or unsupported.
When You Have To Reshoot (Do Not Try To Fix It)
There are issues that just can’t get fixed in post, whether it’s editing or cropping or color correcting. When the photograph has these defects, the system used by the U.S. automatically rejects it, and any attempt to “fix” it will result in repeated failures. In the following circumstances a full reshoot is the only solution that is acceptable to federal standards.
1. Extreme Shadows
Strong shadows on the face or in the background cannot be removed without distorting the image.
Intense shadowing leads to biometric occlusion, which means the system is unable to properly detect contours and boundaries of the face.
Retake the photo if you notice:
- Strong shadow under the chin
- Dark areas behind the head
- Harsh directional light creating gradients across the background
Manipulating these shadows would be considered digital manipulation, which is not allowed.
2. Overexposed or Underexposed Image
The light is too bright or too dark, causing permanent severe exposure mistakes. Even sophisticated editing cannot recover lost detail without introducing artifacts.
Retake when:
- Bright areas look washed out
- Facial features are lost due to overexposure
- The photograph is grainy or has murkiness of underexposure
Any attempt to “correct” exposure usually results in compression artifacts and color distortion.
3. Glasses Glare
Glasses are not allowed in U.S. passport photos, and glare on the lenses cannot be corrected in a way that looks authentic.
Retake if:
- Light is reflected from the surface of the lens
- The eyes are obscured, at least, partially
- Any part of the eyes is covered by the frames
Removing glare digitally is considered image manipulation, which violates US federal standards.
4. Face Turned Away From the Camera
But if the head is not perfectly straight-on the photo is unusable. Rotating or “straightening” it digitally breaks biometric geometry.
Retake when:
- The chin is lifted or dropped significantly
- The head tilts to the left or right
- The face is not looking straight at the camera
Landmark alignment is disrupted by both, and they are considered facial occlusion and pose distortion respectively.
5. Hair Covering Eyes or Eyebrows
A light scattering of hair over the eyes can mean the difference between the system being able to pick out some key facial markers or not.
Retake if:
- Either or both eyes are obscured
- Eyebrows are covered or obscured
- Hair overlaps on upper lash line
Digitally editing the hair would change the biometric structure and is prohibited.
6. Pixelation or Noise
Pixelation We can easily fix blurry images. But we cannot fix low resolution images or phone screenshots as that would cause pixelation. Noise also hides important information for identity verification.
Retake when:
- Skin looks blocky
- Edges are jagged
- The image was taken in low light, which will produce noise
Trying to smooth or remove noise results in digital tampering flags.
7. Non-White Background Textures
Backgrounds with patterns, gradients, curtains, door frames, or textured walls will not be brought to a true pure white as that would be considered over editing.
Retake if:
- Yellow or gray tint in the background
- There are objects visible behind the subject
- Texture, shadow or color variations on the wall
A uniform white background is essential for accurate segmentation.
8. Incorrect Head Ratio
However, if your head is too big or small within the image, recropping will not rectify the problem. Scaling the face up or down digitally warps proportions and undermines biometric reliability.
Retake when:
- Head is less than 50% or more than 69% of the image
- There is not enough room above the head in the original picture for cropping
- The distance was too close or too far between the camera and face
Adjusting the head size in post often results in distortion and integrity failures.
Stop Rejection Before You Upload With PhotoGov Compliance Checker
The PhotoGov checker should identify all of the problems which could cause a digital passport photo to be rejected. It performs an automated compliance check against the US system rules using the basic categories the U.S. system checks for - sizing, color, background, biometric alignment, and file validity. Using this prior to submission or upload does prevent instant denial and certainly avoids endlessly failed attempts.
1. What the Checker Anti Bot Examines
PhotoGov checks the entire set of U.S. compliance standards. Its analysis includes:
- Pixel dimensions
- Aspect ratio
- Head height and eye-level placement
- Color accuracy
- File format and metadata
- Background consistency
- Exposure and shadow mapping
- Noise, sharpness, and detail clarity
This mirrors the internal U.S. biometric pipeline and allows you to preview whether your photos will be accepted.
2. How the Head-Size Validator Works
The head-size validator compares your face against a U.S. biometric template to determine if your head is between 50 and 69 percent of the width of the image. It also verifies that eye height is within the standardized landmark zone.
The validator flags:
- Oversized heads from holding the camera too close
- Undersized heads taken from too far away
- Crops that cut off space above the head
- Off-center faces that interrupt alignment
3. Background Correction (#FFFFFF)
PhotoGov features a white background correction that corrects inconsistencies in shading without deforming the face. It detects non-white regions, smooths gradients, and forces the background to be #FFFFFF, the expected value for federal segmentation.
It detects and corrects:
- Mild beige or gray shading
- Low lighting that results in shading
- Light shadows on the wall
- Patterns that make the white look patchy
4. sRGB & JPEG compatibility
The checker verifies if your export is using the following:
- JPEG format
- sRGB color profile
These are rigid requirements from the US. PhotoGov also searches for concealed metadata that can disrupt federal processing.
It identifies:
- Display P3 or AdobeRGB exports
- PNG or HEIC mistaken for JPEG
- Incorrect orientation flags
- Embedded profiles that disrupt rendering
5. Pre-Upload Error Detection
Rather than “failing” after submission, PhotoGov identifies problems prior to them entering the federal system. The analysis covers:
- Shadows detected on face or background
- Crops violating the head ratio
- Facial obstructions (hair, glare, tilt)
- Blur or pixelation
- Excessive or low compression
- File-size failures
- Landmark detection mismatches
Each error is accompanied by a brief explanation and suggested correction.
6. Prevention of Repeat Rejections
If you rely solely on the U.S. upload page, you may correct one problem and not the other, resulting in a couple of failed attempts. PhotoGov cuts out the repeat game of trying.
Benefits include:
- One-pass check of all U.S. requirements
- Cleaning tools that are not against the rules of editing
- Accurate guides for alignment to take the guesswork away
- A final confirmation screen like a federal validation
- A significantly greater approval rate for your next upload
The checker makes sure your photo complies with all the technical and biometric specifications in one go and prevents you from getting another “photo not accepted” message.
FAQ
These answers address the most common reasons why a digital passport photo will not be accepted in the U.S. Each reply is dedicated to the regulation, the technical standard, and what you have to change before sending in photo files again.
1. Why was my U.S. passport photo rejected?
Most rejections for U.S. photos are due to image not meeting essential digital requirements:
- Incorrect size (not within 600×600 px to 1200×1200 px)
- Wrong color profile (not sRGB)
- Background not pure white
- Incorrect head size or alignment
- Shadows, blur, or facial obstruction
It automatically runs all of these checks and anything that does not conform to the US federal templates will be rejected.
2. What is a “face not centered”?
It is that the face is not aligned properly in the biometric window. Common reasons include:
- Head too close to one edge
- Incorrect 1:1 ratio crop
- Unbalanced spacing above or below the head
The US validator requires a horizontally and vertically centered face to ensure consistent landmark mapping.
3. Does DPI matter for U.S. digital passport photos?
No. DPI is irrelevant for digital uploads.
The system only evaluates:
- Pixel dimensions (e.g., 600×600 px)
- Aspect ratio (1:1)
- File quality and clarity
DPI affects printed photos—not digital submission.
4. What format should digital passport photos be in for U.S. submission?
Only files with JPEG format and sRGB color profile can be submitted.
PNG, HEIC, AdobeRGB, Display P3 and TIFF files are rejected automatically before biometric checks commence.
5. Why is my lighting getting rejected?
The lighting also interferes with the background segmentation and the face analysis. The system flags:
- Harsh shadows
- Hotspots on the skin
- Dark gradients on the background
- Overexposure or underexposure
Good lighting will allow the face and the solid white background to meet the U.S. visibility requirements.
6. Was wondering if I could edit my background to be white in color?
Only minimal correction is allowed.
You are not allowed to artificially paint over, erase or reconstruct the background.
Permitted adjustments include:
- Softer blending of patchy white areas
- Removing slight tinting to match #FFFFFF
Anything more is considered digital manipulation and will result in disqualification.
7. Can I resubmit the same photo again?
Yes – but only if the problem is fixable without changing the face.
Examples you can fix:
- Incorrect crop (1:1 ratio)
- Wrong color profile (convert to sRGB)
- File size too large
- Mild background unevenness
You are not allowed to reuse the same photo if there is facial occlusion, blur, extreme shadows, or the head size is too big or too small and it cannot be corrected without distortions.
8. Why is my square (1:1) image still being rejected by the system?
Just having a 1:1 aspect ratio is not enough to be compliant. The system also checks:
- Is the head size for the 50-69% rule correct
- If the face is aligned
- If the crop cuts off space above the head
An incorrectly composed square photo will still be rejected.
9. How do I check head size for U.S. rules?
The head size must be between 50 and 69% (inclusive) of the total height of the photo. Use a checker like PhotoGov or:
- Measure the chin-to-top-of-head distance
- Compare it to the full image height
- Confirm the head isn’t too large or too small
Proper head size means the biometrics will be correctly aligned.
10. Should I use 600×600 px?
No. The U.S. system allows any square size from 600×600 px to 1200×1200 px.
600×600 px is the minimum, not the requirement.
A slightly larger size (such as 900×900 px) often results in sharper output, which is useful for clear landmark detection.
Authored by:
Nathaniel K. RowdenApproved by Association of Visa center
On this page:
- Why U.S. digital passport photos get rejected
- Top 15 Reasons U.S. Digital Passport Photos Get Rejected
- Official 2025 U.S. Digital Passport Photo Specifications
- The 2025 U.S. Fix Checklist — Step-by-Step Troubleshooting
- Why photos are not accepted by the U.S. automated review system
- When You Have To Reshoot (Do Not Try To Fix It)
- Stop Rejection Before You Upload With PhotoGov Compliance Checker
- FAQ