How to Take a Digital Passport Photo with Your iPhone: Step-by-Step Guide
Table of contents:
- Why Take a Digital Passport Photo With Your iPhone?
- What Is a Digital Passport Photo and Why Is It Important?
- Key Requirements for Digital Passport Photos Taken on an iPhone
- Taking a Digital Passport Photo With an iPhone: a 6-Step Guide
- Passport Photo Maker: Turn an iPhone Selfie Into a Digital Passport Photo
- Common Mistakes in Home-Made Passport Photos and How to Avoid Them
- Final Step: Pre-Submission Checklist
- Making Digital Passport Photo With iPhone: 7 Key Takeaways
- Frequently Asked Questions
- Official Government Sources
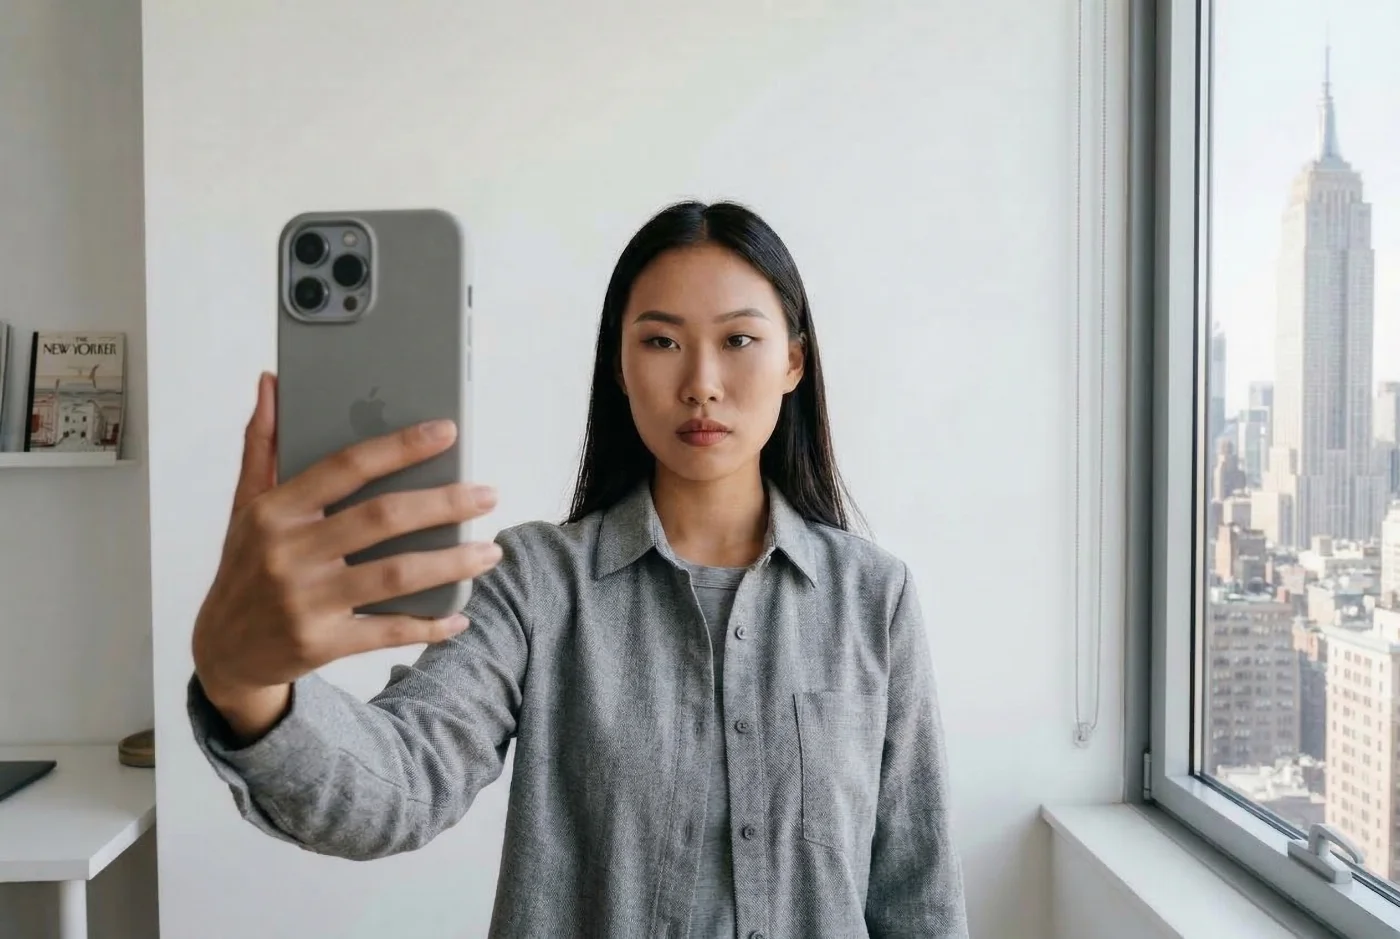
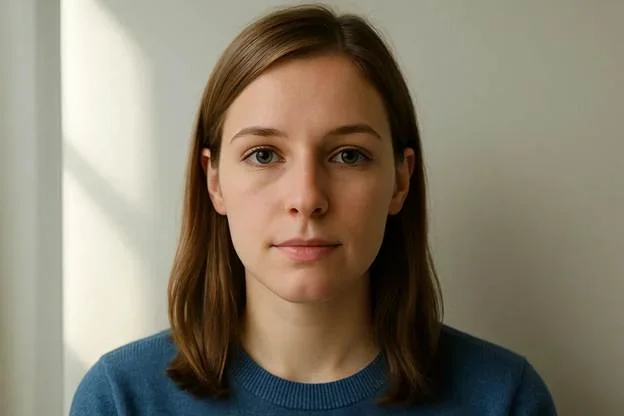
Today, you don’t need to spend time and money on a studio visit — you can take a technically compliant digital passport photo on your iPhone. Any recent iPhone produces images with sufficient resolution, color depth, and sharpness to meet all official digital passport photo requirements. This Guide covers the process step-by-step, including the setup, lighting, camera settings, and post‑processing. Follow our expert tips and make a photo that passes automated checks on the first upload.
 Why Take a Digital Passport Photo With Your iPhone?
An iPhone has everything you need to produce a compliant digital passport photo: a sufficiently sharp camera, a controllable screen for preview, and built‑in tools for basic editing.
Three key reasons make an iPhone a practical choice for passport photos:
Control — lighting, background, positioning, and framing are fully adjustable. If something is off, you reshoot immediately rather than returning to a studio.
Self‑sufficiency — shooting, cropping, and exporting all happen on one device. The finished JPEG can go directly to the upload portal without transferring files between devices.
Cost — there is no fee for taking the photo. The only potential cost is a third‑party app, which is optional.
What Is a Digital Passport Photo and Why Is It Important?
A digital passport photo is a biometric image file submitted online for passport, visa, and other ID applications (for example, through Travel.State.Gov in the United States or His Majesty’s Passport Office services in the United Kingdom).
In contrast to a casual portrait, a digital passport photo is produced specifically for automated and manual identity checks and must follow a narrow set of composition and biometric rules defined by the issuing authority and the International Civil Aviation Organization (ICAO). More and more countries require digital photographs instead of paper submissions — and you must make your picture right to get it accepted.
This is when your iPhone comes in handy. Today, it can replace a professional photo studio: you snap, edit, and submit your digital photo in a few clicks. Let’s explore the process step-by-step.
Key Requirements for Digital Passport Photos Taken on an iPhone
To get your photo accepted and avoid unnecessary delays or even application rejections, you must follow strict official requirements when shooting your digital passport photo with an iPhone. Let’s explore a basic set of rules for your final digital image using a U.S. passport photo as an example.
Dimensions: 600×600 to 1,200×1,200 pixels, square (1:1) aspect ratio
File format: JPEG for visas and DV Lottery entries; HEIF and PNG for online passport renewals
File size: 54 KB–10 MB for passport renewal; ≤240 KB for visa and DV applications
Color: 24-bit, sRGB — not Display P3 (the iPhone default) and not AdobeRGB
Background: white or off-white, plain, no shadows
Expression: neutral — eyes fully open, mouth closed, no smiling
Head size: chin to top of head occupying 70–80% of the frame height
Glasses: not permitted, no exceptions without formal medical documentation
Editing: no filters, no retouching, no AI enhancement of any kind.
Your final result must meet all of the listed requirements exactly — and it is absolutely doable using just your iPhone. In the next section, we will explore the setup, the shooting, and the editing processes.
Taking a Digital Passport Photo With an iPhone: a 6-Step Guide
 Step 1. Setup and Lighting
When you take a digital passport photo at home, lighting is one of the most important factors for getting a clear, good‑quality image.
Soft, even light directly on your face helps keep the photo natural‑looking and shadow-free. A north‑ or east‑facing window in daylight usually works best, as it provides indirect light without harsh bright spots in your future photo.
If you are using artificial light, place a lamp with a white or neutral shade slightly above your eye level and directly in front of you, at about a 45‑degree angle. The goal is even illumination without shadows under your chin, darker areas on the face, or shadows on the background.
Turn off the iPhone flash, as it can create glare and make your skin tone uneven. Avoid standing directly under ceiling lights, as they cast downward shadows on the nose, eye sockets, and chin.
Step 2. Preparing the Background
 The background must be white or off‑white, smooth, and uniform. A plain white wall is the most reliable option. If you don’t have one, you can stretch a white bedsheet or tablecloth flat against a wall, making sure there are no folds or creases that might create shadows.
Stand about three feet (around one meter) away from the background to avoid casting a shadow. Visible shadows or uneven color in the background are one of the most common reasons for digital photo rejection.
Avoid off‑white walls with textured plaster, printed or patterned surfaces, and make sure that no visible objects are in the frame. Furniture edges, door frames, artwork, and wall outlets cannot be present in the image.
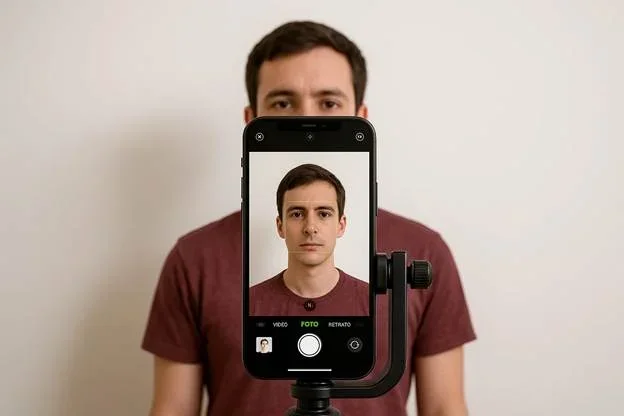
Step 3. iPhone Positioning and Camera Settings
It’s important to place the iPhone correctly and set up its camera before shooting photos. Follow these simple steps:
Place the iPhone at eye level, directly in front of your face
Stand 3–5 feet (around 1–1.5 meters) away from the iPhone
If you have a tripod, fix the iPhone on it instead of holding it in your hand
Disable portrait mode: if it’s on, it will add a background blur that can cause your photo to be rejected
Turn off filters: open the Camera app, tap the filter icon (three overlapping circles), and make sure “Original” is selected so no filter is applied to the file
Choose your aspect ratio: you can set the aspect ratio to 1:1 so the photo is captured as a square from the start, instead of cropping it afterwards.
Turn the timer on and set it to 3 or 10 seconds. This helps avoid camera shake from pressing the shutter. To trigger the shutter, you can press the volume button on your EarPods or AirPods.
Step 4. Framing and Focus
 Keep a neutral facial expression, fine‑tune the composition, and make sure the camera is focused on your face.
Position yourself square in the shot, facing the camera directly. Don't tilt your head up or down or turn it to either side. Keep your face straight so it is not rotated or tilted in the frame
The top of your head should be close to the top edge, and the upper part of your shoulders should be visible at the bottom (your head taking 70–80% of the frame).
Turn on the grid (Settings → Camera → Grid) if it helps you keep the phone level and align your eyes along a horizontal line
Make sure your face is in focus: tap your face on the screen before the timer starts. This locks focus on your features and sets the exposure according to your skin tone
Step 5. Taking and Reviewing the Photo
Now you’re all set up, and it’s time to take a photo.
Start the timer and move into position without touching the phone again
Keep your facial expression neutral: look directly into the camera, keep your eyes open, and your mouth closed. Don’t smile or frown. If your hair falls over your eyes or eyebrows, tie it back so that both eyebrows are fully visible.
After each shot, review the image and retake the photo if you notice that your face isn’t sharp, your head is off-center, or doesn’t fall into the 70-80% range; there are shadows, glare of objects visible in the frame.
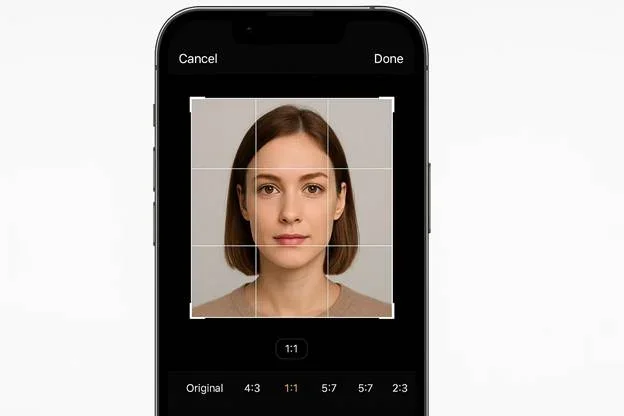
Step 6. Cropping and Exporting the File
 This final step prepares the image for upload.
Crop the photo to a square so that your head occupies 50-69% of the height, with a small amount of space above the top of your head and a clean white or off‑white background around it
Make sure no edges, corners, or background objects appear after cropping
Choose the 600×600 to 1,200×1,200 pixel dimensions and save a file as a JPEG (preferred format)
For passport renewals, file size must be 54 KB-10 MB, for visas and DV Lottery entries — 240 KB max.
Shooting and editing a digital passport photo manually gives you full control. But it also means you have to manage every technical detail yourself: file format, color profile, pixel dimensions, and background quality. A dedicated passport photo maker can take over most of that technical work in the background.
Passport Photo Maker: Turn an iPhone Selfie Into a Digital Passport Photo
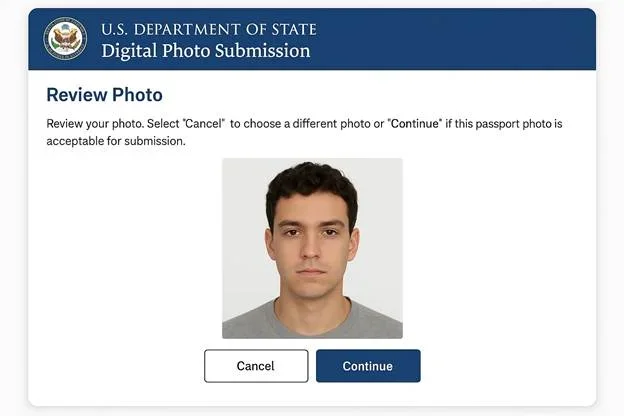
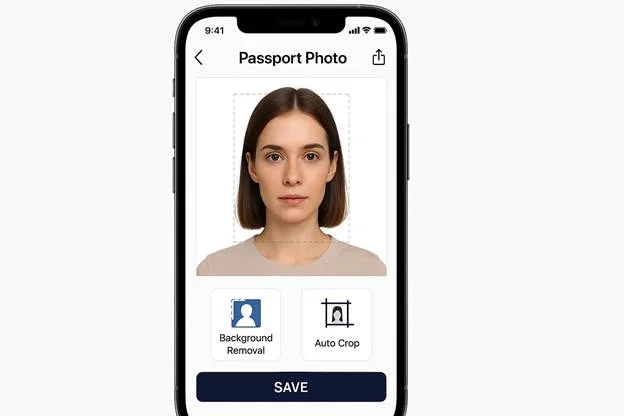 Using a passport photo maker like PhotoGov allows you to convert a standard iPhone selfie into a passport photo file that matches the U.S. Department of State technical requirements. The process is simple: after you've taken a selfie on your iPhone, upload it to PhotoGov, wait while the system processes the image, matching it to your application requirements, and download a ready‑to‑submit digital passport photo.
Behind the scenes, PhotoGov automatically:
Crops and resizes the image to 600×600 pixels
Converts the color profile from Display P3 to sRGB
Centers the face and aligns the eyes according to biometric proportions
Removes background shadows and replaces the background with a clean white field
Adjusts brightness and contrast and fixes EXIF orientation where needed.
By default, iPhones save photos in HEIC with a Display P3 color profile. HEIC files are not accepted for visa or DV Lottery submissions, and can only be used for passport renewals via TravelStateGov, and Display P3 is not accepted on any of them. These issues are not visible on the phone screen, but they are immediately caught by automated validation. PhotoGov converts both format and color space, without changing any system settings on the iPhone.
The resulting JPEG is a technically compliant file prepared to pass all automated technical checks on the Travel.State.Gov for visas, passport renewals, or DV Lottery entries.
Common Mistakes in Home-Made Passport Photos and How to Avoid Them
 Although using your iPhone to take a passport photo is convenient, there are a few pitfalls that may cause your photo to be rejected by the authorities. Knowing these errors and how to prevent them is key to making sure your digital passport photo meets the official standards.
Here, we'll discuss the most common iPhone passport photo mistakes and how to correct them, so that your photo will be accepted.
Avoiding Shadows, Glare, and Overexposure
Digital passport photo approval heavily relies on lighting. Poor lighting can cause shadows, glare, flash reflections, or overexposure, any of which may lead to the photo being rejected. In this section, we will explore how to avoid the most common iPhone lighting mistakes.
Shadows on the face most often happen because of the overhead or side lighting, as well as hair blocking it. Use soft, diffused frontal light and keep your hair back to avoid these issues.
Shadows on the background appear when you stand too close to the wall. Stand at around 3-5 feet (1 meter) from the backdrop so your shadow falls on the floor, not on the wall.
Glare can be caused by direct flash or by light reflecting off shiny surfaces. Turn off the flash and make sure there are no glossy or reflective objects in the shot.
Overexposure makes the face look washed out, making your skin tone unnatural, which may trigger rejections in automatic checks. After you tap to lock focus on your face, gently drag the exposure slider down until your skin tone looks natural and not too bright.
Avoiding Non-White or Patterned Backgrounds
Depending on your document type, the background of your photo must be white or off-white (U.S. passports or visas), light-colored (UK passports), or light grey (European IDs, for example, German passports). Anything outside that range — colors, gradients, visible folds, textures, or patterns — can cause the image to be rejected, even if it looks acceptable on the phone screen.
When you frame the shot, pay attention to the background as carefully as you do to your face. It should appear consistently lit, white or off‑white, without darker spots, color shifts, or visible edges.
Avoid trying to “fix” a non‑white background in the iPhone Photos app: standard brightness and contrast tools change the entire image and rarely create the kind of uniform background that passes biometric validation.
Avoiding Framing Errors
The automated checks measure head height from chin to crown relative to the entire frame. On average (but check your document requirements), it must take 70-80% of the shot. If the head is too big or too small, your digital photo will be rejected.
Even a small head tilt makes the eyes sit at different heights, which biometric symmetry checks treat as an error. Enable the grid overlay and make sure both eyes sit on the same horizontal line.
If the camera is higher than eye level, it visually “compresses” the head; if it is lower, it elongates the face and neck. Position the lens exactly at eye level and keep the phone perfectly vertical, not tilted up or down.
The frame must include the upper part of both shoulders to give the system the correct context for head and posture. Avoid an overly tight crop that cuts off the shoulders or turns the shot into a close-up of just the face.
Final Step: Pre-Submission Checklist
 Check that every requirement on this list is met before submitting your digital photo online:
File format: JPEG (HEIF and PNG only for passport renewals via Travel.State.Gov)
Aspect ratio: exactly 1:1
Pixel dimensions: 600×600 to 1,200×1,200 px
File size: ≤ 240 KB for visas and DV Lottery entries, 54 KB – 10 MB for passport renewals
Background: plain, white or off-white, no shadows
Head size: 70–80% of the frame from the bottom of the chin to the top of the head
Shoulders: the upper part is visible in the frame
Expression: neutral. eyes open, mouth closed, no smiling
Accessories: no glasses, no headwear unless worn for religious or medical reasons
Digital alterations: no filters, retouching, or AI editing
Color profile: sRGB
Recency: taken within the last 6 months.
The Department of State’s automated system runs through the same checklist before your photo is accepted. If one of the requirements fails, the system returns an “invalid photo” error, so it makes sense to take a moment and double-check them all.
Making Digital Passport Photo With iPhone: 7 Key Takeaways
It is possible to take a fully compliant digital passport photo using only an iPhone, without visiting a studio.
Correct lighting, a plain light background, and a neutral expression are essential to avoid automated or manual rejections.
Clothing should be simple and in medium tones so it does not blend into the background or create a strong contrast that distracts from the face.
Every issuing authority sets its own rules for aspect ratio, pixel dimensions, file size, and color space, so these specifications must be checked before shooting or exporting the file.
The iPhone should be positioned at eye level, with Portrait mode and filters disabled, and the head sized and framed according to the official guidelines for the document.
Reviewing the image for shadows, glare, head tilt, and background objects before upload significantly reduces the risk of “invalid photo” errors.
A dedicated passport photo tool like PhotoGov can automate cropping, background cleanup, and technical conversions, increasing the chances of instant approval.
Frequently Asked Questions
What is a Digital Passport Photo Taken With an iPhone?
A digital passport photo taken with an iPhone is a biometric image created specifically for identity verification and submitted as a file rather than as a print. It is captured with the iPhone camera under controlled lighting and background, then exported in the exact pixel size, file format, and color space required by the passport or visa authority for online applications.
How is a Digital Passport Photo Different From a Regular iPhone Photo?
An everyday iPhone photo does not follow any strict rules for pose, lighting, or background, and often uses filters or creative effects. A digital passport photo must follow defined standards for facial expression, framing, background, and technical file settings so that both software and human reviewers can confidently recognize the person.
How is a Digital Passport Photo Different From a Printed Passport Photo?
A printed passport photo is assessed mainly by its physical size, print quality, and appearance on photographic paper. A digital passport photo is assessed as an image file and has to meet specific requirements for resolution, aspect ratio, file size, format, and color profile, along with the same biometric composition rules that apply to printed photos.
Is an iPhone Camera Good Enough for a Digital Passport Photo?
Yes, the camera on a modern iPhone easily meets and usually exceeds the resolution and sharpness needed for digital passport photographs. The main issues tend to come from poor lighting, an unsuitable background, incorrect distance or angle, or exporting the file with the wrong technical settings—not from limitations of the camera itself.
What Settings Should I Use on an iPhone for a Digital Passport Photo?
To take the best digital photo, place the iPhone at eye height, use the rear camera if possible, switch off the flash, the Portrait mode, and disable all filters and effects. Using a short self‑timer or a remote shutter helps you hold a steady, repeatable pose while the phone remains fixed in place.
Can One iPhone Photo Be Used Both as a Digital and as a Printed Passport Photo?
A single well‑exposed original image can often be used as the source for both digital uploads and printed copies. However, the versions you actually submit may require different crops, resolutions, or margins, so it is safer to keep one high‑quality master file and export separate variants tailored for online submission and printing.
Do I Need a Special App to Create a Digital Passport Photo on an iPhone?
Yes, a dedicated passport photo maker, such as PhotoGov, can streamline the process by creating a technically compliant digital photo: it automatically adjusts the crop, cleans the background, and converts the file to the technical specifications of the authority that sets the rules for your particular document type.
Official Government Sources
The US Department of State Official Website: The US Department of State — Travel
Was this helpful?
82 found this helpful
Authored by:
Nathaniel K. Rowden (Compliance consultant)Top expert
Verified by the Photogov compliance team
ICAO 9309-compliant
Based on official government sources
Helpful votes: 82
Was this helpful?
82 found this helpful
We value your Privacy
We use cookies to enhance your browsing experience, serve personalized ads or content. By clicking “Accept All”, you consent to our use of cookies.