How to Take a Digital Passport Photo on an Android Phone — a Step-by-Step Guide
A modern Android phone has everything needed to produce a technically compliant digital passport photo: a 12 MP+ rear camera, built‑in crop tools, and access to apps that automate background removal and verify compliance against official passport photo requirements. Done properly at home, this approach stays cheap with no 15-30–dollar studio fee or pharmacy markup, fast with no appointments, queues, or travel, and reusable because you can retake the photo as many times as needed.
Combined with an automated tool like PhotoGov, your phone can handle the entire process end to end: capturing the image, replacing the background, applying country‑specific cropping, and running a final validation so the file is ready for online submission. This guide walks you through that workflow step by step, so you can confidently create a submission‑ready file on your own Android device.
3 Reasons to Capture a Digital Passport Photo Using an Android Phone
Capturing a passport photo on Android is now the most practical home option for the vast majority of applicants. Three reasons stand out.
Sufficient camera quality. Most Android phones from 2020 onwards ship with a 12 MP or higher rear sensor (Sony IMX, Samsung ISOCELL, OmniVision OV) that easily produces files within the 600 × 600 to 1200 × 1200 pixel range required by the U.S. State Department and the equivalent ranges used by other countries.
Built-in editing tools. Google Photos and the Samsung Gallery app handle cropping, brightness, and basic color correction without any third-party installation. One UI 5+ on Samsung even includes a one-tap background eraser.
Easy to access online passport photo makers. Apps like PhotoGov are accessible in your Android browser and allow you to verify head size, eye line, background uniformity, and pixel/file specs in under 30 seconds — the parts that are hardest to get right by hand.
The result: full control of the process, much lower cost, and a higher probability of approval on the first submission than the average pharmacy or booth photo.
How to Take Your Own Digital Passport Photo on Android Step-by-Step
Capturing a compliant photo on Android comes down to three steps: setting up the scene, positioning the camera, and composing the shot.
Step 1. Set Up the Background and Lighting
The background and lighting account for the majority of passport-photo rejections, according to consular post data published by the U.S. Department of State. Get this right, and the rest is straightforward. Use these expert tips on lighting and background.
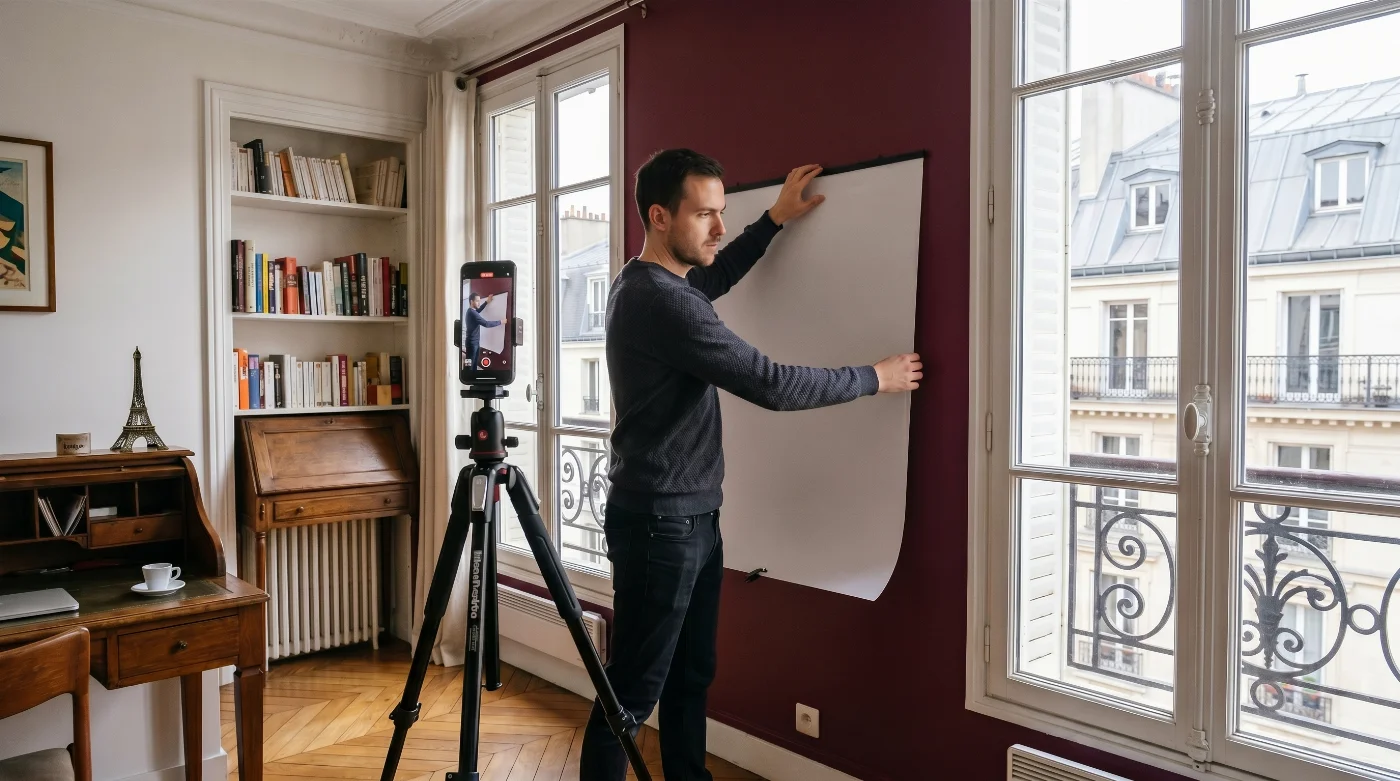
Background: a plain, smooth white or off-white wall. No textures, posters, doorframes, or visible shadows. (Some countries — UK, Schengen — accept light gray; the U.S. does not.)
Light: indirect daylight from a large window, with the window in front (or at the side) of you and the wall behind you. Stand 3 ft (1 m) from the window.
Avoid: direct sun (creates squinting and harsh shadows), overhead room lights (cast shadows under the eyes, nose, and chin), and the built-in flash (creates red-eye, glare, and a flat, washed-out look).
Setup element | What to do |
|---|---|
Background | Plain white or off-white wall, no patterns, no shadows |
Light source | Indirect daylight from a large window, in front of or at the side of you |
Distance to window | About 3 ft (1 m) |
Avoid | Overhead lighting, direct sun, flash, mixed light sources |
Best time of day | Mid-morning or mid-afternoon for soft, even daylight |
Step 2. Position the Camera and Yourself

Camera height and distance are what separate a compliant photo from a selfie that gets rejected.
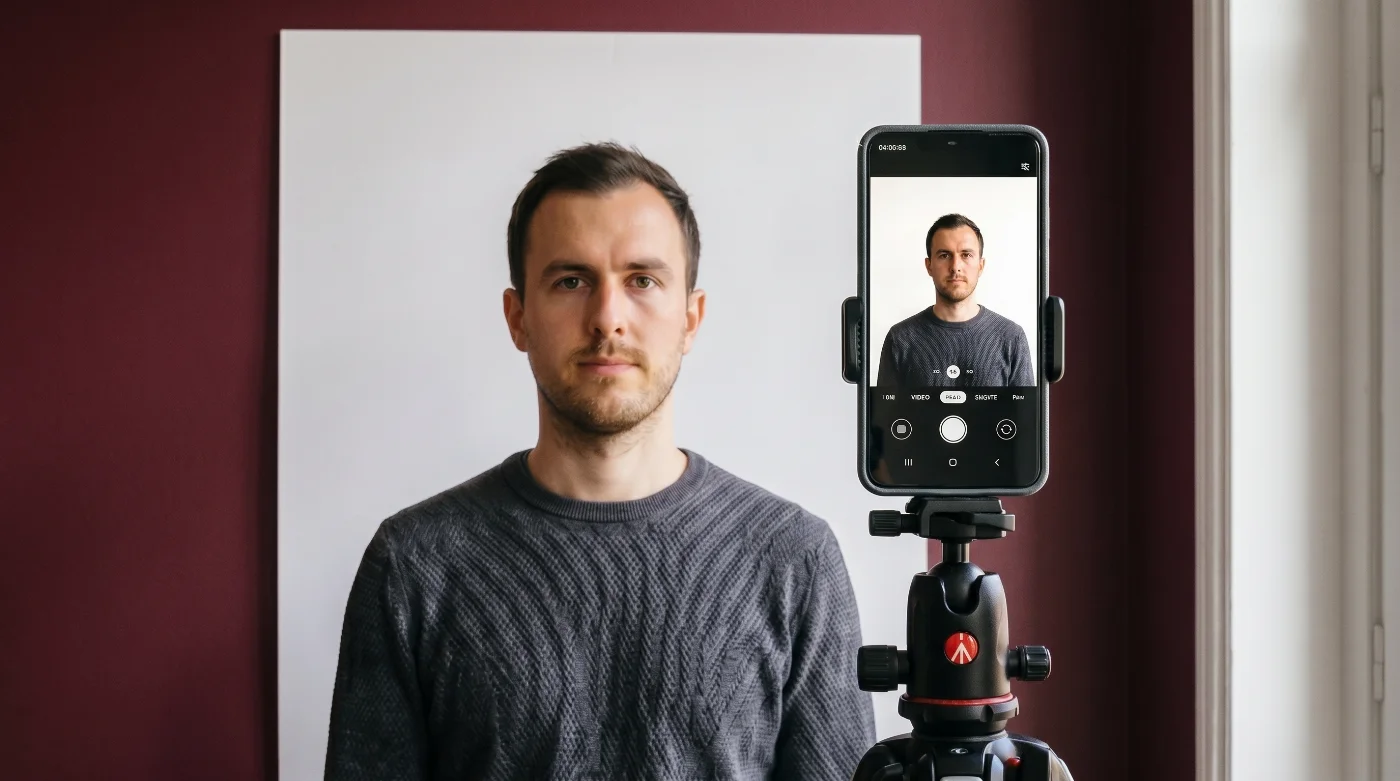
Camera height: exactly at eye level. A camera held below eye level distorts the jaw and nostrils; held above eye level, it shrinks the forehead. The easiest way to get this right is to mount the phone on a tripod or prop it on a stack of books.
Distance: 3 to 5 feet (1 to 1.5 m) between you and the camera. Closer than 3 ft introduces lens distortion; farther than 5 ft makes the head too small in frame.
Camera choice: use the rear (main) camera, not the front-facing selfie camera. The rear lens has higher resolution and produces less facial distortion.
Posture: shoulders square to the camera, head straight (not tilted), eyes open and looking directly into the lens. Mouth closed, neutral expression.
Camera settings: turn off Beauty Mode, AI Photo, Single Take, Live Focus, Top Shot, Pro Mode filters, and any portrait/blur effect. On Samsung, set the aspect ratio to 1:1 or 4:3. On Xiaomi MIUI, disable HDR, AI scene detection, and the camera watermark. Save in standard JPEG, not HEIC (Settings → Camera → File format → JPEG). Learn more about the differences between a JPEG and a HEIC passport photo format.
Positioning element | Specification |
|---|---|
Camera height | Exactly at eye level |
Distance from the camera | 3–5 ft (1–1.5 m) |
Lens | Rear (main) camera, not front selfie |
Posture | Shoulders square, head straight, eyes on the lens |
Expression | Neutral, mouth closed, both eyes open |
File format | JPEG (.jpg) — switch off HEIC if your phone defaults to it |
Step 3. Compose the Shot

Frame the photo so the head and shoulders are visible, the head is centered, and the face fills the correct proportion of the frame.
Head size (U.S. spec): from chin to crown, the head should occupy 50–69% of the image height (1 to 1 3/8 inches when printed at 2 × 2 in). Heads outside this range are an automatic rejection at the CEAC upload stage.
Eye line: roughly 56–69% from the bottom of the frame.
Aspect ratio: square (1:1) for U.S. visa and passport photos. Rectangular 35 × 45 mm for the UK, Schengen, Canada, Australia, and most other countries.
Centering: the face must be centered horizontally; both ears do not need to be visible, but the full face from chin to forehead and from edge to edge must be in frame.
If your country uses a rectangular standard, see the country-by-country specifications in the requirements table further down.
Using PhotoGov to Turn an Android Selfie into a Passport Photo
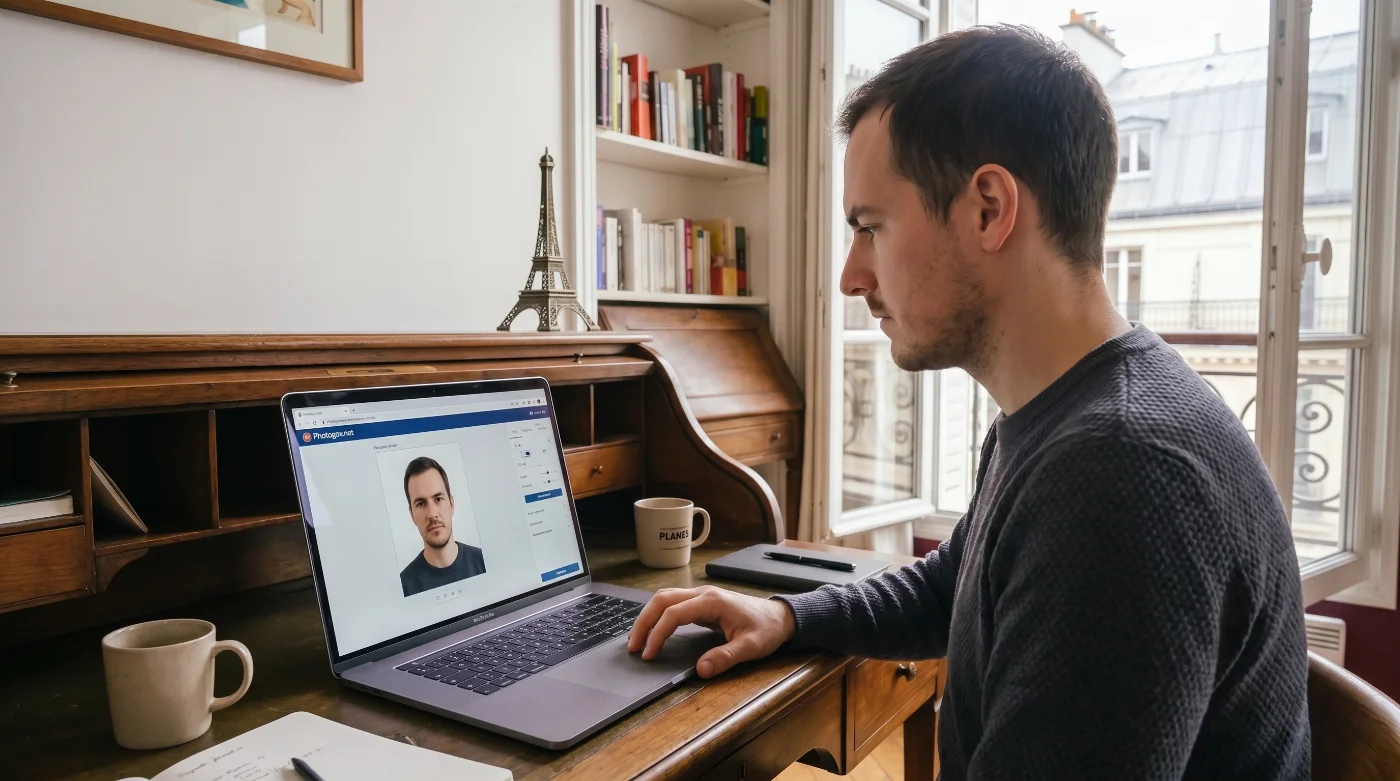
The fastest way to turn a raw Android photo into a passport photo that is technically compliant with official digital photo specifications is to upload your shot to PhotoGov. The tool handles every step of the workflow that is hardest to do by hand:
Automatic background removal — replaces whatever is behind you with a plain white backdrop, no manual masking, no halo around the hair.
Country-specific cropping — 150+ document types covering most countries with their key document types, including U.S. visa, U.S. passport, UK, Schengen, Canada, India, China, Japan, and more. Each is automatically cropped to its exact official spec (e.g., 600 × 600 / 1,200 x 1,200) px for U.S., 35 × 45 mm for UK).
Compliance check — verifies head size, eye line, neutral expression, glasses removed, and file specs (format, pixel size, file size) against the official requirement.
Output — JPEG ready for direct upload to DS-160, GOV.UK, or any other portal, plus a printable 4 × 6 sheet you can take to any pharmacy.
Detail | Value |
|---|---|
Background removal | Clean, plain white backdrop change |
Country support | 150+ countries and key document types worldwide |
Biometric / country-specific compliance check | Head size, eye line, expression, glasses, file specs |
Add-on services | Human verification (senior compliance specialist checks your photo / |
Output formats | Online JPEG and printable PDF in A4, A5, A6, and 4R formats |
Pricing | Free first digital photo; from $5.90 per document afterwards |
For most Android users, this is the simplest end-to-end workflow: capture a decent raw shot on the rear camera, upload to PhotoGov, and download the submission-ready passport photo.
Editing and Cropping Your Passport Photo on Android
If you prefer to edit your photo manually, Android's built-in tools cover most of what you need. Here is the precise workflow.
How to Crop to the Required Size in Google Photos
For a U.S. visa or passport photo, the target is a square (1:1) image between 600 × 600 and 1200 × 1200 pixels. Google Photos can do this in five steps.
Step | Action |
|---|---|
1 | Open Google Photos and tap the photo you want to use |
2 | Tap the crop icon (the square with arrows at the bottom) |
3 | Switch the aspect ratio selector to Square (1:1) |
4 | Position the crop frame so the head occupies 50–69% of the height |
5 | Tap Save copy to keep the original untouched |
After saving, check the file properties (three-dot menu → Details) to confirm the pixel dimensions. If the result is larger than 1200 × 1200 px, use a free resize tool (Photo Resizer, ImageResize, or PhotoGov) to scale it down.
Removing the Background on Android
Google Photos does not include automatic background removal for ID photos. The three reliable options are:
PhotoGov — purpose-built for ID photos, returns a file with a white background, technically compliant with official digital photo specifications, in one click. Best option for accuracy.
Samsung Gallery's Erase background tool (One UI 5+) — produces a transparent PNG; you must then composite it onto a plain white background using a layered editor like Snapseed or Photoshop Express. Free but multi-step.
Google Photos Magic Eraser — useful for removing distracting objects, but not the entire background.
Whichever tool you use, zoom in on the corners of the final image. If you see any faint outline around the hair or shoulders, or any color variation in the white area, the consulate's automated check will likely flag it. Re-edit or re-shoot.
After background removal, save the final file and apply a final brightness/contrast pass if needed. Avoid any beauty filter, skin smoothing, or AI retouching — those are detectable by U.S. State Department systems and cause automatic rejection.
Common Errors When Capturing a Digital Passport Photo on Android — and How to Avoid Them
Six mistakes account for the overwhelming majority of Android passport-photo rejections. Each has a simple fix.
1. Uneven Lighting and Shadows
Side light, overhead light, and direct sun create shadows that automated facial-recognition systems read as facial deformities or beard stubble.
Fix: indirect daylight from a large window in front of you. Never use the built-in flash, never shoot in direct sun, never shoot directly under a ceiling light.
2. Patterned, Colored, or Off-Spec Background
The U.S. requires plain white or off-white. Cream, beige, gray (where white is required), or any pattern fails the compliance check.
Fix: a plain white wall, freshly painted or covered with a smooth white sheet pulled tight to remove wrinkles. Confirm your country's exact background color in the requirements table below.
3. Camera Held at the Wrong Height
Phones held at chest height create a "looking down" distortion; phones held above eye level shrink the forehead and enlarge the chin.
Fix: tripod, phone stand, or stack of books — camera exactly level with your eyes.
4. Wrong Head Size in Frame
Head too small or too large is one of the top three rejection reasons at the CEAC upload stage. Note that the spec is for the head (chin to crown), not the face.
Fix: head fills 50–69% of image height for U.S. photos. Use a passport-photo crop tool or PhotoGov to verify automatically.
5. Glasses, Accessories, or Filters
Eyeglasses (banned for U.S. visa photos since November 2016 except for documented medical reasons), AirPods, hats, beauty filters, AI retouching, and Portrait Mode are all rejection triggers.
Fix: remove all accessories; turn off every camera enhancement; export a flat, unedited JPEG.
6. Wrong File Format or Pixel Size
HEIC files, files outside 600 × 600 to 1200 × 1200 px, and files outside the 54 KB to 240 KB range are rejected by the U.S. CEAC upload tool before you even submit.
Fix: switch your camera to JPEG output (Settings → Camera → File format → JPEG); use PhotoGov, Photo Resizer, or Snapseed to resize and re-export within the required ranges.
Digital Photo Requirements for Android Phone Users
The exact specification depends on the country issuing your passport or visa. Below are the official numbers for the most common destinations, drawn directly from the issuing authority's published rules.
Specification | United States | United Kingdom | Schengen / EU | Canada |
|---|---|---|---|---|
Print size | 2 × 2 in (51 × 51 mm) | 35 × 45 mm | 35 × 45 mm | 50 × 70 mm |
Digital pixel range | 600 × 600 to 1200 × 1200 | 600 × 750 to 1200 × 1500 | varies by country | 420 × 540 |
Aspect ratio | Square (1:1) | Rectangular (7:9) | Rectangular (7:9) | Rectangular (5:7) |
Head height (chin to crown) | 25–35 mm (50–69% of image) | 29–34 mm | 32–36 mm | 31–36 mm |
Background | White or off-white | Light gray or cream | Light gray | Plain white or light-colored |
Format | JPEG (.jpg), 24-bit color | JPEG (.jpg), 24-bit color | JPEG (.jpg), 24-bit color | JPEG (.jpg), 24-bit color |
File size | 54 KB to 240 KB for visas; | up to 10 MB | varies | up to 4 MB |
Recency | Within the last 6 months | Within the last 1 month | Within the last 6 months | Within the last 6 months |
Source |
In addition to the country-specific specs, every passport photo must be sharp, in focus, with even lighting and natural skin tones, taken in everyday clothing that contrasts with the background, with a neutral expression, mouth closed, and both eyes open, looking directly into the lens. No filters, no Portrait Mode, no AI retouching.
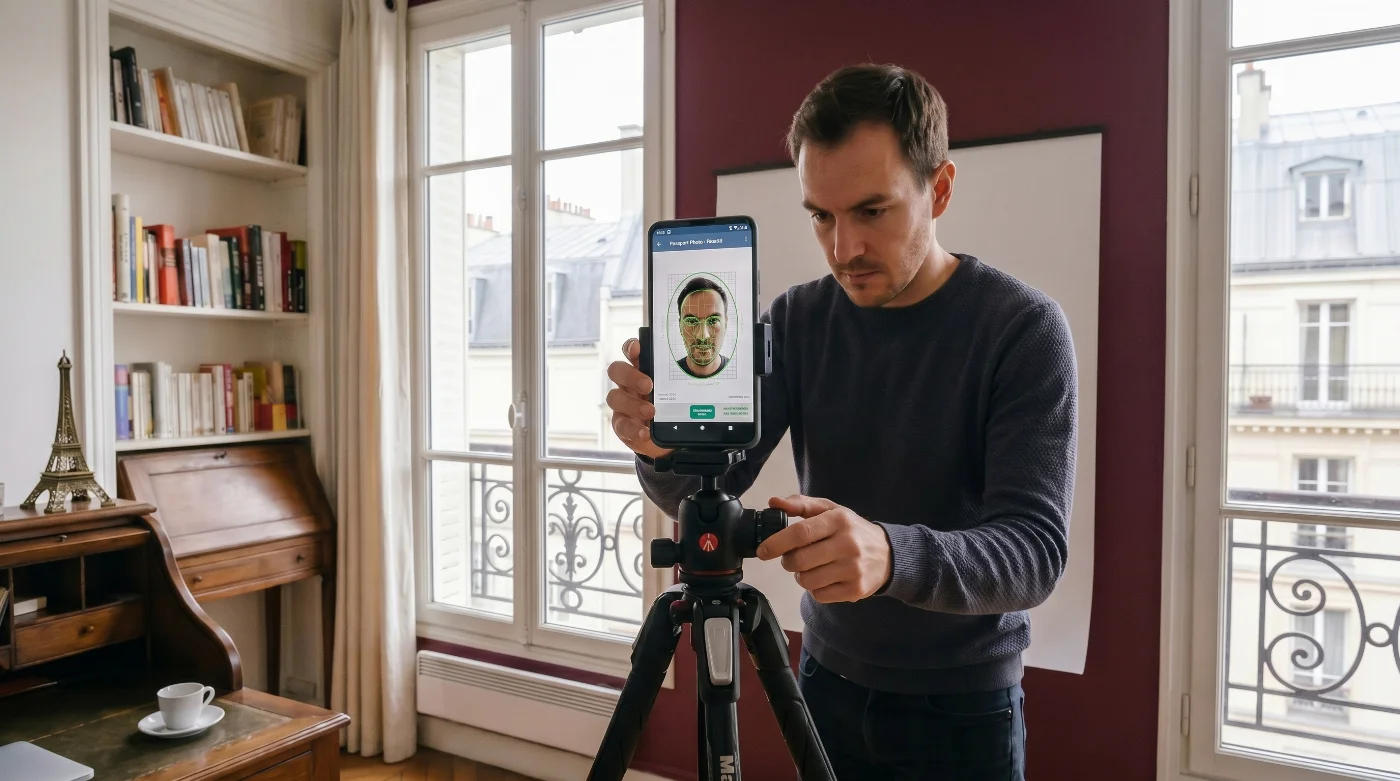
How to Check Your Digital Photograph Before You Submit It
Before uploading or printing, run through this five-point pre-submission check.
1. Pixel Dimensions
Open the file in Google Photos → tap the three-dot menu → Details. The pixel size must fall within your country's range — for the U.S., 600 × 600 to 1200 × 1200 pixels.
2. File Format and Size
Confirm the extension is .jpg (not HEIC, PNG, GIF, or TIFF) and the file size is between 54 KB and 240 KB for the U.S. To re-compress, open the file in any photo editor and re-export at 85% JPEG quality.
3. Head Position and Proportion
Overlay your photo with a passport template guide, or use PhotoGov's compliance check, which flags head-too-large, head-too-small, and off-center issues automatically in seconds.
4. Background Uniformity
Zoom in on the corners of the image. If you see any color variation, soft shadow, or visible outline left over from background removal, the consulate's automated check will likely flag it. Re-shoot or re-edit.
5. Recency and Appearance
The photo must be taken within the last 6 months (U.S., Schengen, Canada) or 1 month (UK). Even a perfectly compliant photo from 7 months ago will be rejected. The same applies if your appearance has changed significantly (weight, beard, hair color, visible facial tattoos) since the photo was taken — submit a fresh shot.
If you are unsure about any of the five checks, run the file through a reliable passport photo maker before submission. It verifies all five points automatically and returns a green check or a specific error code.
Taking a Digital Passport Photo With Android in 2026: Final Thoughts
Any modern Android phone — Samsung Galaxy, Google Pixel, OnePlus, Xiaomi, or any other 12 MP+ device — has more than enough camera quality to produce a fully compliant digital passport or visa photo, provided you set up the background and lighting properly, frame the shot at eye level with the rear camera, and verify the file specs before submission.
For most users, the safest workflow is straightforward: capture a clean original shot on the rear camera against a plain white wall in indirect daylight, then run the file through an online passport photo editor for an automatic background removal, country-specific cropping, and a final compliance check. The whole process takes under 5 minutes — and you'll have a JPEG ready to upload to DS-160, GOV.UK, or any other application portal in one click, with confidence that it will pass on the first try.
Frequently Asked Questions
Can I Use the Front (Selfie) Camera On My Android Phone for a Passport Photo?
It is technically allowed, but not recommended. The rear (main) camera has higher resolution and produces less facial distortion. If you must use the front camera, mount the phone on a tripod 3–5 ft away — never hold it at arm's length, since the wide-angle distortion is almost always rejected.
Why Does my Samsung or Pixel Save photos as HEIC Instead of JPEG?
Recent Samsung and Pixel models default to HEIC for storage savings. The U.S. CEAC upload tool and most other portals do not accept HEIC. To switch: Settings → Camera → Storage location / Picture format → JPEG. On Pixel: Settings → Camera → Advanced → File format → JPEG. Learn more about the differences between JPEG and HEIF for passport photo uploads.
What's the Maximum File size for a U.S. Visa Photo Upload?
240 KB. The minimum is 54 KB. Files outside this range are rejected by the CEAC upload tool before submission. To resize, re-export the JPEG at 85% quality with PhotoGov, Snapseed, or any image editor.
Can I use Portrait Mode, Beauty Mode, or AI Photo on my Android?
No. Portrait Mode adds artificial background blur, Beauty Mode smooths skin and adjusts facial features, and AI Photo applies retouching — all are detected and rejected by the State Department's verification systems. Turn them off before shooting.
How do I Remove the Background of a Passport Photo on Android for Free?
You have three options:
PhotoGov — purpose-built for ID photos, free for the first digital photo, then $5.90 in the US, UK, or Canada
Samsung Gallery's Erase background tool (One UI 5+) — free, but produces a transparent PNG that you must composite onto white manually
Google Photos Magic Eraser — only removes individual objects, not the full background.
What Head Size Does the Photo Need on Android?
For a U.S. passport or visa photo, the head from chin to crown must occupy 50–69% of the image height (1 to 1 3/8 inches when printed at 2 × 2 in). Other countries vary — see the requirements table above.
Can I Use a Passport Photo I Took on My Android 8 Months Ago?
No. The U.S., Schengen, and Canada require a photo taken within the last 6 months; the UK requires one taken within the last 1 month. Even a perfectly compliant older photo will be rejected.
Can I Take My Child's or Baby's Passport Photo With My Android?
Yes. Lay the baby on a plain white sheet and hold the phone directly above; or seat older babies in a car seat covered with a white sheet. Use burst mode and pick the frame with both eyes open and no smile. Babies cannot share a photo with a parent — every applicant needs their own photo, regardless of age.
Do I Need to Wear a White Shirt for the Android Passport Photo?
No — in fact, avoid white shirts. They blend into the white background and are a common rejection reason. Wear a solid, medium-to-dark color (navy, dark gray, burgundy, forest green, black) that contrasts clearly with the backdrop.
What if My Photo is Rejected at the CEAC Upload?
CEAC returns a specific error code (head not centered, background not uniform, pixel dimensions out of range, glasses detected, etc.). Map the code to one of the requirements, retake the photo from scratch (don't try to "fix" the rejected one), and re-upload. After three failed attempts, choose the alternative option to bring printed 2 × 2 photos to your interview.
Can I Print my Android Passport Photo at Home?
Yes, if you have a photo printer and glossy or matte 4 × 6 in photo paper (200+ gsm). Place four 2 × 2 in copies on a 4 × 6 sheet at 600 DPI, print on Best Quality, let dry, and cut with a paper cutter. Otherwise, send the JPEG to a CVS, Walgreens, FedEx Office, or local pharmacy for printing.
Which Android App is Best for a Passport Photo?
For end-to-end automation (capture, background removal, country-specific cropping, compliance check), PhotoGov is a reliable option for ID photos specifically. For manual editing, Google Photos handles cropping, and Snapseed handles fine adjustments.
Official Government Sources
Digital Passport Photo Requirements in the US: U.S. Department of State
Digital Passport Photo Requirements in the UK: GOV.UK
Digital Passport Photo Requirements in Canada: IRCC Canada
Digital Photo Requirements in Australia: Department of Foreign Affairs and Trade — Australian Passport Office
Biometric Regulations for International ID Documents: International Civil Aviation Organization (ICAO) Document 9303
Was this helpful?
24 found this helpful
Authored by:
Nathaniel K. Rowden (Compliance consultant)Top expert
Verified by the Photogov compliance team
ICAO 9309-compliant
Based on official government sources
Helpful votes: 24
Was this helpful?
24 found this helpful
We value your Privacy
We use cookies to enhance your browsing experience, serve personalized ads or content. By clicking “Accept All”, you consent to our use of cookies.