Indian OCI Photo Requirements in 2026 — Tips, Samples & Mistakes to Prevent
Table of contents:
- 11 Essential OCI India Photo Requirements: Checklist
- Acceptable OCI India Photo Examples
- Unacceptable OCI India Photo Examples
- OCI Digital vs Printed Photos Explained
- Where to Take an OCI India Photo?
- OCI India Photo Services: Overview
- How to Take an OCI India Photo at Home
- Taking OCI India Photos of Your Child
- 10 Common Reasons for OCI India Photo Rejection
- What to Do if Your OCI India Photo Is Rejected
- Frequently Asked Questions
- Official Sources
An Overseas Citizenship of India application starts online, and the portrait you upload becomes the identity image used throughout the process. The central OCI Services portal requires a square colour photograph with the face centred and covering 80% of the frame, a plain light-coloured background that remains visibly different from white, JPEG or JPG format, equal width and height between 200 and 900 pixels, and a file size up to 200 KB. This guide turns every official rule into a practical checklist for adults, children, fresh applications, and OCI miscellaneous services.
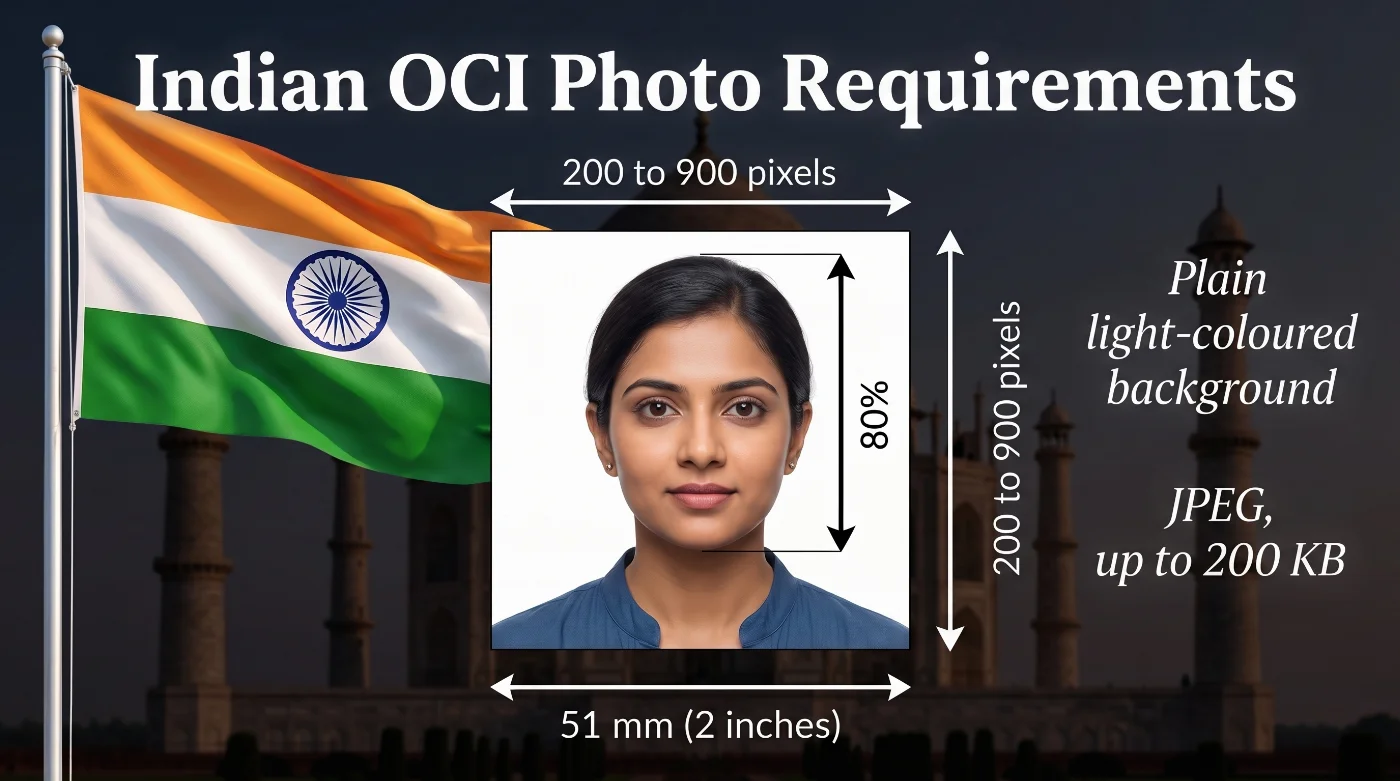 Source: Ministry of Foreign Affairs of India
11 Essential OCI India Photo Requirements: Checklist
OCI photo requirements are defined by the Ministry of Home Affairs OCI Services portal and its official OCI photo specification, which follows ISO and ICAO principles for machine-readable travel documents. The checklist below lists all 11 essential OCI photo requirements — follow them to avoid application delay or rejection.
Parameter | Requirement |
|---|---|
1. Number of photos | One digital photograph for each applicant. Printed photo in the quantity required by the Indian Mission, Post, or FRRO. |
2. Recency | Current photograph that accurately reflects the applicant’s appearance. A photo taken within the last six months meets the recency rule published by Indian missions. |
3. OCI Photo Size | 51 × 51 mm (2 × 2 inches) / 200 × 200 to 900 × 900 pixels. |
4. Colour | A colour photograph. Natural skin tones, balanced contrast, and continuous-tone quality. |
5. Background | Plain, light-coloured background. |
6. Lighting | Soft, even lighting that keeps the face and background clear. |
7. Positioning and Framing | Applicant’s face must be square in the frame. Face takes 80% of the frame. |
8. Facial Expression | Neutral expression with both eyes open and mouth closed. |
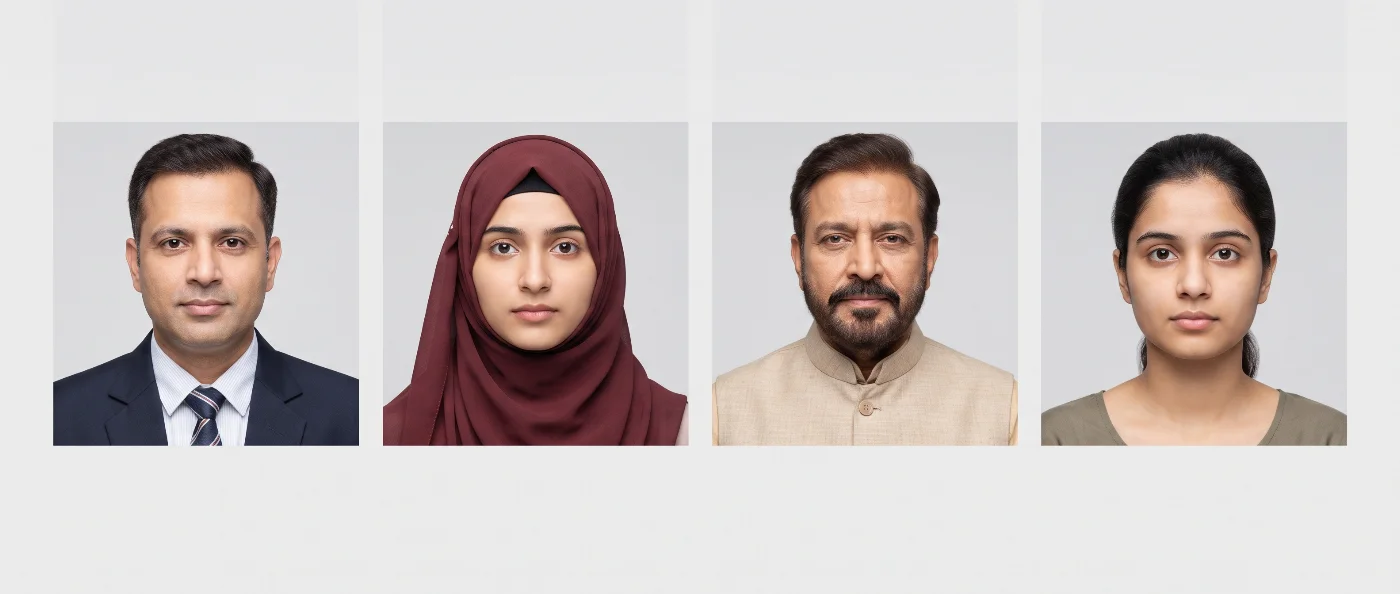
9. Attire, Head Covering, and Accessories | Everyday clothing in colours that contrast with the background. A religious head covering may be worn with the full face from chin to forehead visible. Headphones and hands-free devices are not allowed. |
10. Glasses | Clear prescription glasses are allowed but only if the eyes remain fully visible. If there is a reflection or glare on the lenses, the photo will be rejected. Sunglasses and tinted lenses are not allowed. |
11. Digital Quality | JPEG or JPG, file size up to 200 KB. |
Use PhotoGov’s OCI photo maker to prepare the correct photo for the Overseas Citizenship in India application; no editing skills, account creation, or registration required.
Acceptable OCI India Photo Examples
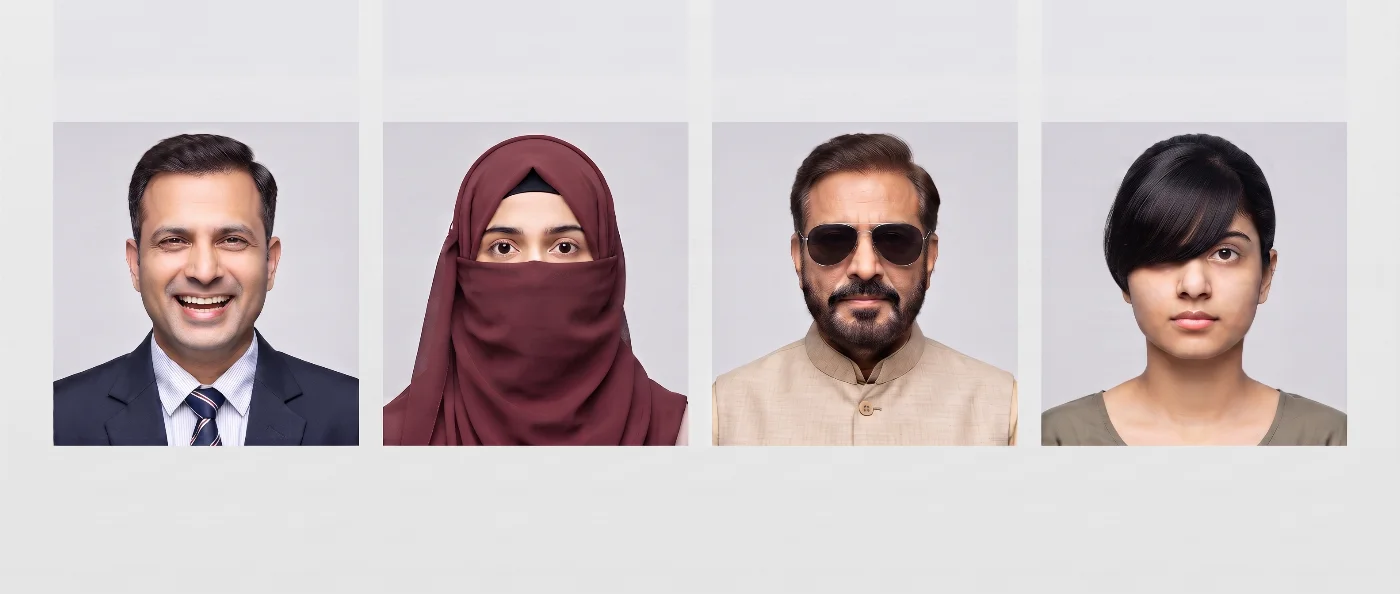
Unacceptable OCI India Photo Examples
OCI Digital vs Printed Photos Explained
Every OCI application includes a digital photo upload through the official OCI Services portal. Printed copies serve as an additional mission-specific requirement, so the checklist issued by the Indian Mission, Post, or FRRO handling your case determines the physical photo quantity.
What Is a Digital Photo for an OCI Application?
A digital OCI photo is the square JPEG or JPG file uploaded during online registration or OCI miscellaneous services. The central portal publishes equal width and height from 200 × 200 to 900 × 900 pixels and a maximum file size of 200 KB. The portrait shows the full face from the front, the head and shoulders centred, and the face filling about 80% of the frame. Some mission pages publish a stricter minimum such as 360 × 360 pixels; the upload screen and the checklist for your processing mission provide the final local setting.
What Are the Printed Photo Specs for OCI?
A printed OCI photograph uses a square 51 × 51 mm (2 × 2 inch) format in colour. The official photo sheet calls for thin photo paper or stock, clear continuous-tone detail, natural colour, and a clean print. Use the same portrait as the online upload so the image in the application package and the digital record match. The number of prints varies by mission and service type, so prepare the quantity stated in the local appointment or postal checklist.
Both formats use the same biometric portrait: full frontal face, upright and centred head, clearly visible eyes, natural expression, balanced lighting, light-coloured background, and authentic facial detail. The digital file adds pixel, format, and file-size controls; the paper version adds print-surface and physical-size controls.
Specification | Digital | Printed |
|---|---|---|
Purpose | Required upload in the online OCI application or OCI miscellaneous service | Additional copy for a mission, post, FRRO, appointment, or postal package when the local checklist requests it |
Quantity | 1 digital file per applicant | Quantity stated by the processing mission |
Dimensions | Square, 200 × 200 to 900 × 900 pixels; equal width and height | Square, at least 51 × 51 mm (2 × 2 inches) |
Format | JPEG or JPG; maximum 200 KB | Colour print on thin photo paper or stock with continuous-tone quality |
Submission | Upload through the official OCI Services portal before completing the online application | Attach or present the matching print exactly as directed by the local mission or FRRO |
Where to Take an OCI India Photo?
An OCI portrait can come from a professional studio, a retail photo counter, a suitable booth, or a carefully captured smartphone image. The provider matters less than the final result: a square 51 × 51 mm composition, about 80% face coverage, a light grey or pale-coloured background, authentic facial detail, and a JPEG/JPG file that fits the 200–900 pixel and 200 KB limits.
Local Photo Labs and Retail Photo Counters
Ask the operator for an OCI Registration photo rather than a standard Indian passport photo. Provide the exact square format: 51 × 51 mm, a matching JPEG copy, face coverage around 80%, and a plain light-coloured background that stays visibly distinct from white. Review the crop on screen and confirm that the full head, both facial edges, and the top of the shoulders remain visible.
Post Offices
Postal outlets that offer passport photography can produce a square OCI photo when their system supports custom formats. Bring the official dimensions and request both the digital JPEG/JPG file and any printed copies required by your mission. Check the digital file before leaving, because the OCI portal also validates square proportions, pixel range, and file size.
Self-Service Photo Booths
Choose a booth that offers a 2 × 2 inch square ID-photo preset and a digital download. Sit upright, align the eyes with the guide, keep the face large in the frame, and select a light-coloured background. Complete a final portal-spec check for 200–900 pixels and 200 KB before upload.
Professional Photo Studios
A studio offers the strongest control over camera height, three-point lighting, natural colour, lens reflections, and the 80% face crop. Tell the photographer that the document is an OCI card application and request a square 51 × 51 mm print plus a JPEG/JPG file within the official upload limits. Ask the studio to preserve the applicant’s facial features and natural skin texture.
Pharmacies and Convenience Chains
Retail chains with staffed ID-photo counters can be a practical option when they support custom square photos. Confirm the OCI specifications before capture, request the digital file, and check the background colour, head position, face coverage, and file properties at the counter.
Online OCI Photo Tools
An online OCI photo tool turns a well-lit smartphone portrait into the required square file by controlling crop, pixel dimensions, file format, and compression. Start with a front-facing, sharply focused image against a plain light-coloured background. PhotoGov can prepare a portal-ready JPEG while preserving the applicant’s real facial features; the official OCI Services validator and the processing authority make the final acceptance decision.
OCI India Photo Services: Overview
Service | Time to Get an OCI Photo | Pricing | Compliance Control |
|---|---|---|---|
Retail Photo Labs & Photo Counters | 10–20 minutes | Local rate | Good with a custom OCI preset |
Post Offices | 10–20 minutes | Local rate | Good with digital-file review |
Self-Service Photo Booths | 5–10 minutes | Local rate | Basic; complete a portal check |
Professional Studios & ID-Photo Providers | 30–60 minutes | Local rate | Strong |
Pharmacies & Convenience Chains | 10–20 minutes | Local rate | Good with a custom OCI preset |
Online OCI Photo Tools | Under 1 minute | Shown before download | Strong for technical file checks |
How to Take an OCI India Photo at Home
A home capture works well when you control the camera position, lighting, and background before processing the file. Use the rear camera of a recent smartphone or a camera on a tripod, place the lens at eye level, and ask another person to take the picture from a comfortable distance. This setup keeps facial proportions natural and gives the square crop enough room for the head and shoulders.
PhotoGov can handle the technical crop, square dimensions, JPEG output, and file-size target. Build the source image with the following setup so the final portrait stays clear and authentic.
Choose soft daylight near a large window or two balanced lamps, and place the applicant in front of a plain light-grey or pale-coloured wall.
Stand about 1–1.5 metres from the background and position the camera at eye level, far enough away to capture the head and upper shoulders with natural facial proportions.
Face the lens directly, hold the head upright, keep both eyes level and visible, and use a natural neutral expression with the mouth closed.
Wear simple everyday clothing that contrasts with the background, and arrange hair so both eyes and both edges of the face remain visible.
Use clear, reflection-free lenses, or remove glasses for the capture. Check the official OCI photo specification for compliant examples.
Take several sharp colour photographs, then select the frame with the most even exposure, natural skin tone, and symmetrical head position.
Upload the selected image to PhotoGov, choose the relevant India/OCI square format, and export a JPEG or JPG between 200 and 900 pixels per side with a file size up to 200 KB.
Taking OCI India Photos of Your Child
The official OCI photo specification gives children practical flexibility while preserving a clear frontal portrait. For children under ten, the reviewing authority may relax face-height and eye-position rules. Babies and infants receive additional flexibility for facial expression, eye position, and line of sight; babies under one may have their eyes closed.
Create a calm, well-lit setup and photograph the child alone. Keep the face clear, use a simple light-coloured background, and capture the head from the front. PhotoGov’s baby passport photo guide offers an easy setup for newborn and infant portraits.
Setting
Soft, even light and a plain light-coloured background.
Position
A clear frontal portrait with the child centred and alone in the frame.
Expression
A calm, natural expression; babies receive age-appropriate flexibility.
Frame
Full face, both facial edges, and a clean frame free of hands, toys, furniture, and supporting objects.
10 Common Reasons for OCI India Photo Rejection
OCI photo review focuses on geometry, visibility, background, lighting, and file properties. These ten issues create the highest rejection risk, together with the direct correction for each one:
Incorrect format: Set equal width and height, use at least 51 × 51 mm for print, and keep the digital file between 200 × 200 and 900 × 900 pixels.
Wrong formatting: Crop the portrait so the centred face occupies about 80% of the frame while the full head and top of the shoulders remain visible.
Background mismatch: Use a plain, evenly lit, light-coloured background that remains visibly distinct from white and fills the frame edge to edge.
Uneven exposure: Balance the light across the face and background so skin tone looks natural and facial detail remains clear.
Turned or tilted head: Square both shoulders to the camera, level the eyes, and centre the upright face.
Expression or eye visibility issue: Use a natural neutral expression, closed mouth, direct gaze, and clearly visible eyes.
Lens glare or tinted eyewear: Use clear, reflection-free lenses and keep the frames away from the eyes.
Covered facial outline: Arrange hair, religious headwear, and accessories so the face remains visible from chin to forehead and along both edges.
Weak image quality: Start with a sharp, high-resolution colour capture and preserve continuous-tone facial detail during compression.
Upload properties outside the portal range: Export JPEG or JPG, keep both sides within 200–900 pixels, and reduce the file to 200 KB or less.
A final technical check catches the most common failures before upload. Confirm square geometry, face coverage, background colour, eye visibility, JPEG/JPG format, pixel range, and file size in one pass, then compare the preview with the official examples.
What to Do if Your OCI India Photo Is Rejected
A photo rejection or upload error points to a specific technical or biometric mismatch. Read the message in the OCI Services portal or the request from the Indian Mission, Post, or FRRO, identify the affected field, and prepare a fresh file that directly corrects that point.
For an online upload error: create a new square JPEG/JPG within 200–900 pixels per side and 200 KB, then upload it again through the official OCI Services portal.
For a mission request: prepare a matching digital file or 51 × 51 mm print and submit it through the channel and by the deadline stated in the official message.
Keep the new portrait consistent with the applicant’s current appearance and with any matching print. A fresh capture usually produces a cleaner result than heavy correction of a weak image.
When PhotoGov prepares the technical file, share the authority’s feedback with support so the team can verify crop, dimensions, format, compression, and background against the current OCI settings.
Frequently Asked Questions
What Are the Essential OCI India Photo Requirements?
Digital size: 200 × 200 to 900 × 900 pixels.
File type: JPEG or JPG, up to 200 KB.
Background: Plain, light-coloured, visibly distinct from white, and border-free.
Face: Front view, centred, full head and shoulders visible, about 80% coverage.
Expression and quality: Natural neutral expression, clearly visible eyes, balanced light, natural colour, and sharp authentic detail.
What Is the OCI India Photo Size?
The OCI photo uses a square format. A printed copy measures at least 51 × 51 mm (2 × 2 inches), while the online file has equal width and height between 200 × 200 and 900 × 900 pixels. The face occupies about 80% of the frame.
Where Can I Take an OCI India Photo?
A professional studio, retail photo counter, post office, pharmacy, or suitable 2 × 2 inch photo booth can produce an OCI portrait. Give the operator the complete specifications and request both the square print and the matching JPEG/JPG file when your mission checklist uses both formats.
A smartphone portrait processed through PhotoGov provides a convenient home option. Capture a sharp front-facing image in soft light, then use the tool to prepare the square crop, pixel dimensions, JPEG output, and 200 KB file target.
How Much Does an OCI India Photo Cost?
The price depends on country, provider, and whether you order prints, a digital file, or both. Retail counters and studios publish local rates, while booths charge per session. Confirm that the quoted service includes a downloadable JPEG/JPG file within the OCI portal limits.
PhotoGov displays the current price before download and lets you preview the processed result first. One correctly prepared digital file can also produce mission-requested 51 × 51 mm prints at a local lab.
How Many Photos Do I Need for an OCI Application?
Upload one digital photograph for each applicant. A processing mission may request one or more matching printed copies, so use the quantity shown in its current checklist.
How Can I Check That My OCI Photo Meets the Official Rules?
Compare the final image with the central OCI Services FAQ and the official OCI photo specification. PhotoGov’s biometric photo guide helps you review face position, lighting, expression, and technical file properties before upload.
What Is the Best Way to Capture a Digital OCI Photo?
Use a camera at eye level, soft balanced light, and a plain light-grey or pale-coloured background. Capture the head and shoulders from the front, keep the face sharp and naturally recognisable, then apply only the crop, resize, format, and compression required for the portal.
Where Can I Get an OCI India Photo?
Choose any provider that supports a custom 51 × 51 mm square image and a matching JPEG/JPG file. Professional studios offer the most controlled lighting, while staffed retail counters and selected post offices provide a faster local option.
For a home workflow, take the portrait with a smartphone and use PhotoGov to prepare the upload dimensions and file size. Check the final result against the official sample sheet before submission.
What Is the Photo Size for an OCI Card?
The physical OCI photo is square and measures at least 51 mm by 51 mm. The portal file is also square, from 200 to 900 pixels on each side, and the face fills about 80% of the image.
Which Photo Format Is Required for an OCI Application?
The OCI Services portal accepts JPEG and JPG images up to 200 KB. The image uses a 1:1 aspect ratio with equal width and height between 200 and 900 pixels. HEIC, PNG, WebP, TIFF, and PDF files require conversion to JPEG or JPG before upload.
How Do I Take a Digital Photo for an OCI Application?
Use this five-step workflow:
Set up a plain light-coloured background that stays visually distinct from white and light it evenly.
Place the camera at eye level, face it directly, and frame the full head plus the top of the shoulders.
Keep the head upright, both eyes visible, the mouth closed, and the expression natural and neutral.
Select the sharpest colour image and preserve natural facial texture and skin tone.
Export a square JPEG/JPG between 200 and 900 pixels per side, reduce it to 200 KB or less, and review the portal preview.
How Do I Upload a Digital Photo for an OCI Application?
Open the official OCI Services portal, choose the relevant registration or miscellaneous service, and follow the application steps to the image-upload screen. Select the prepared JPEG/JPG file, verify that the preview shows a centred, front-facing head and shoulders, complete the remaining uploads, and save the application reference details.
Where Should I Take an OCI India Photo?
Choose the setting that gives you control over the official outcome: a professional studio for precise lighting, a staffed photo counter for speed, or a home capture with an online technical check. In every route, confirm the square crop, 80% face coverage, a light grey or pale-coloured background, JPEG/JPG format, 200–900 pixel range, and 200 KB limit.
Official Sources
Official OCI photo requirements: Ministry of Home Affairs — OCI Services FAQ
Official OCI children photo requirements: Ministry of Home Affairs — Official OCI Photo Specification
Biometric Regulations for International ID Documents: International Civil Aviation Organization (ICAO) Document 9303
Was this helpful?
23 found this helpful
Top expert
Based on official government sources
Helpful votes: 23
Was this helpful?
23 found this helpful
Service provided by Y VISION TECHNOLOGIES LLP · Stoney Works 8 Stoney Lane, London, England, SE19 3BD · Terms · Refund policy · Contact
We value your Privacy
We use cookies to enhance your browsing experience, serve personalized ads or content. By clicking “Accept All”, you consent to our use of cookies.