Getting the Ideal Biometric Passport Photo
Submitting a biometric passport photo is among the most important criteria when seeking a passport. Used for biometric identity and security reasons, this kind of photo has to meet certain criteria. Even tiny errors could cause your passport application to be rejected or delayed.
- But don't be concerned! PhotoGov.net lets you quickly generate a compatible biometric passport photo using only your phone, no photo studio or professional photographer required.
This post will guide you through the main criteria for biometric passport images and demonstrate how PhotoGov can assist you in achieving accuracy the first time.
Get photo for: Biometric passport photo
Instructions:
How to take a good photo?

1/7 Image format
Photo must be in color. Taken within the last 6 months.
How to take a good photo?
1/7 Image format
Photo must be in color. Taken within the last 6 months.
ID & Passport Photo Tool. Your personal data is processed in accordance with security and privacy standards.
The Importance of Your Biometric Passport Photo
A biometric passport photo is not just a regular picture. Your passport, which will be used for security and identification in systems like facial recognition at border control, includes this. This indicates the image has to satisfy rigorous criteria established by the authorities including size, head orientation, background color, and expression.
Not satisfying these criteria could cause your passport application to be processed late or possibly denied. PhotoGov.net guarantees your photo will satisfy all required standards without any inconvenience.
How PhotoGov Enables You to Produce the Ideal Biometric Passport Photo
Your passport photo doesn't have to be difficult. PhotoGov makes it simple to produce a compliant biometric photo in only a few easy actions:
Use your phone to snap a well-lit, crisp selfie. Ensure your face is in the centre and your expression is neutral
Send your selfie to PhotoGov.net
Our system will automatically crop, resize, and modify your photo to fit the particular criteria for a biometric passport photo
Your photo is ready for submission; download it once processing is finished
How to take your own Biometric passport photo photo
If you don’t want to go through the trouble and expense of locating and hiring a professional photographer to take your picture, you can simply take your own from home. So long as you follow the below instructions carefully, you can capture the perfect passport photo yourself:
1. Take a picture of yourself
Open up the PhotoGov.net photo service and take your picture. Make sure you’re not wearing any headcovers or glasses, do not wear a uniform, and keep your expression neutral. Ensure that the area is well-lit and that you are standing against a neutral background.
Watch "How to take a photo" (00:46)
2. Upload your photo to PhotoGov AI
Next, upload your image and process it through our site.
3. Receive your Passport Photo
Finally, you can download your ID photo. These images can be printed off, or you can simply use them as digital photos.
Biometric Passport Picture Specifications
Here is a thorough chart of the technical specifications for a biometric passport photo:
Dimensions (Width x Height) | 3.5 cm x 4.5 cm (35 mm x 45 mm) |
Image Definition | Picture Definition Clear, crisp picture with no glare or blurriness |
Head Height (to top of hair) | 32–36 mm (about 75% of photo height) |
Background Color | Light gray or plain white |
DPI resolution | At least 600 DPI |
Print-ready | Certainly |
Appropriate for online submission | Yes |
Articulation | Eyes open, mouth closed, neutral expression |
Time | Recency Has to be done in the last six months |
Format | JPG or JPEG |
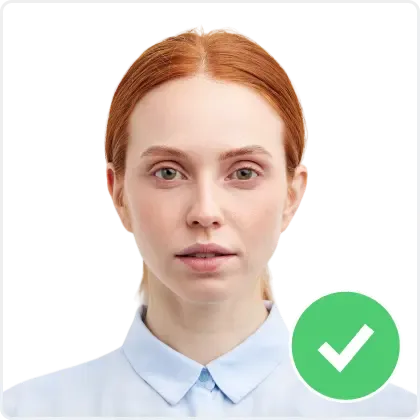
Example photos:
Below are examples of correct and incorrect photos
Typical Errors to Avoid
Although many people think taking a biometric passport photo is easy, typical errors could lead to problems with your application. Here are some things to avoid doing:
The background should be simple white or light gray, with no patterns, textures, or shadows
Your picture has to be precisely 35 mm x 45 mm
Avoid shadows or dark spots that hide your face or the surroundings under poor lighting
Facial expression: Your mouth should be closed and your eyes open, hence a neutral expression is essential
Glasses with glare: If you wear glasses, check for no glare or reflection obstructing your vision
PhotoGov automatically corrects these errors for you, so guaranteeing that your photo is compliant each time
Main Features of PhotoGov
PhotoGov is the greatest tool for producing your biometric passport photo for the following reasons:
Crop
Crops the image to the proper size (35x45 mm) automatically
Resize
Resizes the picture to fit the official size criteria for biometric passport pictures
Background removal
Removes any distracting background and replaces it with a neutral, conforming hue
Auto-adjustment
Automatically changes contrast, sharpness, and illumination to provide a clear, high-quality image
Advantages of Using PhotoGov.net Quick and Easy
Just send us your selfie; we'll handle everything else.
Affordable: Achieve professional-quality outcomes without the steep cost of photo studios.
Our method ensures your photo will satisfy all the official biometric passport photo criteria every time.
We offer both versions, so you are prepared for any submission technique
How to take Biometric passport photo photos for babies and kids
When taking pictures of babies and children for passport, many of the same rules apply; for example, they must still adhere to the dress code, and the photograph must be high-quality and well-lit. With that being said, the State Department is generally more forgiving when it comes to the neutral expression requirement.
- If you are photographing a newborn:
- Spread a white sheet out over the floor.
- Place the baby down on the sheet and take their photograph against it.
For slightly older babies:
- Prop them up in a child’s chair against a white sheet.
- If they are still unable to hold up their head, prop it up for them using a hand behind the sheet. Ensure no one else is visible in the shot.
Frequently Asked Questions
May I use a selfie for my biometric passport photo?
What should I dress for my biometric passport picture?
May I grin in the picture?
How current should my picture be?
Is digital sufficient or should I have a printed photo?
Will PhotoGov change the background or lighting for me?
What occurs should my picture be turned down?
Other documents for the Others
Others
56 doc.
- 2x2 inch photo (about 1 MB in size)
- Biometric passport photo
- IATA ID card 35x45 mm
- Photo 1.25x1.5 inch
- Photo 1.5x1.5 inch (38x38 mm, 3.8x3.8 cm)
- Photo 1.5x2 inch (3.8x5 cm)
- Photo 1x1 inch (2.5x2.5 cm)
- Photo 21x30 mm
- Photo 240x288 pixels
- Photo 25x25 mm (2.5x2.5 cm)
- Photo 25x30 mm (2.5x3 cm)
- Photo 25x35 mm (2.5x3.5 cm)
- Photo 26x32 mm
- Photo 2x2 cm
- Photo 2x2 inch (51x51 mm, 5x5 cm)
- Photo 2x2.5 inch
- Photo 2x2.75 inch (2x2.3/4inch, about 5x7 cm)
- Photo 2x3 cm (20x30 mm)
- Photo 30x35 mm
- Photo 30x40 mm (3x4 cm)
- Photo 32x42 mm
- Photo 33x48 mm (3.3x4.8 cm)
- Photo 358x441 pixels
- Photo 35x35 mm (3.5x3.5 cm)
- Photo 35x40 mm (3.5x4 cm)
- Photo 35x45 mm (aligned by the eye line) (3.5x4.5 cm)
- Photo 35x45 mm (aligned by the top) (3.5x4.5 cm)
- Photo 35x50 mm (3.5x5 cm)
- Photo 37x37 mm
- Photo 38x46 mm (3.8x4.6 cm)
- Photo 3x3 cm (30x30 mm)
- Photo 4.5x6 cm
- Photo 40x50 mm (4x5 cm)
- Photo 40x60 mm (4x6 cm)
- Photo 43x54 mm
- Photo 43x55 mm (4.3x5.5 cm)
- Photo 45x45 mm (4.5x4.5 cm)
- Photo 45x57 mm
- Photo 4x4 cm (40x40 mm)
- Photo 4x4.5 cm (40x45 mm)
- Photo 50x50 mm (5x5 cm)
- Photo 50x70 mm (5x7 cm)
- Photo 5x6.5 cm
- Photo 600x800 pixel
- Photo 6x9 cm
- Photo 9x12 cm
- Photo one big cun 33x48 mm, 390x567 px
- Photo one cun (25x35 mm, 295x413 px)
- Photo one small cun (22x32 mm, 260x378 px)
- Photo two cuns 35x53 mm, 413x626 px
- Photo two small cuns (35x45 mm, 413x531 px)
- Resume Photo 2x2 inch
- Resume Photo 35x45 mm
- School pass 35x45 mm
- UN passport 2x2 inch (51x51 mm)
- Work pass 35x45 mm